Table of Contents
Advertisement
Quick Links
Advertisement
Table of Contents

Subscribe to Our Youtube Channel
Related Manuals for EKF Astro TM-AS

Summary of Contents for EKF Astro TM-AS
- Page 1 TECHNICAL MANUAL Astro digital timer TM-AS...
-
Page 2: Technical Data
1 DESCRIPTION Astro digital timer TM-AS is used for automatic control of lighting (or other electrical equipment) using two independent groups of contacts with no light sensors with controlled switching by sunset and sunrise time based on location coordinates. The product corresponds to GOST IEC 60947-1-2014, GOST IEC 60947-5-1-2014. - Page 3 Parameter Value Degree of protection IP20 Weight, g, max. Operating temperatures -20...+55°С Climatic version Altitude above sea level, m, max. 2000 Permissible relative humidity at 40°C (non- condensing), not more Degree of pollution Position in space Onto 35 mm Installation DIN rail The product shall be operated under the following environmental conditions:...
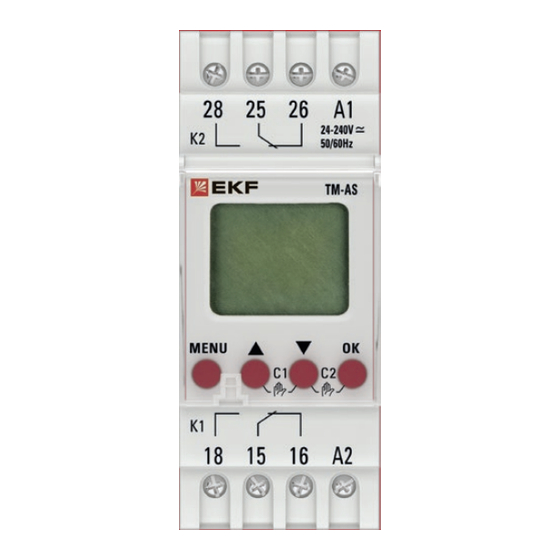
- Page 4 There are setup buttons for current time and timer programming, LED illuminated display on the front panel of the timer under transparent cover with possible sealing. Figure 1. Front panel. Display indicators: – Weekdays: – Holiday mode Monday... sunday – Winter time C1 –...
- Page 5 Function of control buttons: Table 2 • Menu entry • Confirm the • Return to the main selection menu • Selection in the • Selection in the menu menu • Value increase • Value decrease • Manual control • Manual control Built-in lithium battery ensures that the timer program will last for 10 years in the event of power failure.
-
Page 6: Settings And Programming
3 INSTALLATION AND OPERATION The product shall be installed onto 35 mm DIN rail in the distribution enclosure. In order to avoid pickup, false triggering, improper operation of the timer, don’t put the supply conductors together with power wiring. Use the shielded cable if necessary. Copper and aluminum wire with cross-section of max. - Page 7 Main menu:...
- Page 8 Таблица 3. Astro Astro mode setting PROGRAMM Programming mode DATE/TIME Date and time settings MODES Mode settings SERVICE Other settings End of settings and exit from the menu Press «MENU» to enter the main menu. With the buttons «▲▼» select the desired menu item. If there is no activation for one min- ute, the timer will exit automatically from the menu.
- Page 9 In order to view the astronomical time on a specified day: Select the mode ASTRO and press «OK». Then select the menu item VIEW and press «OK». Select the year with the buttons «▲▼» and press «OK». Select the desired month and day in the same way. If you press the buttons «▲▼»...
- Page 10 Astronomical mode setting up: Только для реле с 2 C/O Select the mode ASTRO and press OK. Then select the menu item MODE and press OK. Select channel 1 or 2 with the buttons «▲▼» and press OK. Select channel 1 or 2 with the buttons «▲▼» and press OK.
- Page 11 Geographical location setting up: Select the mode ASTRO and press OK. Then select the menu item LOCATION and press OK. Select the menu item LATITUDE and press OK to set up the latitude. Then select the southward or northward, set up the degrees and minutes with the buttons «▲▼».
- Page 12 Time zone map of Russia and the countries of the former USSR The numbers indicate the difference against the Universal Time Калининград Таллин Мурманск Рига Вильнюс Санкт-Петербург Минск Архангельск Кишенев МОСКВА Ярославль Киев Тула Н.Новгород Норильск Харьков Магадан Саратов Ижевск Ростов...
- Page 13 Longi- Longi- Latitude, Latitude, tude, tude, City degrees City degrees degrees degrees Voronezh Samara Yekaterinburg St. Petersburg Ivanovo Saratov Izhevsk Severo-Kurilsk Irkutsk Sochi Kazan Stavropol Kaliningrad Tver Kaluga Tolyatti Kemerovo Tomsk Kirov Tula Krasnodar Tyumen Krasnoyarsk Ulan-Ude Kursk Ulyanovsk Lipetsk Magadan Khabarovsk Magnitogorsk...
- Page 14 Current time setting: Select the menu item DATE/TIME, press the button OK. Then select the menu item TIME, press OK. Set up the current hour and minute with the buttons with «▲▼» , moving to the relative item with the button OK. If you press the buttons «▲▼»...
- Page 15 Summer/winter time settings: Select the menu item DATE/TIME, press the button OK. Then select the item SUMMER-WINTER, press OK. Then set the order to transfer to winter/summer time according to the table. Press MENU to exit from the settings.
- Page 16 New program configuration: Только для реле с 2 C/O Только для реле с 2 C/O...
- Page 17 Select the menu item PROGRAM, press the button OK. Select the item NEW, press the button OK. After that the number of the program will be displayed. If the memory of the timer is full, a new program will not be configured. FULL will be displayed. Set up the weekly WEEK or yearly YEARLY operation cycle of the timer.
- Page 18 Adjustment of configured program: Select the menu item PROGRAM, press the button OK. Select the menu item REVIEW, press the button OK and repeat the actions described in the previous item. Delete a program: Weekly program Yearly program...
- Page 19 Select the menu item PROGRAM, press the button OK. Select the menu item DELETE, press the button OK. If required to delete one program, select the item ONE, then select the number of the deleted program with the buttons «▲▼» and press OK. If required to delete all the pro- grams, select the item ALL and press the button OK to confirm the memory cleaning.
- Page 20 Select the menu item MODES, press the button OK. Select the menu AUTO, press the button OK. Select the channel and then select the operating mode of the timer: automatic- as per configured program, or random – a random activation of the time is within 1 to 30 minutes. Press MENU to complete program configuration.
- Page 21 HOLIDAY mode settings: Select the menu item MODES, press the button OK. Then select the menu item HOLIDAY, press the button OK. Select the item ON to acti- vate the mode, press the button OK. After that set the year, month and day to activate the OFF mode.
- Page 22 Working hour counter: Только для реле с 2 C/O Select menu item SERVICE, press the button OK. Select the item HOUR COUNTER, press the button OK. Select the channel, then select the item SHOW to review the number of working hours in the ON position. Select the item RESET to delete the working time.
-
Page 23: Wiring Diagram
Factory reset: ОPress and hold the buttons «MENU», «▲▼» and «ОК» for 3 seconds at the same time, the configured programs and parameters will be returned to the factory settings. No need for special maintenance of a product during operation. Tight- en screw terminals of the timer once per 6 months. -
Page 24: Overall And Installation Dimensions
5 OVERALL AND INSTALLATION DIMENSIONS Fig. 5 Overall and installation dimensions... -
Page 25: Delivery Scope
6 DELIVERY SCOPE 1. Astro digital timer TM-AS EKF - 1 pc.; 2. Technical manual - 1 pc. For all available documentation, scan the QR-code on the insert or on the inside of the package. 7 SAFETY REQUIREMENTS ATTENTION! The device uses potentially lethal voltage. By protection method against electric shock, the device belongs to protection class «0»... -
Page 26: Storage And Transportation
Service life: 10 years. Manufacturer: For information, refer to the product package. Importer and EKF trademark service representative: EKF ELECTRICAL SOLUTION – FZCO, Dubai Silicon Oasis, DDP, Building A2, Dubai, United Arab Emirates. Importer and EKF trademark service representative on the territory of the Russian Federation: OOO «Electroresheniya»,... -
Page 27: Certificate Of Acceptance
11 CERTIFICATE OF ACCEPTANCE Astro digital timer TM-AS has been approved for operation. Date of manufacture: For information, refer to the product package. Technical control stamp...
Need help?
Do you have a question about the Astro TM-AS and is the answer not in the manual?
Questions and answers