
Summary of Contents for TOPP DS2S
- Page 1 SELETTORE DI PROGRAMMA DIGITALE DS2S DIGITAL PROGRAM SWITCH ISTRUZIONI PER L’INSTALLAZIONE E L’USO INSTALLATION AND USE INSTRUCTIONS COD. 0P5443 VER 0.0 REV 09.20...
- Page 3 INSTALLATIONS- UND GEBRAUCHSANLEITUNG COD. 0P5443 VER 0.0 REV 03.18 légende 1 - Couvercle et base sélecteur DS2S 2 - Emballage accessoires 3 Vis AF d3x25 + 3 Tasseaux d4x20 3 - Carte électronique sélecteur DS2S 4 - Manuel d'installation et d'utilisation...
- Page 4 Installazione selettore - Switch installation - Installation sélecteur - Instalación selector - Installation des Schalters Fig. Fig. IT- Zona di pressione EN-Pressure zone FR-Zone de pression SP-Zona de presión DE-Druckbereich IT- Aprire il selettore applicando una leggera pressione sulla Fig. superficie indicata in fig.2.
- Page 5 Installazione selettore - Switch installation - Installation sélecteur - Instalación selector - Installation des Schalters Fig. Fig. IT- 6 -Cavo per schermatura IT- 5 -Guaina EN- 6 -Wire for shielding EN- 5 -Sheath FR- 6 -Câble pour blindage FR- 5 -Guaina SP- 6 -Cable para protección SP- 5 -Vaina DE- 6 -Abschirmkabel...
- Page 6 Installazione selettore - Switch installation - Installation sélecteur - Instalación selector - Installation des Schalters Fig. 10 IT- COLLEGAMENTI ELETTRICI:Collegare la scheda elettronica porta ed il selettore tramite il cavo 4 poli EN- ELECTRICAL CONNECTIONS: Connect the electronic circuit board of the door and the switch using the 4-pole wire FR- CONNEXIONS ÉLECTRIQUES: Connecter la carte électronique de la porte et le sélecteur via le câble à...
- Page 7 ES- Tarjeta electronica DE- Platine DE- Platine DS2S IT- Il cavo 4 (schermatura) va utilizzato solamente per lunghezze cavo superiori ai 20 metri. Per cavi con lunghezze inferiori non è necessario. EN- Cable 4 (shielding) should only be used for cable lengths in excess of 20 meters. For shorter cables is not necessary.
- Page 8 Installazione selettore - Switch installation - Installation sélecteur - Instalación selector - Installation des Schalters Installazione selettore - Switch installation - Installation sélecteur - Instalación selector Fig. 11 Fig. 12 IT- Dopo aver collegato i cavi al connettore della scheda, IT- Posizionare la scheda infilando il PCB sotto le due asole posizionarli nell’apposita sede come indicato in figura.
- Page 9 Installazione selettore - Switch installation - Installation sélecteur - Instalación selector - Installation des Schalters Installazione selettore - Switch installation - Installation sélecteur - Instalación selector Fig. Fig. 14 Fig. 15 IT- Rimuovere la pellicola protettiva del display montaggio IT- Posizionare il coperchio utilizzando gli appositi incastri scheda completo.
- Page 10 Installazione selettore - Switch installation - Installation sélecteur - Instalación selector - Installation des Schalters Installazione selettore - Switch installation - Installation sélecteur - Instalación selector Fig. 14 Fig. 17 Fig. 14 Fig. 18 IT- Montaggio completo EN- Complete assembly FR- Montage complet SP- Montaje completado DE- Zusammenbau...
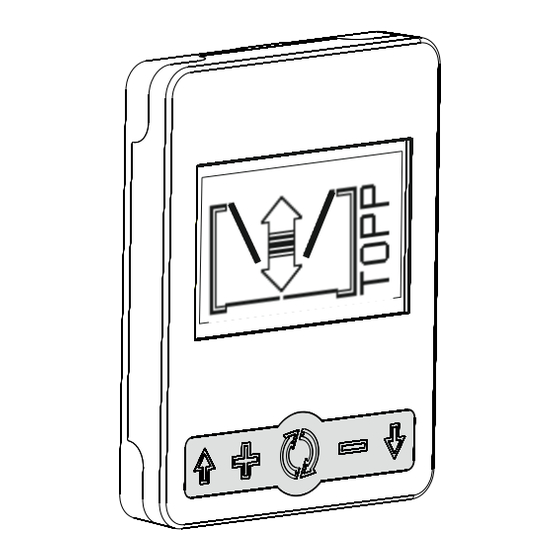
- Page 11 Funzioni selettore - Switch functions - Fonctions sélecteur - Funciones selector - Funktionen des Schalters Fig. 14 Fig. 19 IT- Funzionalità pulsanti. N.B. I pulsanti vengono azionati con una leggera pressione al centro del simbolo EN- Key functionality. Note: The keys are used by pressing lightly at the center of the symbol FR- Fonctionnement boutons.
- Page 12 Funzioni selettore - Switch functions - Fonctions sélecteur - Funciones selector - Funktionen des Schalters IT- AUTOMATICO - Si abilitano tutti i sensori . La porta opera in modo completamente automatico. EN- AUTOMATIC- All sensors are abled. The door opens in a completely automatic mode. FR- AUTOMATICHE - SP- AUTOMATICO - DE- AUTOMATISCH -...
- Page 13 Funzioni selettore - Switch functions - Fonctions sélecteur - Funciones selector - Funktionen des Schalters IT- SOLO USCITA - Si disabilita il sensore esterno di entrata. Si abilita il sensore interno di uscita. Si disabilita la funzione di apertura del sensore di sicurezza in chiusura, se è stata impostata. Restano attivi i sensori di sicurezza per la funzione sicurezza.
- Page 14 Menù selettore - Switch menu - Menu sélecteur - Menú selector - Schaltermenü IT- Dalla schermata iniziale, per accedere al menù, tenere premuto per 4 secondi. In caso di più porte collegate, permette di entrare nel menù della porta selezionata. EN-From the initial screen, to access the menu, hold for 4 seconds.
- Page 15 Collegare il DS2S come da pag.6. Dare alimentazione all’automazione posizionando l’interruttore d’accensione (I-O) in posizione ON. Alla prima accensione sul display del DS2S viene visualizzata la seguente scritta: ! Allarme eseguire RESET. Prima di proseguire si rende necessario impostare alcuni parametri, di DEFINIZIONE OBBLIGATORIA -tenere premuto il tasto per 4 sec.
- Page 16 Power the automation by positioning the switch (I-O) in the ON position. At the first starting, the words “ ! Alarm perform RESET “ will appear on the DS2S display. Before continuing it is necessary to set certain parameters – MANDATORY PARAMETERS -pressing and holding key for at least 4 seconds.
- Page 17 -Scegliere la funzionalità Doppia Anta Coordinata M-S dalla videata mostrata nel DS2S. -Il DS2S visualizza la scritta « Porta M», premere il tasto ENTER della scheda MASTER -Il DS2S visualizza la scritta « Porta S», premere il tasto ENTER della scheda SLAVE.
-
Page 18: Double Door
1-2-3 Follow the instructions described in pag.16 on the MASTER board. At the first starting, the words “ ! Alarm communication “ will appear on the DS2S display. 1-2-3 Follow the instructions described in paragraph pag.16 on the SLAVE board. - Page 19 Menù selettore 14 IT SETUP PARAMETRI - accessibile solo con password tecnica (default 2426) Permette di impostare/visualizzare i parametri del selettore Permette di impostare/visualizzare i parametri del selettore : Permette di riportare la macchina allo stato di fabbrica. RESET allo stato nativo ANTE LIBERE RESET ESEGUI...
- Page 20 Menù selettore 14 IT PARAMETRI - PARAMETRI - FORZA ANTIVENTO PAR.MOVIMENTO PAR.MOVIMENTO LOGICA RADAR PORTA CHIUSA (continuazione) (continuazione) parametro 104 parametro 125 NO con SENS. SIC. : Imposta la logica di comando dei in CHIUSURA INT. sensori di attivazione NC con SENS. SIC. in CHIUSURA INT.
- Page 21 Menù selettore 14 IT PARAMETRI - PARAMETRI - : Non presente BATTERIA RADAR PARAMETRI VARI parametro 110 SEQUENZIALE : Apre in mancanza rete DA INTERNO A ESTERNO (continuazione) parametro 106 : Apre eccetto se in chiuso DA ESTERNO A INTERNO : Apre eccetto chiuso, sola uscita, sola entrata ACUE LOGICA...
- Page 22 BISTABILE RADIO ACQUISISCI USCITA AL 50% radiocomandi. * Programmazione dei radiocomandi (fino a 8) - Se si dispone del TS1S Telecomando 4 canali Topp premere il secondo CONTROLLO STATO ASSENTE tasto (Funzione Chiuso). ELETTROSERRATURA parametro 130 SBLOCCATA SE A GND...
- Page 23 Digital program switch menu SETUP PARAMETERS - accessible only with expert password (default 2426) Allows you to set/view the switch parameters Allows you to set/view the switch parameters Wings free : Resets to the native state. Serves to return the RESETS to the native state machine to the factory status.
- Page 24 Digital program switch menu PARAMETERS - PARAMETERS - MOVEMENT MOVEMENT RADAR LOGIC PAR. PAR. MOVEMENT ANTIWIND FORCE parameter 104 PAR. WITH CLOSE DOOR (continue) (continue) NO. with SAF. SENS. (continue) parameter 125 : Defines the control logics of the in CLOSING INT activation sensors.
- Page 25 Digital program switch menu PARAMETERS - PARAMETERS - No battery BATTERY Opens SEQUENTIAL RADAR Other par. FROM INSIDE TO OUTSIDE (continue) Opens except when closing parameter 106 FROM OUTSIDE TO INSIDE Opens except when closing, exit only or entry only. ACUE : Closes OPEN LOGIC...
- Page 26 AT DUTY 50% To program the radio control devices (up to 8): ELECTRIC LOCK STATUS ASSENT - If you are using the Topp TS1S 4-channel remote control, press CONTROL MODE the second key (Close Function). parameter 130 UNLOCKED IF TO GND...
- Page 27 Elenco errori - Error list - Liste erreurs - Lista errores - Fehlerliste Codice/Code DE- Beschreibung IT- Descrizione FR-Description /Código/Code EN-Description SP-Descripción IT- Segnalazione di primo avvio. E’ necessario eseguire la procedura di apprendimento/reset. EN- Signal of first startup. Necessary to perform the learning/reset procedure. IT- Motore guasto.
- Page 28 FR-Si l'installateur ne parvient pas à résoudre l'erreur, contacter le service après-vente Topp Srl. SP-Si el instalador no consigue solucionar el error, ponerse en contacto con el servicio de asistencia Topp Srl. DE-Falls der Installateur den Fehler nicht beheben kann, wenden Sie sich an den Kundendienst von Topp Srl.
- Page 32 TOPP S.r.l. Società a Socio Unico soggetta a direzione e coordinamento di 2 Plus 3 Holding S.p.a. Via Galvani, 59 - 36066 Sandrigo (VI) - Italia Tel. +39 0444 656700 - Fax +39 0444 656701 Info@topp.it - www.topp.it...
Need help?
Do you have a question about the DS2S and is the answer not in the manual?
Questions and answers