Table of Contents
Advertisement
Quick Links
Installation & Servicing
Models covered by these instructions
RS 30
RS 40
RS 50
RS 60
IDEAL ELAN 2; RS. 30, 40, 50 & 60
Wall Mounted, Balanced Flue, Gas Boilers
CAUTION:
To avoid the possibility of injury during the installation, servicing or cleaning of this appliance, care should be taken when handling
the edges of sheet steel components.
IMPORTANT:
These appliances are for use with NATURAL GAS ONLY.
NOTE:
The appliances covered by this book are fitted with SIT gas control valves
NOTE:
TO INSTALLER: LEAVE THESE INSTRUCTIONS ADJACENT TO THE GAS METER
GENERAL
PERFORMANCE DATA
Table 1 - GENERAL DATA
Boiler Size
Main Burner
Gas Control Valve
(41-415-77) Ideal ELAN 2 RS 30
(41-415-78) Ideal ELAN 2 RS 40
(41-415-79) Ideal ELAN 2 RS 50
(41-415-80) Ideal ELAN 2 RS 60
RS 30
RS 40
118 500 047
118 500 048
3/8 in BSP SIT Composit 0680 009 240V
RS 50
FURIGAS - Type 'R'
118 500 046
RS 60
Advertisement
Table of Contents

Related Manuals for Stelrad Ideal ELAN 2 RS 30

Summary of Contents for Stelrad Ideal ELAN 2 RS 30
- Page 1 Installation & Servicing Models covered by these instructions RS 30 (41-415-77) Ideal ELAN 2 RS 30 RS 40 (41-415-78) Ideal ELAN 2 RS 40 RS 50 (41-415-79) Ideal ELAN 2 RS 50 RS 60 (41-415-80) Ideal ELAN 2 RS 60 IDEAL ELAN 2;...
-
Page 2: General Guidance
Boiler Size RS 30 RS 40 RS 50 RS 60 Burner Injector Bray 103; 900 Bray 16; 1200 Bray 16; 1500 Bray 16; 1700 Pilot Injector SIT 0.27mm Gas Supply Connection RC½ in. BSP ½ Flow Connection 22mm O.D. Copper Return Connection 22mm O.D. -
Page 3: Location Of Boiler
If in doubt please enquire. Any direct connection of a control device not recommended by Stelrad Group Ltd., could invalidate the BSI certification and the normal appliance warranty. It could also infringe the Gas Safety Regulations and the above Regulations or other statutory requirements. -
Page 4: Air Supply
Installation pipes should be fitted in accordance with BS.6891:1988. Do NOT use pipes of a smaller size than the boiler inlet gas connection The complete installation MUST be tested for gas soundness and purged as described in the above Code. FLUING The flue must be installed in accordance with the recommendations of BS5440:1 The following notes are intended for general guidance,... -
Page 5: Water Circulation System
Air from room/internal Position of air vent Air direct from outside space 100 (16) 50 (8) HIGH LEVEL cm 100 (16) 50 (8) LOW LEVEL cm Table 5;- RS 40 Position of air vent Air from room/internal space Air direct from outside 133 (21) 67 (11) HIGH LEVEL cm... -
Page 6: Installation
INSTALLATION 1 UNPACKING The boiler is supplied fully assembled in one pack “A” together with one of 3 packs B, B1 and C, containing the flue terminal appropriate to wall thickness Pack ‘A’ Contents DIMENSIONS For hole & boiler outline relationship... -
Page 7: Wall Mounting
Pack ‘A’ Hardware Pack Contents 3-off No 10 × 2 in Ig screws 3 off wall plugs Pack B. B1 and C Contents Flue Terminal Assembly Sachet of Sealing Compound 2 WALL MOUNTING... -
Page 8: Wall Thickness
1. It is most important that the boiler is installed in a vertical position. 2. The flue duct should be horizontal, but a slignt downward slope away from boiler is acceptable 3. The wall must be of suitable load bearing capacity. 4. -
Page 9: Wall Mounting Template
7 BOILER CASING REMOVAL - Continued 4. Remove the control box securing screw. 5. Lift the pack of the control box slightly and swing it down, pivoting from the back 6. Release the 2 bottom captive screws and lift the casing off the boiler. Place the casing safety to one side, taking care not to damage the glass fascia panel. -
Page 10: Preparing The Wall
9 PREPARING THE WALL 1. Drill the three fixing holes with an 8mm ([[data unavailable]]in) masonry drill and inset the plastic plugs provided. 2. Cut the appropriate hole in the wall for insertion of the terminal assembly NOTE: The terminal MUST not come into contact with a combustible material such as that used in nonstandard construction of timber framework and plaster board etc. -
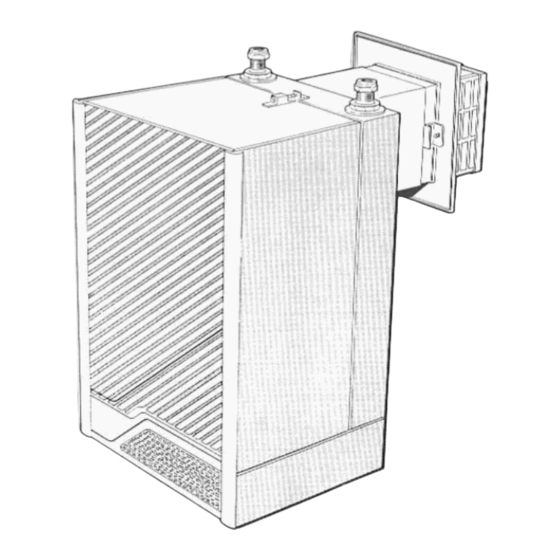
Page 11: Fitting The Flue Assembly
1. Lift the boiler into position entering the projecting air duct into the wall opening and engaging the back panel on the wall mounting plate lugs 2. Check the boiler alignment using a spirit level, and adjust as necessary with the jacking screw - Refer Frame 2 3. -
Page 12: Gas Connection
13 GAS CONNECTION A MINIMUM gas pressure of 20 mbar (8 in w.g) MUST be available at the boiler intel. Extend a gas supply pipe NOT LESS THAN 15 mm OD to the boiler and connect to the gas service cock situated at the bottom of the boiler. Connection MUST be made from BELOW and from the REAR of the boiler. - Page 13 The vertical distance between the pump and feed/expansion cistern MUST comply with the pump Manufacturers minimum requirements to avoid cavitation. Should these conditions net apply, either lower the pump position or raise the cistern above the minimum requirement specified by Stelrad Group Ltd...
- Page 14 Thermostatic Radiator Valves Stelrad group Ltd., support the recommendations made by leading manufacturers of domestic heating controls that heating systems utilising full thermostatic radiator valve control of temperature in individual rooms should also be fitted with a room thermostat controlling the...
-
Page 15: Sealed System Requirements
Such an arrangement will provide for a potentially more efficient control of the environment and will also avoid the continuous running of the circulation pump during programmed heating ‘On’ periods. thus saving electrical energy It is recommended strongly therefore that, when thermostatic radiator valves are used, that space heating temperature control over living/dining area or hallway having a heating requirement of at least 2 kW (7000 Btu/h) be achieved using a room thermostat whilst other rooms are individually controlled by thermostatic radiator valves. - Page 16 2. Safety Valve A spring loaded safety valve complying with the relevant requirements of BS.759 must be fitted in the flow pipe as close to the boiler as possible and with no intervening valve restriction. The valve should have the followihg features - a.
-
Page 17: Electrical Connections
i. Thoroughly flush out the whole of the system with cold water without the pump in position. ii. With the pump fitted, fill & vent the system until the pressure gauge registers 1.5 bar (21.5 lbf/in ) and examine for leaks. iii. -
Page 18: Electrical Connections/Wiring Diagrams
23 INTERNAL WIRING 1. Route the electrical leads into the box. via the grom-metted hole at the rear and connect as shown. NOTE: (a) Secure each lead with one of the cable clamps provided (b) The mains fead connection MUST be made in such a way that should the lead slip from anchorage the current carrying conductors become taut before earthing conductor ELECTRICAL CONNECTIONS/WIRING DIAGRAMS 24 EXTERNAL WIRING... - Page 19 25 PICTORIAL WIRING 26 MID POSITION VALVE, (NO RELAY)- PUMPED ONLY NOTE: 1. SOME EARTH WIRES ARE OMITTED FOR CLARITY ENSURE PROPER EARTH CONTINUITY WHEN WIRING. 2. Black dots denote alternative pump connections. 3. This is a fully controlled system - set the boiler thermostat to HIGH. 4.
-
Page 20: Frost Protection
WIRING DIAGRAMS/FROST PROTECTION 28 TWO SPRING CLOSED VALVES - PUMPED ONLY NOTE: 1. SOME EARTH WIRES ARE OMITTED FOR CLARITY, ENSURE PROPER EARTH CONTINUITY WHEN WIRING. 2. Black dots donate alternative pump connections. 3. This is a fully controlled system - set the boiler thermostat to HIGH. 4. -
Page 21: Commissioning And Testing
COMMISSIONING & TESTING 30 COMMISSIONING & TESTING (a) Electrical Installation 1. Checks to ensure electrical safety should be carried out by a competent person. 2. ALWAYS carry out the preliminary electrical system checks as detailed on the Instructions for the British Gas Multimeter or similar test meter. -
Page 22: Fitting The Casing
32 FITTING THE CASING IMPORTANT: This appliance MUST NOT be operated without the casing being correctly fitted and forming an adequate seal. 1. Lift the boiler casing, with the glass fascia in the down position up to the boiler assembly and secure with the top captive screw. 2. -
Page 23: General Checks
3. Set the boiler thermostat selector switch (D) to HIGH and check that the burner cross-lights smoothly. The HIGH indicator neon will glow when the boiler is alight. 4. Test for gas soundness around the boiler gas components using leak detection fluid. 5. - Page 24 Flow temperature Thermostat Setting °C °F HIGH NOTE: The ‘HIGH’ or LOW indicator neons will glow whenever the boiler thermostat is calling for heat. WARNING: The boiler MUST NOT be operated with the casing removed 35 HANDING OVER After completing the installation and commissioning of the boiler system, the installer should hand over to the Householder by the following actions.
-
Page 25: Burner Assembly Removal
1. Release the top captive screw 2. Slide the glass fascia upwards until it locates in the retaining catch 3. Remove the two securing screws, slide the bottom panel forward slightly, and then sideways to remove from the casing 3 BOILER CASING REMOVAL— Continued 4. - Page 26 5 BURNER ASSEMBLY - REMOVAL— Continued 1. Supporting the burner assembly, disconnect the earth end. 2. Slacken the securing screw and pull out the electrical plug. 3. Slacken the thermocouple and withdraw the overheat thermostat leads from the interrupter block. 4.
-
Page 27: Cleaning The Flueways
e. The spark gap is correct - Refer to Frame 15 f. The thermocouple tip is not burned or cracked g. The position of the thermocouple relative to the pilot burner and main burner is correct. h. The thermocouple terminal at the gas valve is clean. Clean or renew components as necessary. -
Page 28: Component Replacement
COMPONENT REPLACEMENT NOTE: To replace the components in frames 10 it is necessary to remove the boiler casing - Refer to Frame 2 IMPORTANT: When work is complete the casing MUST be correctly refitted. The boiler MUST NOT be operated if the casing is not fitted. 10 SIGHTGLASS REPLACEMENT 1. - Page 29 12 OVERHEAT THERMOSTAT REPLACEMENT Refer also to Frame 11 1. Remove the burner & controls assembly - Refer to Frames 4 & 2. Release the strain relief bush and withdrawer the interrupter leads 3. Unclip the leads from the pack panel 4.
- Page 30 14 SPARK ELECTRODE REPLACEMENT Refer also to Frame 15 1. Undo the thermocouple connection and pull the thermocouple clear. 2. Disconnect the spark lead. 3. Undo the spark electrode retaining nut and withdraw the electrode. 4. Fit the new electrode and re-assemble in reverse order. 15 PILOT BURNER REPLACEMENT 1.
-
Page 31: Gas Valve Replacement
COMPONENT REPLACEMENT 16 SPARK LEAD REPLACEMENT 1. Remove the burner and control assembly - Refer to Frames 4 and 5. 2. Remove the buckle clip. 3. Undo the two securing nuts and washers and remove the sealing plate. 4. Disconnect the spark lead from the base of the electrode and withdraw the lead. 5. -
Page 32: Main Burner Replacement
4. Removo the burner manifold sealing gasket - Refer Frame 16 - and withdraw the thermocouple 5. Fit the new thermocouple and re-assemble ir reverse order NOTE: Avoid sharp bends in the thermocouple lead and ensure that it follows the same route as previously. 19 MAIN BURNER REPLACEMENT 1. - Page 33 COMPONENT REPLACEMENT 22 HEAT EXCHANGER REPLACEMENT Continued from Frame 21 4. Support the heat exchanger and undo the flow and return pipe connections. 5. Disengage the skirt from the interpanel and case the heat exchanger forward to drain the water from the return connection. 6.
-
Page 34: Thermostat Switch Replacement
NOTE: To replace the components in Frames 24- 26. If the clearance beneath the boiler is 220 mm (9 in) or greater it is only necessary to remove the casing bottom panel and hinge the control box down-Refer to Frame 24 NEON REPLACEMENT 1. - Page 35 1. Remove the control box cover. 2. Disconnect the suppressor leads from the terminals marked ‘N ‘ and ‘L ‘ withdraw the suppressor. 3. Fit the new suppressor in reverse order ensuring that all electrical connections are correctly re-made. 27 BURNER AND CONTROLS ASSEMBLY 28 BOILER CONTROL BOX...
-
Page 36: Fault Finding
FAULT FINDING PILOT FAULTS Before attempting any electrical fault finding, ALWAYS carry out the preliminary electrical system checks as detailed in the Instructions for the British Gas Multimeter, or similar test meter. Detailed instructions on the replacement of faulty components are contained in the ‘Servicing’ section of this publication. 1 PILOT WILL NOT LIGHT 2 PILOT WILL NOT STAY LIT WHEN THE GAS CONTROL VALVE KNOB IS RELEASED... - Page 37 MAIN GAS/THERMOSTAT FAULTS 3 PILOT LIT, BUT NO MAINS GAS 4 MAIN BURNER IS SHUT DOWN BY THE OVER-HEAT THERMOSTAT...
-
Page 38: Short List Of Parts
This List is extracted from the British Gas List of Parts, which contains all available spare parts. Details of the British Gas Lists are held by Gas Regions STELRAD Distributors and by Merchants. IDEAL ELAN 2. RS30, 40, 50 and 60 GAS BOILERS When ordering spares, please quote: 1. -
Page 39: Casing Assembly
CASING ASSEMBLY 2 BOILER CASING - Exploded View... - Page 40 STELRAD GROUP pursues a policy of continuing improvement n design and performance of its products Tne right is. therefore, reserved to vary specification without notice. STELRAD GROUP Limited Sales and Marketing, P.O. Box 103 National Avenue, Kingston upon Hull, North Humberside HU5 4JN...
- Page 41 Registration No. London 322137 A SUBSIDIARY OF METAL SOX p l c. H.0614 4/88 Printed in England...
Need help?
Do you have a question about the Ideal ELAN 2 RS 30 and is the answer not in the manual?
Questions and answers