
Summary of Contents for ARK Tamo
- Page 1 Tamo Keysafe with illuminated multi-push buttons Installation and Manual EN – Original instructions...
-
Page 2: Table Of Contents
Contents Introduction Intended use Used symbols Safety instructions Specifications Setting a code Choosing a code Setting the code Checking the code Installing on a wall Using the device Opening/unlocking Closing/locking Maintenance Cleaning Spare parts Replacing the illumination module Disposal Warranty... - Page 3 Country Status Number European Patent (AT Granted 3 241 960 BE CH DE DK ES FR GB IE IT LU NL NO SE) Hong Kong Granted HK1240992 United States Granted 10 047 542 Australia Pending 2017260052 Canada Pending 3 022 692 India Pending 201847044853...
- Page 4 Tamo Installation and Manual Preface Dear Valued Customer, Thank you for purchasing the Tamo keysafe. This manual contains all the information to familiarise yourself with the product. We request that you read this manual carefully before you install and start using the product. This manual covers setting the code, installing the device and how to use it.
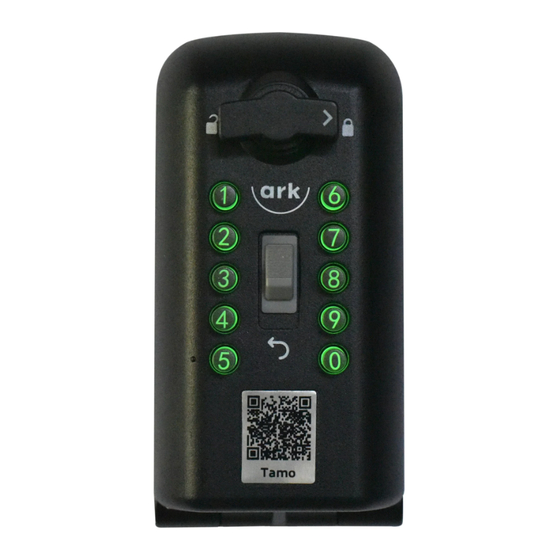
- Page 5 Main Parts Image 1 Weather cover Clear button Open dial Latch Code change tool Code cover Mounting holes Code dials Masonry screws size 6, 60 mm masonry (x4)
-
Page 6: Introduction
1 Introduction Intended use The code buttons are illuminated for use at night. They light up when the unit is held or installed in the vertical position. When the safe is open there is an internal light in the vault. Each button can be pressed up to 4 times giving over 9 million possible codes. -
Page 7: Safety Instructions
• Only use the Tamo as described in this manual. • Do not use if visibly damaged. Installation • Do not mount the Tamo within 15 cm of the corner on a masonry surface. • Make sure the Tamo is mounted flush with the surface and does not move. -
Page 8: Setting A Code
Battery illuminated module CR2032 battery Expected lifespan of the 5 years illuminated module battery Attack Test standard Tamo LPS1175 issue 8 A5 4 Setting a code 4.1 Choosing a code There is no preset or 'master' code and codes are not held by The Key Safe Company. We recommend using a minimum code of 6 digits with one of the digits repeated. - Page 9 Page Intentionally Blank...
-
Page 10: Setting The Code
4.2 Setting a code The code is based on the amount of times a digit is used. The order of the digits is not important. See ‘Choosing a code’ on Page 8 for more information. To set a code please follow the instructions below: Open the weather cover (see Image 2). - Page 11 Image 2 Image 3 Image 4...
-
Page 12: Checking The Code
// Setting the code (continued) Slide the code cover towards the latch. Take out the code change tool (Image 5). Use the code change tool to turn the code dials of each digit to the number of times this digit is used (see Image 6a and Image 6b). - Page 13 Image 5 Image 6a Image 6b Image 7 Image 8...
-
Page 14: Installing On A Wall
5 Installing on a wall Please refer to www.keysafe.co.uk for installation videos To mount the Tamo to a wall, the following tools are needed: • 5 mm masonry drill bit • Drill • Marker pen or pencil • T30 Torx screwdriver •... - Page 15 Image 9 Image 10...
-
Page 16: Using The Device
• Clean out the dust and debris from the holes by blowing gently into the holes. • Place the Tamo over the holes. • Use the four included screws (Image 11). • Drive the screws directly into the brick using a T30 Torx screwdriver. -
Page 17: Closing/Locking
Image 11 Image 12 6.2 Closing/locking Close the lid. Rotate the open dial 180° anti clockwise to lock. If the device has been locked correctly, you will hear a click. -
Page 18: Maintenance
See the table below for an overview of common spare parts. Name Part number Weather cover 910003 Fixings - Tamo MPK311 Illuminated module (PCB) 910001 Installation template MPK303 5 mm masonry drill bit +... -
Page 19: Replacing The Illumination Module
7.3 Replacing the illumination module The battery should last 5 years but this will not affect the normal operation and security of your device. Replacement light modules are available. Open the weather cover and safe. Remove the screw securing the illumination module (Image 13). -
Page 20: Disposal
Please follow the locally applicable guidelines when disposing of the packaging materials and illumination module. 9 Warranty We offer a 2-year warranty on the Tamo including the illumination module. Please ensure product is installed and used as described in this manual to preserve the warranty. - Page 21 This page is intentionally blank...
- Page 22 The Key Safe Company Unit 4 Nunnery Park Hornhill Road, Worcester Worcestershire, WR4 0SX www.keysafe.co.uk support@keysafe.co.uk +44 (0) 330 363 0303...
Need help?
Do you have a question about the Tamo and is the answer not in the manual?
Questions and answers