
Subscribe to Our Youtube Channel
Summary of Contents for Roveconcepts CAMINO TREADMILL
- Page 1 CAMINO TREADMILL MOTORIZED WALKING PAD MANUAL READ ALL INSTRUCTIONS CAREFULLY BEFORE INSTALLING AND USING THIS PRODUCT. RETAIN THIS OWNER MANUAL FOR THE FUTURE REFERENCE.
-
Page 2: Table Of Contents
CONTENTS SAFETY & CAUTIONS...........................3 ASSEMBLY INSTRUCTION........................5 ASSEMBLY STEPS..........................5 TECHNICAL SPECIFICATIONS......................6 GROUNDING INSTRUCTIONS......................6 EXPLODED VIEW...........................7 EXPLOSION DETAILS........................... 8 WARMING-UP............................9 SAFETY TRAINING MEASURES......................10 PRODUCT MAINTENANCE........................10 RUNNING BELT ADJUSTMENT......................13 OPERATION GUIDE..........................14 Camino Treadmill | 2... -
Page 3: Safety Precautions
11. The power cord of electric treadmill is special. If the power cord is damaged, please buy it from the dealer or contact our company directly. 12. If the speed increase suddenly or inadvertently due to an electronic failure, please pull off the safety lock from the console, then the treadmill will stop. Camino Treadmill | 3... - Page 4 16. Warning of incorrect or excessive exercise may cause health damage 17. Every month, check whether all connecting screws are loose and whether all parts are damaged. If there is any damage, it should be replaced and repaired immediately. Camino Treadmill | 4...
-
Page 5: Assembly Instruction
Open the packing box and you can take out the following parts in the box. NAME PARAMETER Treadmill Safety Key Remote Control Allen Key Silicone Oil 30ml Manual Step 1: Take the product out of the packing box, read the instructions carefully, and then power onto use! Camino Treadmill | 5... -
Page 6: Technical Specifications
This product is for use on a nominal 110-volt circuit and has a grounding plug that looks like the plug illustrated in sketch A in following figure. Make that the product is connected to an outlet having the same configuration as the plug. No adapter should be used with this product. Camino Treadmill | 6... -
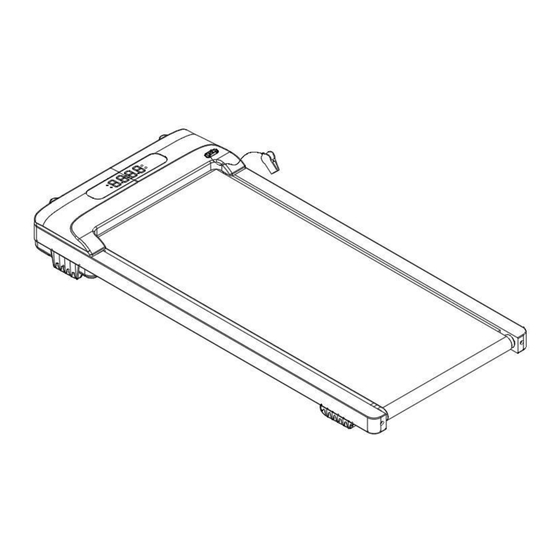
Page 7: Exploded View
DESCRIPTION OF POWER GROUNDING EXPLODED VIEW Camino Treadmill | 7... -
Page 8: Explosion Details
Power switch Lock nut M8 Power cord Spring pad M8 Motor Roller tube Top control Safety switch Remote control Down control Motor cover surface sticker Manual EVA single side adhesive Silicone oil Communication wire Allen key S5 Camino Treadmill | 8... -
Page 9: Warming-Up
5. Sartorius muscle (muscle in the inner thigh) stretch: sit with the soles of the feet opposite and the knees facing out. Grab your feet with both hands and pull toward the groin. Hold for 10-15 seconds, then relax. Repeat 3 times (see Figure 5). Camino Treadmill | 9... -
Page 10: Safety Training Measures
You can control the running intensity through adjusting the velocity and incline of treadmill. We suggest that you don’t set the incline at first; improve the incline is the effective way to strengthen the exercise’s intensity. Camino Treadmill | 10... -
Page 11: Product Maintenance
WARNING: be sure to remove the power plug of the electric treadmill before moving the motor protective cover. Open the motor protection cover at least once a year to clean the motor Camino Treadmill | 11... - Page 12 MODERATE USERS (3-5 HOURS PER WEEK) ONCE EVERY 6 MONTHS; HEAVYWEIGHT USERS (MORE THAN 5 HOURS A WEEK) ONCE EVERY 3 MONTHS. We suggest that you purchase lubricants from your local distributor or contact us directly. Note: any other maintenance should be operated by professionals. Camino Treadmill | 12...
-
Page 13: Running Belt Adjustment
1 / 4 turn. Insert the power switch and safety lock to make the treadmill run. Then stand on the running belt to confirm the tightness. Repeat the above steps until the belt is moderately tight. Figure C Camino Treadmill | 13... -
Page 14: Operation Guide
0. When the reverse count reaches 0, the treadmill slows down smoothly to stop running and enters the standby state 5 seconds after the display of "End" stops completely. Camino Treadmill | 14... - Page 15 0.3-62.1. 5. In the distance reversion mode, press "Mode" to enter the calorie reversion mode, and the "cal" window displays "50.0" and blinks. Press "speed+" and "speed -" to set calories. The calorie setting range Camino Treadmill | 15...
- Page 16 3. If you have any questions, please contact the dealer. Non -professional, please do not try to disassemble or repair to avoid damage to equipment. Camino Treadmill | 16...
- Page 17 C. Check whether the connection line of the motor is damaged, replace the connection line or raise the motor; D. Replace the drive; E. After all the inspection is checked, press the learning key on the driver to re-learn again. Camino Treadmill | 17...
- Page 18 A driver's torque is too large, adjust the torque potentiometer until the appropriate position; B motor in the short circuit, replace the motor; C to kill the transmission site, adjust the transmission site, or add lubricating oil; Camino Treadmill | 18...
Need help?
Do you have a question about the CAMINO TREADMILL and is the answer not in the manual?
Questions and answers