Advertisement
Advertisement
Table of Contents

Related Manuals for Gadnic VENTLUZ02

Summary of Contents for Gadnic VENTLUZ02
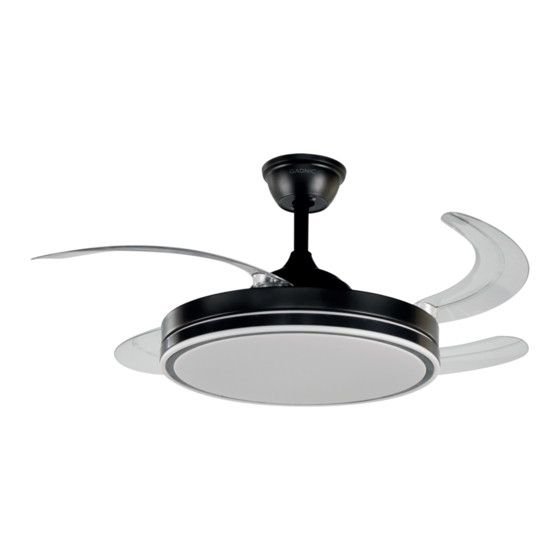
- Page 1 VENTLUZ02...
- Page 2 INDICE ESPAÑOL ....................03 PORTUGUÊS ................... 09 ENGLISH ....................17...
- Page 3 + LUZ LED 3 CCT VENTILADOR DE TECHO CON ASPAS RETRÁCTILES Enhorabuena Ante todo, gracias por su compra. Acaba Ud. de adquirir un ventilador de calidad y garantía contrastadas. Para asegurar su correcto funcionamiento y seguridad, rogamos lea y guarde las instrucciones antes de usar el producto. Instrucciones de Seguridad 1.
- Page 4 Recomendación Manipule el conjunto de la unidad que incluye motor, mecanismo de retracción, palas en posición retraída y kit de luz LED con cuidado. Se recomienda utilizar guantes de algodón al instalar el ventilador para evitar posibles cortes con partes afiladas del ventilador y que las huellas dactilares no queden marcadas en la superficie.
- Page 5 Figura 1 1.Soporte de montaje x1 2. Tornillos x2 3. Toldo x1 4. Varilla y bola de suspensión x1 5. Pasador de bloqueo x1 6. Pasador de enganche x1 7. Cubierta de acoplamiento x1 8. Motor del ventilador x1 9. Aspas del ventilador 10.
- Page 6 Ensamblaje e Instalación RESULTA IMPORTANTE RESEÑAR QUE EL VENTILADOR ESTÁ DISEÑADO PARA SER INSTALADO EN TECHOS CON UNA INCLINACIÓN MÁXIMA DE 15º. 1 Retire el florón, (Nº 3, Fig. 1), del soporte de montaje, (No. 1, Fig. 1), aflojando los 2 tornillos, (”x”...
- Page 7 Cableado Una vez realizadas las acciones anteriormente descritas podemos proceder al conexionado de los terminales tal como se describe a continuación. Figura 2 Cableado de Ventilador DC Cabre Verde / Amarillo Toma Neutral N (Blanco) de tierra Luz L (Azul) (Negro) Receptor Gris DC motor L...
- Page 8 Instalación del Kit de Iluminación LED 1. Instalar el kit LED y atornillarlo a la base con delicada firmeza, (Nº 10, Fig. 1), para no pasar la rosca. 2. Conectar los cables correspondientes del kit LED a los cables correspondientes que encontramos en la parte inferior del soporte del motor del ventilador, (Nº...
-
Page 9: Mantenimiento Y Limpieza
Manual Mando RF Instrucciones del ventilador Apagado / Encendido de la luz ON/OFF Modo día Modo noche Luz cálida Luz neutra Luz fría Ajuste del brillo Modo Invierno/Verano Timer 2 horas Timer 4 horas Timer 8 horas Brisa natural Apagado / Encendido del ventilador ON/OFF Mantenimiento y Limpieza 1. - Page 10 Potencia del Velocidad R.P.M. Caudal (m³/min) motor (W) 96,78 106,44 13,0 111,90 16,9 121,5 20,7 132,30 27,6 142,44 150 mm 300 mm 370 mm 480 mm 1060 mm página 08...
- Page 11 VENTILADOR DE TETO COM PÁS RETRÁTEIS + LUZ DE LED 3 CCT Parabéns Antes de mais nada, obrigado por sua compra. Você acabou de adquirir um ventilador de qualidade e garantia comprovadas. Para garantir a operação correta e a segurança, leia e guarde as instruções antes de usar o produto.
- Page 12 Recomendação Manuseie o conjunto da unidade, incluindo o motor, o mecanismo de retração, lâminas na posição retraída e o kit de luz LED com cuidado. Recomenda-se o uso de luvas de algodão ao instalar o ventilador para evitar possíveis cortes com partes afiadas do ventilador e para evitar que impressões digitais sejam deixadas na superfície.
- Page 13 Figura 1 1. Suporte de montagem x1 2 Parafusos x2 3. Capota x1 4. Haste de suspensão e esfera x1 5. Pino de travamento x1 6. Pino do engate x1 7. Tampa do acoplamento x1 8. Motor do ventilador x1 9.
-
Page 14: Montagem E Instalação
Montagem e instalação É IMPORTANTE OBSERVAR QUE O VENTILADOR FOI PROJETADO PARA SER INSTALADO EM TELHADOS COM UMA INCLINAÇÃO MÁXIMA DE 15º. Remova a roseta (No. 3, Fig. 1) do suporte de montagem (No. 1, Fig. 1), soltando os 2 parafusos Remova a roseta (nº... - Page 15 Fiação Uma vez executadas as ações descritas acima, podemos prosseguir com a conexão dos terminais conforme descrito abaixo. Figura 2 Fiação do ventilador CC Cabo verde / amarelo Aterramento Neutro N (branco) Light L (azul) Receptor (Preto) Motor CC cinza L controle remoto Entrada N...
- Page 16 Instalação do kit de iluminação LED 1. Instale o kit de LED e parafuse-o na base com firmeza delicada (nº 10, Fig. 1), de modo a não apertar demais a rosca. 2. Conecte os fios correspondentes do kit de LED aos fios correspondentes na parte inferior do suporte do motor do ventilador (nº...
-
Page 17: Manutenção E Limpeza
Manual do comando de RF Instruções do ventilador Ligar/desligar a luz Modo ON/OFF diurno Modo noturno Luz quente Luz neutra Luz fria Ajuste de brilho Modo inverno/verão Temporizador 2 horas Temporizador 4 horas Temporizador 8 horas Brisa natural Desligamento e ativação do ventilador ON/OFF Manutenção e limpeza 1. - Page 18 Potência do Taxa de fluxo R.P.M. Velocidade (m³/min) motor (W) 96,78 106,44 13,0 111,90 16,9 121,5 20,7 132,30 27,6 142,44 150 mm 300 mm 370 mm 480 mm 1060 mm página 16...
- Page 19 RETRACTING BLADE CEILING FAN + LED LIGHT 3CCT Congratulations You have just acquired a proven quality and warranty ceiling fan. Safety Instructioins 1. Be sure to disconnect main circuit breaker from the control and protection panel before starting the installation of this device. Power supply must be according to AC220/50Hz.
- Page 20 Recomendation Handle the unit assembly which includes motor, retraction mechanism, blades in retracted position and LED light kit carefully. It is recommended to wear cotton gloves when installing the fan so that fingerprints are not left on the surface. Unpacking and Prior Checking Proceed to extract and identify each and every one of the parts included in the table below.
- Page 21 Figure 1 1. Soporte Montaje Techo x1 2. Tornillos del florón x2 3. Florón x1 4. Varilla y bola colgante x1 5. Pasador de bloqueo x1 6. Pasador de enganche x1 7. Tapa acoplamiento x1 8. Motor del ventilador x1 9.
-
Page 22: Assembling And Installing
Assembling and Installing Assembling and Installing IT IS IMPORTANT TO REVIEW THAT THE FAN IS DESIGNED TO BE INSTALLED IN CEILINGS WITH A MAXIMUM INCLINATION OF 15º. Remove the canopy, (No. 3 - Fig. 1), from the mounting bracket, (No. 1, Fig. 1), loosening the 2 screws, ("X" and "y"), which fix it then slide it down. - Page 23 Wiring Once the actions described above have been carried out, we can proceed to terminal connection as described below. Figure 2 Fan Wiring Connection DC Green / Yellow Stripe Ground Neutral N (White) wire Light L (Blue) (Black) Remote Grey DC motor L control receiver Input N...
- Page 24 Led Lighting Kit Installation 1. Install the LED kit and screw it to the base with delicate firmness (No. 10, Fig. 1), so as not to pass the thread. 2. Connect the corresponding wires of the LED kit, to the corresponding wires located in the lower part of the fan motor support, (No.
-
Page 25: Technical Information
RF Remote Manual Instructions of Smart Fan Light LED Light ON/OFF ON/OFF Daytime mode Night mode Warm light Neutral light Cool light Dimmable light Summer / Winter mode Timer 2 hours Timer 4 hours Timer 8 hours Natural wind Fan ON/OFF ON/OFF Mantenance and Cleanind 1. - Page 26 Velocity R.P.M. Motor Power Caudal(m³/h) 96,78 106,44 13,0 111,90 16,9 121,5 20,7 132,30 27,6 142,44 150 mm 300 mm 370 mm 480 mm 1060 mm page 24...
Need help?
Do you have a question about the VENTLUZ02 and is the answer not in the manual?
Questions and answers