Table of Contents
Advertisement
Quick Links
Advertisement
Table of Contents

Related Manuals for Lode Corival V2

Summary of Contents for Lode Corival V2
- Page 1 Operator Manual Corival V2 English Lode BV Groningen, The Netherlands 0336...
- Page 2 On/Off switch External Input External Output Type B Electrical Safety This is the operator manual for the Lode Corival Ergometer. If you need more detailed information, we refer to your local distributor or the user guide (only available in English).
-
Page 3: Table Of Contents
Operator Manual Corival Table of Contents DESCRIPTION OF THE CORIVAL ERGOMETER ANUAL CONTROL QUICK START NALOG EXTERNAL CONTROL º RS232 ERMINAL DIGITAL EXTERNAL CONTROL VIA MAIN MENU SYSTEM PARAMETER ET DISPLAY 3.1.1 Power 3.1.2 3.1.3 Heartrate 3.1.4 Torque 3.1.5 Timer 3.1.6 Distance SLOPE... - Page 4 Operator Manual Corival Blood pressure option 928815 Using the BP system Patient Hook-up D.2.1 Apply the cuff D.2.2 Position of the cuff Installing the BP cuff D.3.1 Analog ECG trigger Abort codes BP system Cleaning and disinfection Cleaning of the cuff:...
-
Page 5: Description Of The Corival Ergometer
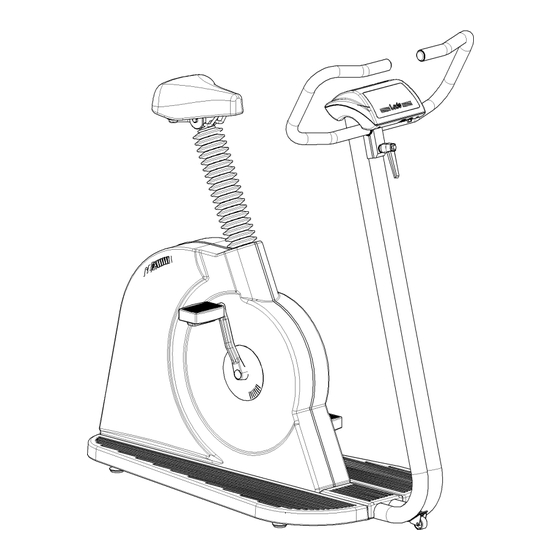
Operator Manual Corival 1 Description of the Corival ergometer The control panel consists of the following elements: 1. Led indicator for rpm 2. Display A directed to test subject 3. Down button 4. Up button 5. Confirmation button 6. Ergometer type indication Fig. -
Page 6: Manual Control Quick Start
Operator Manual Corival Adjustability The ergometer is adjustable to test subjects of all sizes and ages. • The height of the saddle can be adjusted by tilting the handle on the back underneath the saddle • The height of the handlebars can be adjusted by loosening the screw knob in front of the ergometer. -
Page 7: Analog External Control
MODE, you can set this mode as default startup menu. The Corival is now ready for digital external control. Another option to control the ergometer from a pc is with the Lode Ergometry Manager (LEM, article 92890X) software. This uses the Lode 38k4 protocol. -
Page 8: Terminal º Digital External Control Via Rs232
Operator Manual Corival 2 Main menu When the ergometer is started after pressing the confirmation button ( ) you enter the MAIN MENU. The following submenus are selectable from the main menu: TERMINAL MANUAL ANALOG SYSTEM PARAMETER Use the arrow keys▲ ♥ to scroll through the menus. Press the ( ) button to select a menu. Keeping the ( ) pressed for a few seconds allows you to go up one or more menu levels, wherever you are in the menu. -
Page 9: System Parameter
Operator Manual Corival 3 System parameter In the System Parameters different specific ergometer settings can be carried out. Set display This function allows you to adjust the parameters which can be read out on the display during exercising. If more then 2 are set to ON they are shown in groups of 2 scrolling. Choosing default allows you to go to factory settings for the display parameters. -
Page 10: Hyperbolic
Operator Manual Corival 3.3.1 Hyperbolic Hyperbolic mode means that the workload P can be adjusted in watt. The workload is kept constant independent of rpm. 3.3.2 HR controlled Heart rate can be adjusted and the workload is regulated until the adjusted heart rate is reached. -
Page 11: Ecg Trigger
Operator Manual Corival 3.4.5 ECG Trigger When the blood pressure option 928815 is used a heart rate trigger signal is obligatory 3.4.6 TC Bytes The Test code (TC) Bytes offer in case of malfunction or poor performance of the BP option 928815 the possibility to make error codes visible. -
Page 12: Specifications
Operator Manual Corival 4 Specifications Technical Specifications Principle eddy current brake Mains voltage 115-230 VAC (adjustable) Frequency 50 Hz, 60 Hz Patient capacity 350 lb - 160 kg Power consumption 120 VA Workload 0-999 W HYP, 0-999 W LIN Device control manual, external analog, external digital Accuracy <... -
Page 13: Communication Ports
Operator Manual Corival Communication ports This chapter describes the communication ports in the back panel of the Corival: RS232 (two ports for RS232-in and loop connection RS232-out) Analog in/out RS232 The Corival has two RS232 connectors for loop-connecting a number of Corivals and for communication with a personal computer or an ECG device. -
Page 14: Maintenance
Adjust the voltage with a screwdriver to your local mains voltage. Shift back the main unit and screw it. Take care not to jam wires or tubes. Contact your local dealer for a maintenance contract or ask Lode: LODE BV Tel. -
Page 15: B Programmable Control Unit Top 928810
Confirmation button Using the Programmable Control Unit Check if the ergometer is properly installed. In the display of the basic control panel the following appears for a few seconds: LODE ERGOMETER TYPE Followed after a few seconds by: 0 rpm... -
Page 16: Menu Structure Programmable Control Unit
Operator Manual Corival LODE ERGOMETER BPM initialized Then the main menu appears: system parameter TERMINAL manual Term The menu displayed in capitals can be selected. As extra reminder the first 4 letters of the selectable mode are showed above the confirmation button. With the ▲ ♥ keys you can scroll through the other menus and select SYSTEM PARAMETERS, MANUAL, ANALOG or PROTOCOL. -
Page 17: Manual Menu
Operator Manual Corival 3. DEVICE NO 1. PROTOCOL* 2. PROTOCOL EDIT * 2. PROTOCOL RUN * 2. PROTOCOL DELETE * Compared to the standard version the *menus are added. B.3.2 Manual menu Selecting the manual mode will show you (default) the following display at the programmable control panel: MANUAL P = 0W... -
Page 18: System Parameters Menu
Operator Manual Corival The ergometer is now ready for digital external control. For more information about digital external control using the RS 232 serial port see the user guide supplied with the ergometer. B.3.5 System parameters menu In the SYSTEM PARAMETERS different ergometry specific settings can be carried out as described previously in the standard manual. -
Page 19: Operation From Basic Control Panel
Operator Manual Corival display of these parameters. You can program the parameters (also up to 4 without scrolling) at the basic control panel as well, but you have to switch the control over to the basic side first as is described in the next paragraph. The menu SETTINGS will give you the opportunity to select PROTOCOL as a default startmenu besides the previously described menus ANALOG, MANUAL, TERMINAL and SYSTEM PARAMETERS. - Page 20 Operator Manual Corival name1 name2 With the ▲ ♥ keys you can select the desired protocol (in this example name1) to edit. Select NEW to program a new exercise protocol and give the protocol a useful name maximal 10 characters with the▲ ♥ keys. The allowed characters for the name are: ’0∆..∆9∆,∆a∆..∆z∆, and ∆...
- Page 21 Operator Manual Corival End Of Stage; automatic measurement at every end of the exercise step with the possibility to program the measurement time before the end of the stage. Recovery time If you have programmed automatic BP measurement in the protocol, you get the possibility to program the repeat time of the BP measurement during the recovery stage: After the programming of the BPM the menu PROTOCOL will appear again.
- Page 22 Operator Manual Corival test Ramp P=160W t=09:40 6P dP=-060W dt=060s next Select Recovery the ▲ ♥ keys and change the Workload to 35 and press the confirmation button. After confirmation you will automatically go to the BPM menu. Select No BPM when the BPM module is not installed or select Repeat with the ▲ ♥ keys and choose 2 minutes for the repeat time, confirm with ( ) and choose 2 minutes for the repeat time in the recovery stage.
- Page 23 Operator Manual Corival 10w min start at 30 rpm n= 0/min The ergometer is ready for use with the selected protocol. When the test subject exceeds the 30 rpm the protocol will run. You will see the following screen: 1 t=00:59 =00:01 P= 10 W 58 rpm...
- Page 24 Operator Manual Corival α Ԁ p = 123 mmHg P= 30W 60 rpm DISP START Whenever the test subject is allowed to or has to stop the exercise test, the recovery button has to be pressed. The following will appear on screen: Rec P= 50W t=10:30 P= 50W...
-
Page 25: C Heart Rate Option 928824
Operator Manual Corival Heart rate option 928824 Connecting the Heart rate system (option 928824) To install a heart rate option purchased afterwards, follow the instructions given in the user guide supplied with the ergometer. Installation of the Heart rate option itself has to be done by service personnel only. -
Page 26: D Blood Pressure Option 928815
With option 928815 it is possible to perform stand alone or external controlled blood pressure measurements. After installation (Appendix D.3) the BP module is recognized automatically at start up of the ergometer, indicated by the following screen for a few seconds: LODE CORIVAL BPM Initialized Using the BP system Caution: Carefully read the instructions in Appendix D.2 Patient Hook-up and D.2.3 Notes on... -
Page 27: Patient Hook-Up
Operator Manual Corival Under DISP ▲ an extra menu is available especially useful during deflation. Besides the pressure, also the real time heart rate and Korotkoff tone are indicated. Each heart rate is shown with the symbol α and Korotkoff as Ԁ. When BP has finished the SYSTOLIC and DIASTOLIC values are shown in the upper line. - Page 28 Operator Manual Corival The cuff should be placed on the upper arm, so that it is positioned about 2 cm above the elbow close to the heart level (Fig. 24 Cuff position). Place the microphone on the position that you palpated. Fig.
-
Page 29: Installing The Bp Cuff
Cuff is loose or not connected. 0 / 0 mmHg Air hose or air-bubble leak. Air hose not connected. @SERVICE Fatal error ...Get in touch with the company Lode. value REQUIRED! @CHECK ECG/ Poor patient hook-up (irregular ECG-signal) or poor trigger signal. -
Page 30: Cleaning And Disinfection
Operator Manual Corival MOVEMENT! @CUFF INFLATION Maximum cuff pressure adjusted too low. Inflation pressure adjusted too low. Repeat value TOO LOW! measurement. None value Cleaning and disinfection Entry- and connection cables, like the air-hose from the cuff should not be sterilized in hot steam or cold gas or plunged in disinfectants. - Page 31 Operator Manual Corival The air-hose can easily be put back in the cuff, if beforehand both ends are rolled up to the hose entry. Fig. 34 Placing the air-hose Slip the microphone back in the bag (Fig. 35 Placing the microphone) and close the Velcro fastening.
Need help?
Do you have a question about the Corival V2 and is the answer not in the manual?
Questions and answers