Advertisement
Quick Links
M
M
oyer
oyer
For installation help, please watch the fresh water
cooling video, found in the video tech tips section,
under the support menu of our website.
Fresh Water Cooling Systems are now used on vir-
tually every marine engine currently being produced
for pleasure sail boats. In addition to the obvious ad-
vantage of preventing corrosion, enclosed cooling
systems allow engines to run at higher and more effi-
cient temperatures; and on boats with hot water
heaters they provide hotter water for domestic use.
Moyer Marine Fresh Water Cooling kits are available in
both a front or side mounted configuration. The front
mounted kit requires two inches of clearance in front
of the engine to accommodate a V-belt driven sea-
water pump which mounts above the starter.
Both front and side mounted kits include all necessary
mounting hardware except hoses and clamps. The
vertical heat exchanger is 16" tall and is designed to
be mounted remotely from the engine.
The exchanger can be located in virtually any loca-
tion on the boat, as long as the filler cap is the high-
est point in the cooling system.
Both front and side mounted kits include a Moyer Marine
501 pedestal pump to move seawater through the heat
exchanger.
M
M
arine
arine
inc.
inc.
This pump uses the same impeller as the MMI 502
flange pump and the Oberdorfer Model 202M series
pumps which are commonly used on seawater cooled
engines.
After installing the kit, the original seawater pump will
draw antifreeze from the antifreeze outlet of the
exchanger (rather than from the seawater thru-hull)
and pump it through the engine. After circulating
through the engine, the antifreeze returns to the anti-
freeze inlet of the exchanger to be cooled and re-cir-
culated (rather than exiting through the exhaust).
The new seawater (raw water) pump receives water
from the thru-hull and pumps it through the seawater
side of the exchanger. When it comes out of the ex-
changer, the seawater is routed to the exhaust system
as before to be discharged.
FRONT MOUNTED KIT INSTALLATION:
(For both kits, please reference illustrations, pages 4-7).
Mounting seawater pump to front mounted bracket
INSTALLING THE POWER TAKE-OFF (PTO) SHAFT:
1) Remove the flywheel cover.
2) Remove all flywheel retaining nuts.
3) Slip the PTO shaft over the flywheel studs. Like the
flywheel, the PTO will only go over the flywheel studs
one way. Make sure that the roll pin in the end of the
crank shaft is well centered so that it will not
interfere with the ID of the PTO shaft (photo 1).
1
Atomic - 4
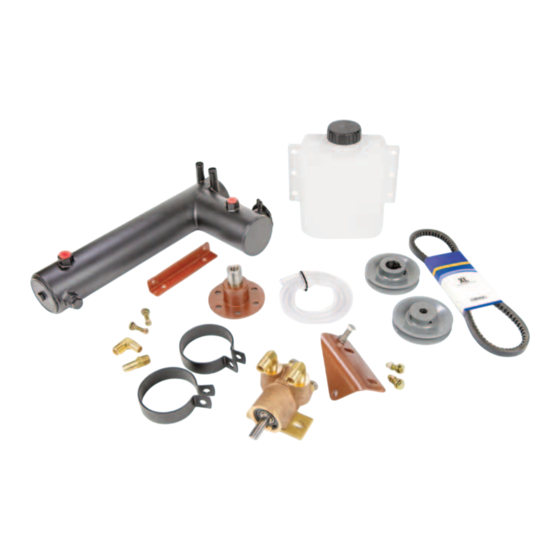
Fresh Water Cooling Kit
PARTS
Advertisement

Summary of Contents for Moyer Marine Atomic 4
- Page 1 1) Remove the flywheel cover. 2) Remove all flywheel retaining nuts. Both front and side mounted kits include a Moyer Marine 501 pedestal pump to move seawater through the heat 3) Slip the PTO shaft over the flywheel studs. Like the exchanger.
- Page 2 4) Install and retorque the flywheel nuts to 35 foot- pounds, and then reinstall the flywheel cover. Next install the 4" x 1" pulley over the PTO shaft. Be sure to install the key way in the pulley, and then tighten its' set screws.
-
Page 3: Installing The Heat Exchanger
INSTALLING THE HEAT EXCHANGER: INSTALLING FRESH WATER HOSES: Connect two new 1/2" fresh water hoses as follows: If the selected location of the exchanger is more than 4 feet (or so) from the engine, the size of connecting 1) From the inlet of the fresh water pump (the original hoses for the antifreeze loop should be increased engine mounted pump) to the hose barb on the anti- from 1/2"... -
Page 4: Troubleshooting
If the temperature lowers immediately, check the condition of both the thermostat housing and the thermostat and replace if necessary. For additional cooling troubleshooting and maintenance, please refer to the cooling section in your Moyer Marine Service and Overhaul Manual. - Page 5 Front mounted fresh water cooling kit (hoses sold separately by the foot) Mount seawater pump/bracket Tension belt after pulleys have been aligned, assembly using the upper starter bolt and pump bolts have been fully tightened (photo 2) (photo 3).
- Page 6 Side mounted fresh water cooling kit (hoses sold separately by the foot) Remove aft housing bolt directly to the Remove right angle from pump bracket by Disassembled pump bracket showing right right of water pump (photo 4). removing pivot bolt (photo 5). angle section and pivot bolt (photo 6).
- Page 7 With belt around all 3 pulleys, reassemble Pivot pump as needed to align pulleys, then Using pry bar, pivot alternator up and pump bracket using the pivot bolt, leaving tighten pivot bolt. If needed loosen pulley tighten alternator support arm bolt. Allow loose enough to pivot (photo 10).
- Page 8 © 2024 Moyer Marine Inc. All rights reserved.
Need help?
Do you have a question about the Atomic 4 and is the answer not in the manual?
Questions and answers