Table of Contents
Advertisement
Quick Links
Advertisement
Table of Contents

Summary of Contents for Sontex Superlink C
- Page 1 Superlink C Instructions for use...
-
Page 2: Table Of Contents
Operating principle and application 4.2. Box content 4.3. Description and component location 4.4. Put in commissioning mode 4.5. LED status 4.6. Dimensions 4.7. Technical data 4.7.1. Power supply and reading intervals 2 / 50 Instructions for use | Superlink C... - Page 3 NB-IoT, LTE-M antenna 5.6.2. Sontex radio antenna 5.6.3. wM-Bus / OMS antenna Maintenance 6.1. Battery change 6.2. Battery pack change 6.3. Backup battery change 6.4. Firmware update Troubleshooting 7.1. NB-IoT LEDs status Superlink C | Instructions for use 3 / 50...
- Page 4 PAGE INTENTIONALLY LEFT BLANK 4 / 50 Instructions for use | Superlink C...
-
Page 5: Identification
1.5. Legal Provisions The information contained in this document is the property of Sontex SA. Publication, in whole or in part, requires the written consent of Sontex SA. Any internal reproduction intended for evaluation of the product or its proper use is permitted and not subject to authorization. - Page 6 PAGE INTENTIONALLY LEFT BLANK 6 / 50 Instructions for use | Superlink C...
-
Page 7: General
This document was drawn up based on the information available at the time of publication. The original version was drawn up in English. The information contained in this document is the property of Sontex. It has been set out for internal use by the end customer, to the exclusion of any other usage. -
Page 8: Equipment Identification
Procedure to follow for any technical support request: Collect the required information for a technical assistance request. [Equipment identification } 8]. è Description of the device problem. è Please refer to the [Troubleshooting } 49]. If the problem persists contact your supplier. 8 / 50 Instructions for use | Superlink C... -
Page 9: Exchange And Return
European Commission has adopted a directive whereby electrical and electronic equipment is taken back by the manufacturer for proper disposal or recycling If you carry out the disposal, the Superlink C must be disposed of under the applicable local environmental regulations. Find out about recycling opportunities in your region This symbol indicates that electrical and electronic equipment must be disposed of separately. - Page 10 PAGE INTENTIONALLY LEFT BLANK 10 / 50 Instructions for use | Superlink C...
-
Page 11: Safety
3.1. Introduction The user must have read and understood all the instructions in the Instructions for use before carrying out any actions or operations on the Superlink C . Sontex accepts no liability if these instructions have not been observed. -
Page 12: Personnel Qualification
The manufacturer is not liable for damage resulting from improper use. Modifications and changes to the device must not be made. The Superlink C may only be operated within the conditions specified in the technical specification. Seals may not be removed except by authorized persons. Country-specific and local regulations as well as the manufacturer’s instructions must be observed. -
Page 13: General Icons
Directive or measure to be applied. Informative comment. Suggestion, advice or help in case of problems. Reference to other documentation. Superlink C | Instructions for use 13 / 50... -
Page 14: General Rules
For use in areas subject to approval: See the information on the nameplate. 3.3.3. Product Safety The Superlink C has been built and tested in accordance with good, state of the art engineering practice to ensure it’s safe operation; it left the factory in technically perfect condition. -
Page 15: Description
In addition, the Superlink C has a USB interface that allows it to be configured with the Superprog software if necessary. -
Page 16: Description And Component Location
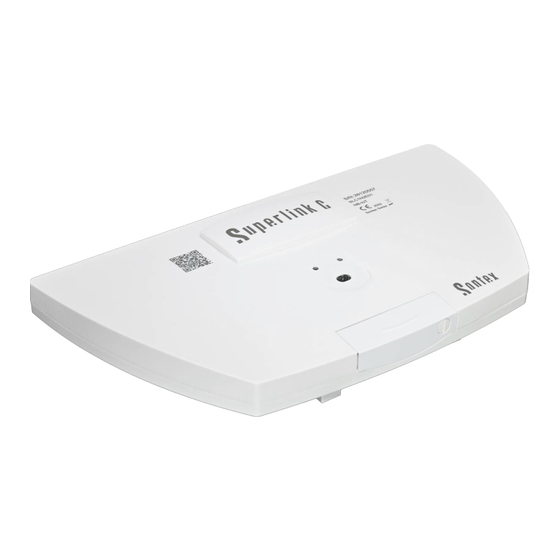
4.3. Description and component location External view Superlink C Orange status LED [} 19] Green status LED [} 19] Security seal [} 26] Lid [} 26] Battery pack (optional) [} 21] 16 / 50 Instructions for use | Superlink C... - Page 17 USB connector (mini A) [} 35] Sonexa Platform button wM-Bus / OMS antenna connector (commissioning button, connects with [} 42] Sonexa Platform) [} 18] Battery pack power connector [} 32] Radio Sontex antenna connector [} 41] Superlink C | Instructions for use 17 / 50...
-
Page 18: Put In Commissioning Mode
The orange status LED blinks three times. è Superlink C is connected to Sonexa Platform, checks the correct date and time, downloads è any pending tasks from the Sonexa Platform message queue, executes them and stays in commissioning mode. -
Page 19: Led Status
Sonexa Platform button) Connecting to Sonexa Platform (a three second Blinks three times press on the Sonexa Platform button) Green LED The green LED informs about Superlink C power supply. Power supply Battery or battery pack Blinks every 4 seconds 230 V... - Page 20 With battery pack 20 / 50 Instructions for use | Superlink C...
-
Page 21: Technical Data
+ Backup 3.6 V 1/2AA Lithium Battery pack 120 Ah 6x 3.6 V D-Format Lithium (Li-SOCI2) + Backup 3.6 V Format 1/2AA Lithium Power consumption ~5 kWh (230 VAC version) For 8 hours reading / week Superlink C | Instructions for use 21 / 50... -
Page 22: Power Supply And Reading Intervals
4.7.1. Power supply and reading intervals The Superlink C gateway is available in several variants to meet customer needs: Battery-powered variants: flexible and location-independent applications. 230 VAC powered variant: projects requiring a larger reading interval. It is particularly suitable for monitoring and alarms. -
Page 23: Radio Communication
791 – 821 Downlink 30 MHz Bandwidth Communication Bidirectional Receiver category 2, Bidirectional according to EN 300-220-1, -2 Protocol Radian 0 Wireless M-Bus HD-FDD according to EN 13757-4 Transmission On demand interval Power 10 mW (10 dBm) Superlink C | Instructions for use 23 / 50... - Page 24 PAGE INTENTIONALLY LEFT BLANK 24 / 50 Instructions for use | Superlink C...
-
Page 25: Mounting
5.1. Placing Superlink C As Superlink C has to communicate with other devices, his location is important. Although Superlink C has a range of 1 kilometer in free field, indoors, this range decreases and varies greatly depending on the type of construction. -
Page 26: Opening Superlink C
The circuit breaker of the power supply must be switch off before attempting any work on the Superlink C. Working in the Superlink C involves work on the mains voltage supply. This work must therefore be carried out by a specialist in accordance with the applicable national wiring regulations and electrical operating conditions. -
Page 27: Upper-Case Cover Removal
Open the lid and unscrew the screw The screw stays attached to the upper-case cover by a washer. è Lift slightly the upper-case cover Remove the upper-case cover from the housing Superlink C | Instructions for use 27 / 50... -
Page 28: Mounting
The circuit breaker of the power supply must be switch off and the electrical connection lead must be voltage-free during Superlink C mounting. Installing the Superlink C involves work on the mains voltage supply. This work must therefore be carried out by a specialist in accordance with the applicable national wiring regulations and electrical operating conditions. - Page 29 Pass the power cable through the hole Insert the plugs in the holes. Fix the battery pack using four screws Superlink C | Instructions for use 29 / 50...
- Page 30 Using the clamping screw , fix the ground , phase and neutral cables. Fix the power cable with the cable tie and its screws Power up the Superlink C. Press the Reset button 30 / 50 Instructions for use | Superlink C...
-
Page 31: Battery Model
5.3.2. Battery model Using the housing drilling template , drill four Ø 6 x 30 mm holes. Insert the plugs in the holes. Fix the battery pack using four screws Superlink C | Instructions for use 31 / 50... -
Page 32: Battery Pack Model
5.3.3. Battery pack model Using the battery pack drilling template , drill four Ø 6 x 30 mm holes. Insert the plugs in the holes. Fix the battery pack using four screws 32 / 50 Instructions for use | Superlink C... - Page 33 Pass the power cable through the hole Fix the housing on the battery pack using four screws Superlink C | Instructions for use 33 / 50...
-
Page 34: Before Closing
Put the plug in the connector Press the Reset button 5.4. Before closing 5.4.1. Antenna connectors Check that NB-IoT antenna is properly tighten. Check that all five antenna connectors are properly connected. 34 / 50 Instructions for use | Superlink C... -
Page 35: Sim Card
5.4.2. SIM card Superlink C can be delivered with or without SIM card. This has been specified in the purchase order. Insert, as shown, the SIM card in its slot Connect a computer to USB port (mini A) Use Superprog to configurate the NB-IoT communication. -
Page 36: Superlink C First Start-Up
5.4.3. Superlink C first start-up Superlink C is installed and connected with Sonexa Platform. ü All the devices are installed. ü Get connected to Sonexa Platform. Refer to Sonexa Platform documentation. Open constant communication with all the devices. See [Put in commissioning mode } 18]. - Page 37 Superlink C is connecting with all the installed devices. è When the test readout is finished, all device icons connected to the Superlink C are è displayed in green Click on to display the Gateway details. Click on DISCONNECT to close constant communication with the gateway.
-
Page 38: Closing Superlink C
5.5. Closing Superlink C Place the upper-case cover on the housing Close the upper-case cover Tighten the screw Close the lid Push the lid 38 / 50 Instructions for use | Superlink C... -
Page 39: Remote Antenna
Insert the security seal all the way in until it clicks into place. 5.6. Remote antenna All Superlink C antennas can be replaced by remote antennas. DANGER Electrical current Risk of electrocution Conductive part outside the housing is not allowed. - Page 40 Unscrew and remove the Superlink C NB-IoT antenna Pull the lever to open the passage hole. Pass the remote antenna cable through the passage hole Screw the remote antenna to the Superlink C connector 40 / 50 Instructions for use | Superlink C...
-
Page 41: Sontex Radio Antenna
ü See [Upper-case cover removal } 27]. If necessary, pull the lever to open the passage hole. Fix, by screwing the nut, the Sontex radio antenna connector into its housing Replace the radio antenna plug with the connector plug. Pass the remote antenna cable... -
Page 42: Wm-Bus / Oms Antenna
ü See [Upper-case cover removal } 27]. If necessary, pull the lever to open the passage hole. Fix, by screwing the nut, the Sontex radio antenna connector into its housing Replace the radio antenna plug with the connector plug. Pass the remote antenna cable... -
Page 43: Maintenance
Sonexa Platform or Superprog! Refer to Sonexa Platform documentation. In case of problems during firmware update using Sonexa Platform, connect a computer using the Superlink C USB port and use Superprog to resolve. Refer to Superprog documentation. 6.1. Battery change... -
Page 44: Battery Pack Change
Discharged backup battery Total loss of configuration 1. Plan to change the battery pack before the backup battery is completely discharged, otherwise you will have to reinstall the Superlink C completely. Sonexa Platform informs you when the battery pack must be changed. - Page 45 Remove the screws Remove the Superlink C from the battery pack Change the battery(ies) pack See [Battery pack model } 32] to remount. Superlink C | Instructions for use 45 / 50...
-
Page 46: Backup Battery Change
Total loss of configuration 1. Plan to change the backup battery while the battery or battery pack has still some charge, otherwise you will have to reinstall the Superlink C completely. Sontex recommends to change the backup battery maximum every ten years. -
Page 47: Firmware Update
6.4. Firmware update The firmware is done through Sonexa Platform. Refer to Sonexa Platform documentation. Refer to Superprog documentation. Superlink C | Instructions for use 47 / 50... - Page 48 PAGE INTENTIONALLY LEFT BLANK 48 / 50 Instructions for use | Superlink C...
-
Page 49: Troubleshooting
Not registered Fast blinking Data transmits Sonexa Platform connection status (green) Status Description Not connected On Connection established Stays lighted NB-IoT module status (red) Status Description Low power On Connection established Active Superlink C | Instructions for use 49 / 50... - Page 50 Sontex SA Rue de la gare 27 Tel. +41 32 488 30 00 CH-2605 Sonceboz sontex@sontex.ch www.sontex.ch...
Need help?
Do you have a question about the Superlink C and is the answer not in the manual?
Questions and answers