Table of Contents
Advertisement
Quick Links
Advertisement
Table of Contents

Summary of Contents for FAME Hybrid Pro XT
- Page 1 FAME Hybrid Pro XT Sound Module DRU0041467-000 02/2024 User‘s Manual...
- Page 2 Please note: These instructions are generally valid for the Fame Hybrid Pro XT module and describe the functions in their entirety. With the Fame Hybrid Pro XT E-Drum Set you may not be able to use all functions to their full extent, because pads from other manufacturers may have to be used.
- Page 3 Please note: These instructions are generally valid for the Fame Hybrid Pro Module and describe the functions in full. With the Fame Hybrid Pro e-drum set, you may not be able to use all functions to the full, because you may have to use pads from other manufacturers, for example.
- Page 4 english HINT! (Operating conditions) Due to its structural characteristics, the device is designed for indoor operation (IP20). Never expose the device to rain, moisture or liquids as this may cause damage. Vibrations, dust or solar radiation can also lead to damage, avoid them! Do not apply excessive force to the switches or controls.
- Page 5 english HINT! (Possible interference with other electrical devices) Radios and televisions placed nearby may experience reception interference. Operate this unit at a suitable distance from radios and televisions. If this equipment does cause harmful interference to radio or television reception, which can be determined by turning the equipment off and on, the user is encouraged to try to correct the interference by one or more of the following measures:...
-
Page 6: Table Of Contents
english Table of Contents 1. Main Features/Introduction________________p. 73 9. PROGRAMM Menu_____________________p. 107 2. Basic Know-How_________________________p. 76 9.1 PROG_____________________________p. 107 2.1 Operation____________________________p. 76 9.2 EQ_______________________________p. 108 2.2 Menu Structure_______________________p. 77 9.3 ACMP_____________________________p. 109 2.3 SD-Card_____________________________p.77 9.4 KFNC*____________________________p. 109 2.4 Drag&Drop (USB Mode)_______________ p. 77 10. -
Page 7: Main Features/Introduction
The FAME Hybrid Pro XT sound module provides you with 32 GB of sound memory with 100 memory locations, some of which are empty kits, i.e. user kits. With the FAME Hybrid Pro XT, all kits are already pre-configured at the factory and can still be changed and saved according to your own wishes. Of course, you can also rename and rearrange the kits, which makes them easier to access and handle on stage. - Page 8 The FAME Hybrid Pro XT's editor software allows you to manage your module from the comfort of your computer and even create your own sounds. Once the SD Card of the FAME Hybrid Pro XT is connected to your computer (Mac or PC) via card Reader. Now start the editor and access the SD card. Now you can organise and manage the internal kits.
- Page 9 Remote App for the Fame Hybrid Pro XT The Remote App is designed to facilitate the control of the module with basic parameters. The app allows seamless connection to the module via the USB interface. Mixer faders: The main page of the app presents you with the mixer faders. Here you can precisely adjust the volume for each channel.
-
Page 10: Basic Know-How
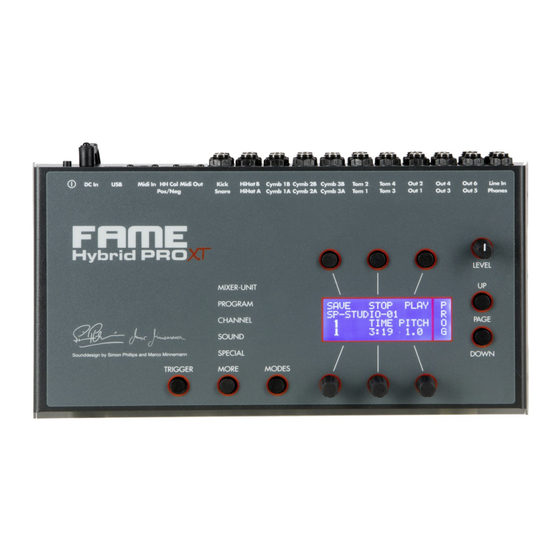
english 2. Basic Know-How 2.1 Operation The operation of the module is simple and is done intuitively via 5 menu items (MIXER- UNIT/PROGRAM/CHANNEL/SOUND/SPECIAL) with various sub-pages. These sub-pages can be selected in sequence by pressing the PAGE UP or PAGE DOWN buttons. There are no second levels and no hidden menu items. -
Page 11: Menu Structure
2.3 SD-Card The FAME Hybrid Pro XT has a pre-installed SD card (32 GB) that you can remove from the side slot if necessary. To do this, use a small, flat and blunt object to push the card in until the ejector spring is released. -
Page 12: File System
Regarding the display size of the FAME Hybrid Pro XT module, for the sake of clarity, it is recommended not to use long folder names and not to create too many levels. -
Page 13: User-Kit-Bank And User-Kit-File
Press and hold the data button 2 and then switch on the module to select between the operating systems on the module. Several operating systems can be stored on the Hybrid Pro XT at the same time, here you determine which OS will be run. -
Page 14: Channel Overview
2.7 Channel-Overview The table below provides basic information on how the FAME Hybrid PRO XT works: Drum- Trigger- MIDI-Note Zone Choke Channel Channel KICK KICK Fell (Head) - SNARE SNARE Fell (Head) - PERC 5 HIHAT HIHAT A2-A#2-B2 Fläche Rand (Edge) Fuß... - Page 15 (HH Control, Bell Control) belongs to input B. Trigger channel: The FAME Hybrid PRO XT offers connection options for up to 15 pads (drum channels). A total of 15 independent trigger channels are available, as five of the drum channels are designed as dual channels (SNARE, TOM 1 to TOM 4).
-
Page 16: Connection
LINE IN: Connect an external sound source here. You can use a stereo cable (e.g. as a feed from your smartphone) or a mono cable if you want to hear a live monitor signal via the Fame Hybrid Pro XT. If you connect a mono cable, the audio signal only sounds "in the middle"... - Page 17 It is possible to use five additional trigger channels (PERC 1 to 5) and thus increase the number of pads connected to the Hybrid Pro XT from 10 to a total of 15 pads. To use the additional trigger channels, connect two pads at a time to the SNARE or TOM channels using a Y-split cable (1 x stereo jack to 2 x mono jack).
-
Page 18: Control Elements
english 4. Control Elements Modes button With Mode you scroll through the different modes, the selected mode is indicated by LED. TRIGGER button Press the TRIG button to hear the sound of the selected channel. The five additional trigger channels PERC 1 to 5 are selected by pressing and holding the MORE button while pressing the TRIGGER button. - Page 19 Display Up to 6 parameters can be shown in the display of the Fame Hybrid Pro XT. As a rule, these are three below the DATA buttons and three above the DATA knobs. The name of the parameter is in the upper row (see example: SOUND, LAYER, VOICE, ATTACK, HOLD, DECAY) and the value to be edited is below (see example: ATTACK = .003).
-
Page 20: Hihat Setup & Calibration
5.HiHat Setup & Calibration Please note: If you use the Fame Hybrid Pro XT Pad Set with the supplied hi-hat, it is already calibrated. These instructions apply to non-branded hi-hat pads and fine adjustments. The hihat is the most complex instrument in the drum set-up. The Fame Hybrid Pro XT offers you the greatest possible flexibility to be able to use as many hi-hat pads and controllers from different manufacturers as possible. - Page 21 english Now open the hihat pad or take your foot off the pedal. Press the left DATA button a third time to complete the calibration. The display shows "done". This means you have successfully completed the calibration. If, on the other hand, "NoChg" appears, the calibration did not work or you have calibrated the Hihat in exactly the same way a second time.
-
Page 22: Menu Structure
Feel free to invest a little time in these settings. You will be thrilled how natural the playing behaviour of the Fame Hybrid Pro XT module will be afterwards. HCAL*: Make the settings for your hi-hat here and calibrate the pad. You will find a detailed explanation in this manual. - Page 23 english Programm Menu PROG: On the programme start page, you select the desired kit and can start the internal metronome or the song player. EQ: A 3-band EQ is available for each kit. This can be used for all instruments or only one channel.
-
Page 24: Save
english 7. Save All changes you make to the module can be easily saved. Important: First, please activate the save function once in the MIXER-UNIT-PREF menu. Switch the function to "on" by pressing the left DATA button. Saving a kit If you have made changes to a programme page and want to keep them permanently, you must save the changed kit. - Page 25 english Use the right-hand dial to determine the cursor position - recognisable by the flashing underscore in the display. If you press the right-hand dial, the character above the cursor is deleted. If you hold down the MORE button and turn the rotary control to the right, all characters above the cursor will be moved. However, if you turn the knob to the left, you will delete all characters up to the cursor.
- Page 26 english UNDO/REDO If you press the MORE button before you have saved, an UNDO function is available instead of the SAVE function. If you confirm the selection, the changes made are reset but remain temporarily saved. If you now press the MORE button again, you will get a REDO command to choose from. Now you can restore the previously discarded changes.
-
Page 27: Mixer-Unit Menu
Save changes in the MIXER-UNIT menu on the MIXER-UNIT start page (see SAVE below). 8.1 MIX The Fame Hybrid Pro XT contains a mixer that allows you to adjust the volume of the individual drum channels. Eight FADER groups are available for this purpose, the volume of which you can control individually. -
Page 28: Trig
The parameters on this page are especially important if you want to connect pads from other manufacturers or acoustic triggers to the Fame Hybrid Pro XT module. TYPE: Here you set which trigger type you have connected to the respective drum channel. The... - Page 29 english Please note that not all types are available for every trigger channel. In the table below you can see which useful options exist in each case: Zones - configuration Type Brands (examples) Information Head/ Rim/ Cross-stick/ Choke Edge Bell PadPP 2box, Roland Piezo...
- Page 30 english XTALK: You can use this function to avoid unwanted trigger impulses, i.e. cross-talk from other pads. For example, if a hard cymbal hit triggers a tom sound, you can suppress the latter. To do this, select the channel that sounds unintentionally (in our case: tom) and change the XTALK value. The following parameter values are available: Off (function off), Low (low suppression), Med (medium suppression), High (maximum suppression).
-
Page 31: Hcal
english Max2: A fixed signal strength of 0 dB is generated regardless of the velocity. Max1: Like Max 2; but with a fixed signal strength of -6 dB. Pos2: The signal strength increases faster in relation to the velocity. At high velocities, however, the signal strength increase is smaller, i.e. -
Page 32: Hset
english LEVEL: Here you can read the signal strength of zone 9 (stepped hi-hat) (the DATA button has no function). HTYP: Here you can determine which hihat or hihat controller you have connected. DEF: All common hihat pads and controllers. ... -
Page 33: Spec
english 8.5 SPEC* On this page you can refine the trigger settings (MIXER-UNIT-TRIG). GAINR: With GAINR (Gain Reduction) you can reduce the input sensitivity of the selected channel. This function is helpful if the connected pad outputs a signal that is too strong. Together with the GAIN parameter on the TRIG page, you can optimally adjust the input sensitivity. -
Page 34: Intf
english 8.6 INTF* On this page you can make the global routing and MIDI settings for each individual trigger channel. Here you determine which BUS the respective signals should be routed to and which settings you can use to control the individual channels via MIDI. ZONES: Here you can see how many (sound) zones are assigned to the trigger channel. -
Page 35: Out
● = fix ○ = optional 8.7 OUT When it comes to signal routing, the Hybrid Pro XT module offers you a number of options. In the chapter signal flow and routing options some connection scenarios are listed, which clearly explain which paths are available to you. - Page 36 english M OUT: In the M-OUT menu item, which can be found in the middle of the top row (not shown), you can specify which of the four direct outputs the click, i.e. the metronome, is routed to. By pressing the MORE switch in combination with the middle data button you can set the following options: •...
- Page 37 english The following signal groups are available: : Drum-Channels: (Kick, Snare, Toms, Cymbals, HiHat, Perc) : Line In-Signal : Song-Signal : Metronom Select a group by turning the DATA control and deactivate or activate the respective signal for the SUB mix by pressing the control while holding down the MORE button.
-
Page 38: Metr
On this page you can change the global MIDI settings. PRCHG: You can choose between On and Off. If you have chosen "On", the Fame Hybrid Pro XT sound module can send as well as receive MIDI programme change commands. This is useful, for example, to change kits from a MIDI keyboard or vice versa to control an external MIDI device from the Fame Hybrid Pro XT sound module. -
Page 39: Pref
In Off mode, changes made cannot be saved. The SAVE-Off mode is particularly suitable if several drummers play on your Fame Hybrid Pro XT at a festival and you want to prevent your drum kits or configuration from being changed and then possibly saved. -
Page 40: Mem
FREE: Percentage of flash memory that is still free and available for further sound files. If you often copy additional sounds to your Fame Hybrid Pro XT, it may happen that there is not enough memory left. In this case, you should clean up your module to make room for new sounds. Make a back- up of the entire content of your module and then, in a second step, delete those sounds from the module that you do not like. -
Page 41: Programm Menu
english 9. PROGRAMM Menu In the PROGRAMME menu area, you can edit the internal programme memory locations. You have 100 factory-preprogrammed kits (memory locations) at your disposal. Each kit is freely editable and can be stored anew. In the PROGRAM menu, you define the sounds and sound settings for each individual kit, adjust the metronome or playback functions and set the internal equalizer. - Page 42 english If you press the knob again while holding the MORE button, you can change the tempo again in whole bpm steps. The tempo of the metronome is saved in the selected kit. If you want to change the tempo and save it, you have to save the kit (SAVE).
-
Page 43: Acmp
english 9.3 ACMP Display: TYPE Metronom Display: TYPE Song An internal player is available for live and studio applications as well as for jamming and practising. Adjustments you make here are saved in the respective kit, just like sound and EQ settings. There are two different types of player: TYPE: Choose between Song-Player and Metronom... -
Page 44: Sound Menu
english "metronome" and the right channel continues to be treated as "song". For situation 2, it is the other way around. Split-Wave-Mode: Situation 1 Split-Wave-Mode: Situation 2 Split wave mode in practice: You need the split wave mode, for example, if you want to play live to a playback or backing track. -
Page 45: Channel Menu
english 10. CHANNEL Menu This page shows you which trigger channel is currently selected and can therefore be edited. You can make the selection in two different ways. Either you hit the corresponding pad or you turn the DATA knob until the desired trigger channel or instrument is shown on the display. -
Page 46: Special Menu
english VOL: Use the knob to adjust the volume of the sound or trigger channel. If you change the value, this automatically affects the VOL value on the SPECIAL-VOL page, which is identical to this. Please note that the volume of the channel set here influences both the volume within the mixer and the volume in the selected BUS. - Page 47 Your own sounds With the FAME Editor, you can create individual sound files from your own samples. With regard to the parameter settings on this page, please note that for your own sounds with few layer levels (1-10 layers), the LAYER setting "FIX"...
-
Page 48: Cfnc
To do this, set the HOLD value to the desired time length and the DECAY time value to very short. Loops: The Fame Hybrid Pro XT can play loops in different playback modes. The loops can be assigned to any drum channel like a normal Fame sound and can thus be started and stopped via pad. You can also create your own loops. -
Page 49: Vol
english 12.3 VOL* EQ: With this function, you can determine whether the signal of the selected drum channel is sent through the EQ (EQ+) or not (EQ-). This function is only available if the value "Drum" is set at BUS on the EQ page. -
Page 50: Signal Flow & Routing Options
english You can also specify where in the stereo sound image the echo signal should sound. To do this, press the left rotary control and choose between the following options: • .80 C = signal in the middle • .80 L = Signal left only •... - Page 51 13. Signal flow and routing options In diesem Kapitel zeigen wir Ihnen, wie der Signalfluss innerhalb des Moduls aufgebaut ist und geben Ihnen anhand von ein paar Beispielen Anregungen für den Einsatz von Hybrid Pro XT in der Praxis.
- Page 52 Using the examples on the following pages, you can see what possibilities the routing functions of the Fame Hybrid Pro XT give you. Of course, these are just a few constellations and not an exhaustive list of all the options available to you for your personal application situation Please note that the following explanations do not show an example for every drum channel - only the crucial pages are shown, comments on the respective pages are noted below.
- Page 53 To do this, the output sockets OUT1•2 of the Fame Hybrid Pro XT are connected to an external mixer and at the same time the monitor output of this mixer (Aux) is connected to the line-in socket of the Hybrid Pro XT module.
- Page 54 english Routed To The outputs OUT1•2 are the Busses 1+2 The kick drum is assigned to Bus 1 Snare is routed on Bus 2 HiHat is routed on Bus 3 Cymbals are also routed on Bus 3 Toms are routed on Bus 4...
- Page 55 Situation 4 – Recording: All instruments individually You connect the Hybrid Pro XT to an external mixing console and want to provide the sound engineer with as many individual channels as possible. To do this, you convert the headphone jack into the individual outputs 7+8 using a Y-split cable (1x stereo jack to 2x mono jack).
- Page 56 english Perc: Choose only Bus 8 HiHat: Choose only Bus 7 Assigned to OUT1·2 ist the gruop BUS 1+2. The headphone jack (“PHONS”) is assigned to the group BUS 7+8. The setting under SUB no longer plays a role in this constellation, as the SUB signal is not present at any output socket.
- Page 57 english Kick on Bus 3 Snare on Bus 4 HiHat only on Bus 5 Toms only on Bus 6 Cymbals (Cymbs) stereo on Bus 7+8 On the OUT page, the SUB mix is assigned to the output jacks OUT1•2, and the group BUS 7+8 is assigned to the headphone jack.
- Page 58 english Situation 6 – Live 3: Variation of Situation 5 There is another, slightly more sophisticated way to use the PERC group for loops, for example, without having to output the cymbals in mono. In this application situation, the song signal and the PERC group share the OUT1•2 sockets.
-
Page 59: Technical Data
english 14. Technical Data Inputs and Outputs: 10 x Trigger-Input (6,3 mm Stereo jack) 4 x Control-Input for HiHat and Cymbals (6,3 mm Stereo-Jack) 1 x Line In stereo (6,3 mm Stereo-Jack) 6 x Line Out mono (6,3 mm Stereo-Jack) 1 x Headphones (6,3 mm Stereo-Jack) 1 x USB 1 x MIDI IN... -
Page 60: Update
Thanks to Fame's open sound system, the module can be updated easily and conveniently using drag and drop. This means you can always keep your Fame Hybrid Pro XT up to date and benefit from new functions and technical enhancements with operating system updates. -
Page 61: Faqs
How can I assign individual drum channels to the direct outputs? The Hybrid Pro XT provides you with many routing options. Read in Chapter 13 which settings you need to make in order to be able to assign individual channels directly to the output sockets. -
Page 62: Contact & Support
In the meantime, numerous add-on packages with additional sounds and samples have been released, which are already included in the Fame Hybrid Pro XT from the factory. These are authentic and modern cymbal and drum sounds, commissioned by us in a professional recording studio. Renowned microphones, preamps, and converters were used to ensure a high-quality sound experience. - Page 63 Your creativity knows no bounds. Included in the delivery of the Hybrid Pro XT are exclusive new sounds originating from an elaborate sampling session of a Yamaha Recording Custom Drum at the Scheren-Museum in Solingen. The exceptional acoustics of the room were captured by using, in addition to the overhead microphones and a mono microphone in front of the drum set, two additional pairs of stereo microphones.
-
Page 64: Mounting A Tablet
english 19. Mounting a Tablet... -
Page 65: Cleaning
english 20. Cleaning Regular cleaning of the device to remove dirt and dust increases the durability of the product. Always disconnect the device from the power supply before cleaning it! Never clean the device wet! Optical lenses should be cleaned using a dry microfiber cloth to optimize light output. Ventilation grilles and openings should always be cleaned of dust and dirt. - Page 66 MS ID: DRU0041467-000...
Need help?
Do you have a question about the Hybrid Pro XT and is the answer not in the manual?
Questions and answers
vorrei scaricarmi il sofware per Pc ,ma ho visto che cè solo per mac , mi potete far sapere quando sarà disponibile..Grazie. Giulio.