Advertisement
Quick Links
SHELVING SYSTEM ASSEMBLY INSTRUCTIONS
RACK
PALMER
C U S T O M A R C H I T E C T U R A L M E T A L W O R K
© 2019 Palmer Industries, Inc.
CANTILEVER
S
H
E
L V
I
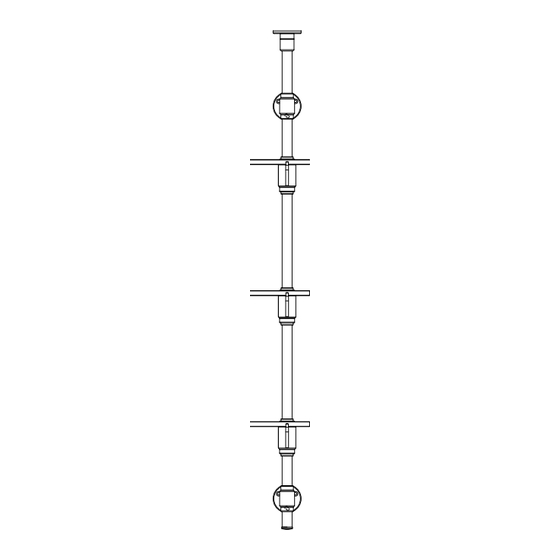
MOUNTING TO CEILING & WALL
INDUSTRIES
PalmerIndustries.com
N
G
#12 WOOD SCREW
#12 WOOD SCREW
WALL FLANGE
10-32 X 3/16"
POINTED
SET SCREW
1/4"-20 X 1/4"
SET SCREW
HEX
WRENCH
RUBBER BUMPERS ARE
APPLIED TO UNDERSIDE
OF GLASS SHELF
AT ARM LOCATIONS
IN-WALL
BLOCKING
REQUIRED
10-32 X 1/8"
FLAT
SET SCREW
401- 421-1730
PALMER
INDUSTRIES
SHELVING
S Y S T E M S
IN-CEILING
BLOCKING
REQUIRED
CEILING FLANGE
IS LOAD BEARING
DO NOT DISASSEMBLE
TEE
SUPPORT POST
TEE
FINIAL
MAY NOT BE SAME
STYLE AS SHOWN
CONTACT PALMER WITH
ANY INSTALLATION QUESTIONS
401- 421-1730
OVER
ARM
SHELF
Advertisement

Related Manuals for Palmer Industries RACK

Summary of Contents for Palmer Industries RACK
- Page 1 ANY INSTALLATION QUESTIONS C U S T O M A R C H I T E C T U R A L M E T A L W O R K 401- 421-1730 OVER PalmerIndustries.com 401- 421-1730 © 2019 Palmer Industries, Inc.
- Page 2 SECURED TO THE WALL FLANGES USING THE PROVIDED 3/16” POINTED SET SCREWS. SECURE THE CEILING FLANGES TO THE CEILING WITH THREE #12 WOOD SCREWS EACH. WHEN ALL COMPONENTS ARE PROPERLY ALIGNED, TIGHTEN SET SCREWS SECURELY. POSITION ARMS AND TIGHTEN 1/4”-20 SET SCREWS. PalmerIndustries.com 401- 421-1730 © 2019 Palmer Industries, Inc.
Need help?
Do you have a question about the RACK and is the answer not in the manual?
Questions and answers