Advertisement
Available languages
Available languages
Quick Links
Advertisement

Related Manuals for Heiko YR-C01A

Summary of Contents for Heiko YR-C01A
- Page 2 Instrukcja obsługi Pilot przewodowy YR-C01A Zawartość Części i funkcje..............1 Sterowanie................. 6 Instrukcja oprzewodowania sterownika......32 Wersja: A • Przed użyciem sterownika przewodowego należy przeczytać tę instrukcję obsługi. • Proszę zachować tę instrukcję.
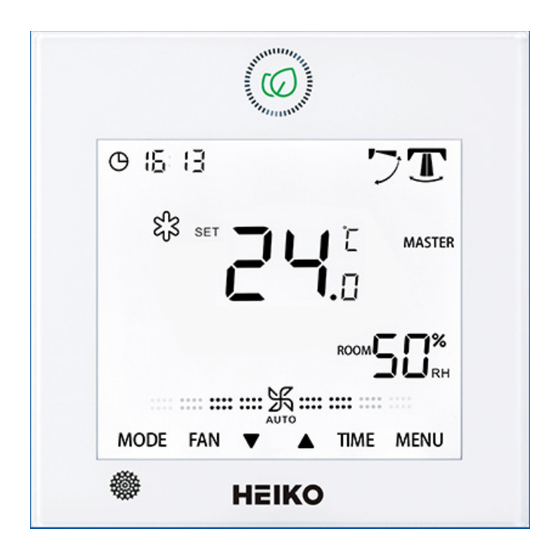
- Page 3 Części i funkcje Wyświetlacz interfejsu...
- Page 4 Części i funkcje Przyciski Włącz/wyłącz urządzenie On/Off . Przełączanie urządzenia pomiędzy trybami. Przełączanie trybów pracy wentylatora. Przyciski góra/dół służą do dostosowania temperatury w ekranie głównym oraz innych parametrów w pozostałych ekranach. Przycisk służy również do przełączania pomiędzy funkcjami Przycisk TIME służy do ustawienia czasu/ wywołania parametru błędu.
- Page 5 Części i funkcje Wyświetlacz wilgotności Symbol błędu Nadmuch 4-kierunkowy Nawiew góra/dół(dostępne tylko w trybie SWING) Kołysanie lewo/prawo(Dostępne w niektórych modelach) Opcje Tryb Auto Tryb chłodzenia Tryb grzania Tryb wentylatora Tryb osuszania Ikona TURBO wyświetli się tylko gdy funkcja będzie włączona. Ikona QUIET wyświetli się...
- Page 6 Części i funkcje Ikona sleeping jest wyświetlana, gdy ustawiony jest tryb snu, a pozostały czas snu ukazany jest za pomocą: Symbol HEALTH wyświetli się tylko gdy będzie włączona ta funkcja. Ikona HRV ( wentylacja z odzyskiem ciepła) zostanie wyświetlona tylko gdy będzie włączona. Tryb ECO zostanie wyświetlony po kliknięciu w ikonkę.
- Page 7 Części i funkcje (1) Prędkość wentylatora (dostępne w niektórych modelach) Lekki nadmuch Niska prędkość Średnia prędkość Wysoka prędkość Bardzo wysoka prędkość Automatyczna prędkość (2) Prędkość wentylatora (dostępna w niektórych wersjach) 1 bieg 2 bieg 3 bieg 4 bieg 5 bieg 6 bieg 7 bieg Auto...
- Page 8 Sterowanie Opis podstawowych funkcji Podstawowe funkcje Metoda sterowania Wciśnij przycisk by włączyć/wyłączyć ON/OFF kontroler. W stanie podświetlenia naciśnij Kontrola trybu klawisz MODE, aby zmienić tryb. W stanie podświetlania wciśnij przycisk Regulacja temperatury by regulować temperaturę. Regulacja prędkości W stanie podświetlenia wciśnij wentylatora przycisk FAN by regulować...
- Page 9 Sterowanie Konfiguracja wstępna (1) Sterownik przewodowy wyświetli wszystkie ikony po podłączeniu do sieci lub restarcie-będzie w trybie inicjalizacji. Sterownik wyświetli następującą sekwencję: (w górnym lewym rogu) → → (w dolnym prawym rogu) → (w górnym lewym rogu), zielony symbol LED (ikona ON/OFF) miga aż do zakończenia inicjalizacji. (2) Jeżeli sterownik nie może połączyć...
- Page 10 Sterowanie Uwaga: Podczas sterowania urządzeniem Fresh Air, główny ekran interfejsu nie wyświetli w stanie normalnym . Aby ustawić czas podświetlenia, wciśnij klawisz MENU by wyświetlić przyciski oraz . Następnie wciśnij i przytrzymaj TIME i przez 5 sekund, by ustawić czas podświetlenia. Zegar (1) Kontroler używa zegara 24-godzinnego. ...
- Page 11 Sterowanie Timer (1) Funkcja timera zawiera Timer wł., Timer wył. oraz Timer wł/wył. (2) Wciśnij przycisk TIME aby wejść do ustawień timera, następnie użyj TIME by przełączać między parametrami, obieg funkcji timera jest następujący: (ON oraz pozycja godzin migają) → (ON o raz pozycja minut migają) → (OFF ...
- Page 12 Sterowanie (3) Gdy miga pozycja minut lub godzin, wciśnij przycisk lub aby ustawić wartość parametru, oraz przytrzymaj przyciski aby przyśpieszyć ustawianie. Wciśnij przycisk MENU by potwierdzić ustawienie. (4) Funkcja TIMER'a zostanie anulowana po kilkukrotnym wciśnięciu TIME aż do zniknięcia ikon TIMER'a. Obieg funkcji Wciśnij przycisk MENU ( w przypadku kaset 4-stronnych lub o przepływie obwodowym trzymaj MENU 5 sekud) aby...
- Page 13 Sterowanie (Ustawienie wilgotności) → (SWING góra dół ) → (SWING lewo-prawo )→ (Funkcja Turbo) → (Tryb cichy j. wew) → (Tryb cichy j.zewn.) → (Tryb snu) → (Ciśnienie (Tryb Health)→ (HRV) → (Oszczędzanie energii)→ statyczne) → (Czyszczenie filtra) → (Tryb podążania strumienia pow.) ...
- Page 14 Sterowanie Wachlowanie żaluzji - Swing (1) Wciśnij przycisk MENU by wejść do wyboru funkcji, użyj lub by przełączać między funkcjami. Przełącz na kołysanie góra/dół lub lewo/prawo, następnie naciśnij ponownie klawisz MENU, aby wejść do ustawienia kąta kołysania ( dostępne w wybranych modelach), wówczas możesz użyć do regulacji wychylenia.
- Page 15 Sterowanie Przepływ powietrza HEALTH - góra/dół ( dostępne w wybranych modelach) (1) Wciskając MENU, zostaniesz przeniesiony do wyboru funkcji,użyj aby Przełączać pomiędzy funkcjami. Przełącz na (górny przepływ Health) lub ( dolny przepływ Health), następnie wciśnij MENU by wybrać funkcję. Gdy funkcja jest wybrana poprawnie, wyświetli się...
- Page 16 Sterowanie Tryb SLEEP (1) Wciśnij przycisk menu by wejść do wyboru funkcji, użyj lub aby przełączać pomiędzy funkcjami. Przejdź do funkcji który jest wyświetli się czas w postaci w górnym lewym rogu. Wciśnij przycisk TIME by przejść do czasu snu, użyj aby jednorazowo skorygować...
- Page 17 Sterowanie (2) Po włączeniu funkcji HRV, aby ją wyłączyć, należy wejść do wyboru funkcji i przełączyć do ikony następnie przycisk MENU, po czym funkcja zostanie wyłączona. Przełączanie pomiędzy stopniami ℃ a ℉ (1) Jeśli bieżąca temperatura jest wyświetlana w °C , ustaw temperaturę...
- Page 18 Sterowanie Oszczędzanie energii (1) Wciśnij przycisk MENU, aby przejść do wyboru funkcji, użyj, aby przełączyć pomiędzy funkcjami. Wciśnij klawisz następnie ponownie MENU, wówczas funkcja oszczędzania energii zostanie włączona. Gdy funkcja będzie włączona, ikona wyświetli się w głównym interfejsie. Gdy funkcja oszczędzania zostanie włączona, wciśnij MENU aby przejść do wyboru funkcji, po czym wciśnij ,następnie wciśnij przycisk MENU aby wyjść...
- Page 19 Sterowanie ② W trybie grzania ustaw temperaturę na 16°C, p rzytrzymaj przycisk FAN przez 5 sekund, aby przejść do parametrów oszczędzania energii w trybie grzania, parametr będzie wyświetlony w lewym górnym rogu. Użyj lub aby ustawić parametr, zakres regulacji parametru wynosi od 16 do 30. Po ustawieniu wciśnij MENU by potwierdzić...
- Page 20 Sterowanie (4) W trakcie funkcji grzania 10°C, j eżeli zostanie zmieniony tryb lub zostanie dostosowany poziom temperatury, funkcja zostanie wyłączona. Nawiew czterostronny (dostępny w wybranych modelach) (1) Dla kaset obwodowych/4-stronnych, ikona oraz będzie wyświetlana w interfejsie głównym. (2) Wciśnij przycisk MENU aby pojawił się widok wyboru żaluzji ( wciskając MENU, ...
- Page 21 Sterowanie Wykrywanie ruchu (dostępne w wybranych modelach) (1) Funkcja wykrywania ruchu zawiera oraz (Podążanie): Strumień powietrza podąża za ludźmi. (Omijanie): Strumień powietrza omija ludzi. ( Wykrywanie): Jednostka wyłączy się w przypadku nie wykrycia ruchu przez 30 minut(czas zależy od jednostki wewnętrznej lub ustawień...
- Page 22 Sterowanie Ustawienie trybu ( dostępne w wybranych modelach) (1) Gdy sterownik jest wyłączony, a podświetlenie włączone, przytrzymaj MODE przez 5 sekund, aby wejść do interfejsu ustawień trybu. Parametr wyświetla się w górnym lewym rogu, użyj przycisków lub ,aby przełączać między 00/01/02/03/04/06/07. Po ustawieniu, należy wcisnąć MENU, aby potwierdzić...
- Page 23 Sterowanie Wyświetlanie usterek (1) W przypadku usterki na głównym interfejsie pojawi się ikona (2) Przy włączonym podświetleniu, przytrzymaj TIME przez 10 sekund aby wejść do interfejsu usterek. Kod usterki wyświetli się w lewym górnym rogu, lewa strona dwukropka to aktualna usterka, natomiast prawa strona to ewentualna zapisana wcześniej usterka.
- Page 24 Sterowanie Podgląd parametru (1) Przytrzymaj MENU przez 5 sekund (w przypadku kaset 4- drożnych oraz o obwodowym przepływie 10 sekund) aby wejść do interfesju podglądu parametru. Wartość parametru będzie widoczna w lewym górnym rogu, w środkowym obszarze wyświetlany jest typ parametru ...
- Page 25 Sterowanie (2) W przypadku migania adresu komunikacji, można to zmienić klawiszami , lub , a zakres regulacji wynosi is 0~3F. Po ustawieniu wciśnij MENU aby zatwierdzić zmiany. Jeśli adres komunikacji jest wyświetlany statycznie, nie można go zmienić. Blokada sterownika przewodowego (1) Wciśnij ...
- Page 26 Sterowanie (2) Sterownik podrzędny nie oferuje funkcji ciśnienia statycznego. SELF CLEAN (CL) UWAGA: Dotyczy tylko urządzeń z tą funkcją. (1) Wciśnij MENU, aby wejść do wyboru funkcji, użyj przycisków lub do przełączania między różnymi funkcjami. W momencie przełączenia do funkcji "CL", skrót ten pojawi się w obszarze temperatury. ...
- Page 27 Sterowanie Tryb QUIET (1) Wciśnij przycisk MENU, aby wejść do wyboru funkcji, użyj aby przełączać pomiędzy funkcjami. Po wejściu do funkcji trybu quiet jednostki zewnętrznej, wyświetli się się kod “OUt”oraz zacznie migać ikona .Parametr czasu włączenia / wyłączenia funkcji jest wyświetlany w lewym górnym rogu. Użyj przycisku TIME by przełączać...
- Page 28 Sterowanie Osuszanie (1) Przytrzymaj MENU o raz przez 5 sekund by wejść w ustawienia zaawansowane. Numer jednostki jest wyświetlany w prawym dolnym rogu. Parametr jest wyświetlany w lewym górnym rogu środkowego obszaru wyświetlania funkcji. Wciśnij przełączyć na kod A38, wciśnij MENU aby potwierdzić ustawienie parametru, użyj , aby ustawić...
- Page 29 Sterowanie Funkcja podświetlenia wyświetlacza (dotyczy tylko wybranych modeli) (1) Aby włączyć podświetlenie przytrzymaj przycisk FAN przez 3 sekundy, w środkowym obszarze na chwilę pojawi się „PP”, co oznacza, że funkcja jest ustawiona. (2) Gdy funkcja jest włączona, przytrzymaj FAN przez 3 sekundy aby wyłączyć podświetlenie, w środkowym obszarze na krótko wyświetla się...
- Page 30 Sterowanie Kompensacja temperatury (1) Funkcja ta służy do kompensacji temperatury otoczenia. W stanie wyłączonym, przy włączonym podświetleniu, naciśnij i przytrzymaj przycisk FAN przez 5 sekund, aby wejść do interfejsu kompensacji temperatury. Ustaw parametry przyciskami Zatwierdź ustawione parametry wciskając MENU. (2) W przypadku jednostki Celsjusza, zakres regulacji parametru wynosi -4 ~ 4.
- Page 31 Sterowanie (3) Wszystkie klawisze są nieaktywne, z wyjątkiem klawisza WŁ. / WYŁ. w trybie wymuszonego chłodzenia / ogrzewania. (4) Gdy jest ustawione wymuszone chłodzenie / ogrzewanie, naciśnij przycisk ON / OFF, aby wyjść z tej funkcji. Różnice między funkcjami sterownika Master (nadrzędnego) i Slave (podrzędnego) Główny Porównanie...
- Page 32 Sterowanie Przełącznik DIP Stan Przełącznik Ustaw. wł./ Funkcja domyślne DIP 2 wył. Sterownik przewodowy SLAVE WŁ WYŁ Sterownik przewodowy MASTER WYŁ WŁ Wyświetl temp. otoczenia WYŁ Nie wyświetlaj temp. otoczenia WYŁ Odczytuj temperaturę otoczenia WŁ z PCB jednostki wewnętrznej WYŁ Odczytuj temperaturę...
- Page 33 Sterowanie Stan Przełącznik Ustaw. wł./ Funkcja DIP1 domyślne wył. Zarezerwowane WŁ WYŁ Zarezerwowane WYŁ Nie wyświetlaj temperatury otoczenia WŁ WYŁ Wyświetlaj temperaturę otoczenia WYŁ Zarezerwowane WŁ WYŁ Zarezerwowane WYŁ Zarezerwowane WŁ WYŁ Zarezerwowane WYŁ...
- Page 34 Instrukcja oprzewodowania sterownika Połączenia sterownika przewodowego J.wew. 1 J.wew. 2 J.wew. N J.wew. 15 J.wew. 16 (jednostka Kontroler przewod. Kontroler przewod. główna) Kontroler przewod. Kontroler przewod. Kontroler przewod. Biegunowe połączenie sterującego kontrolera przewodowego Kontroler.przewod. J.wew. 1 J.wew. 1 Sterownik przewod. Sterownik przewod.
- Page 35 Instrukcja oprzewodowania sterownika Istnieją cztery metody podłączenia sterownika przewodowego do jednostek wewnętrznych 1. Sterowanie grupowe pokazane na rysunku A i D: Jeden sterownik przewodowy może sterować maksymalnie 16 jednostkami wewnętrznymi. Do podłączenia sterownika przewodowego i jednostki głównej (jednostka wewnętrzna jest połączona bezpośrednio ze sterownikiem przewodowym) należy użyć...
- Page 36 Instrukcja oprzewodowania sterownika Okablowanie komunikacyjne Długość przewodu komunikacyjnego (m/ft) Wymiary przewodu 0.3mm x3-żyłowy przewód < 100m/328ft ekranowany (22AWG,3żył.) 0.5mm x3-żyłowy przewód ≥100m/328ft and <200m/656ft ekranowany (20AWG,3żył.) 0.75mm x3-żyłowy przewód ≥200m/656ft and <300m/984ft ekranowany (18AWG,3żył.) UWAGA: • Jedna strona ekranu przewodu komunikacyjnego musi być uziemiona.
- Page 37 Instrukcja oprzewodowania sterownika Instalacja sterownika 1. Najpierw przeprowadź przewód komunikacyjny przez otwór w tylnej pokrywie. Naciśnij ten przycisk, aby otworzyć tylną pokrywę sterownika przewodowego. 2. Zamocuj tylną pokrywę do uchwytu. Następnie podłącz przewód komunikacyjny do portu CON1 sterownika przewodowego. Na koniec załóż przednią pokrywę sterownika przewodowego na tylną, aby zakończyć...
- Page 38 Instrukcja oprzewodowania sterownika CON1...
- Page 42 Wired Controller Operation & Installation Manual CONTENT Parts and Functions............1 Operation ................6 Wired Controller Wiring Instruction ........34 Ver: B • Please read this operation manual before using the wired controller. • Please keep this manual carefully and safely.
- Page 43 Parts and Functions Interface Display...
- Page 44 Parts and Functions On/Off key. Mode key: Press this key to execute mode switch. Fan key: Press this key to adjust fan speed. Up/Down key: Press this key to adjust temperature in the main Interface and other parameter value in other interface. And the key is also used for function switching.
- Page 45 Parts and Functions ROOM/SET humidity display Error icon Four-sided air deflector display ( Only valid for part of models) Up/Down Swing Left/Right Swing (Only valid for part of models) Set icon Auto mode Cooling mode Heating mode Fan mode Dry mode Turbo: This icon will be displayed only when turbo function is set. Quiet: This icon will be displayed only when quiet function is set.
- Page 46 Parts and Functions Sleeping: This icon is displayed when sleeping is set, and remaining time of sleeping is displayed by Health : This icon will be displayed only when health function is set. HRV (Heat Reclaim Ventilation): This icon will be displayed only when HRV function is set. Energy Saving: This icon will be displayed only when energy saving function is set Static Pressure: This icon will be displayed only...
- Page 47 Parts and Functions (1) fan speed( only valid for part models) Breeze Fan Speed Low Fan Speed Medium Fan Speed High Fan Speed Super Fan Speed Auto Fan Speed (2) fan speed( only valid for part models) First gear Second gear Third gear Fourth gear Fifth gear Sixth gear Seventh gear Auto...
- Page 48 Operation Basic function description Basic function Method of operation Press the key to switch on/off the ON/OFF wired controller. In the state of on, press the key Mode control MODE to change mode. In the state of on, press the key Adjusting temperature to adjust temperature.
- Page 49 Operation Initialization (1) The wired controller will display all the icons after be powered on or reset, then it gets into the initializing process. The controller will display in sequence as follows : (the top-left corner) → → (the bottom-right corner) → (the top-left corner), the green LED (ON/OFF key) flashes all the time until the initialization ends. (2) If the wired controller can’t communicate with the indoor unit PCB normally after powering on, the initialization will be finished in 4 minutes, and then the communication malfunction can be checked from the malfunction inquiry function.
- Page 50 Operation Note: When controlling Fresh Air unit, the controller’s main interface will not display keys in normal state. If you need to adjust the backlight time, please press MENU key to display keys. And then long press TIME and keys for 5 seconds to set backlight time. Clock (1) The controller uses 24-hour clock. The default is 12:00 when the wired controller is turned on for the first time.
- Page 51 Operation Timer (1) Timer function includes Timer on, Timer off and Timer on/ off. (2) Press TIME key to enter timer setting, then you can use TIME key to switch parameters, the timer function circulation is as follows: (ON and the hour position are flashing) → (ON and the minute position are flashing) → (OFF and the hour position are flashing) → (OFF and the minute position are flashing) → (ON and the hour position are flashing) → (ON and the minute position are flashing) → (OFF and the hour position are flashing) → (OFF and the minute position are flashing) → the timer icon disappears (cancel timer function).
- Page 52 Operation (3) When the hour or minute position is flashing, press key to adjust the parameter value, and long press to speed up the adjustment. Then you need to press MENU key to confirm the setting. (4) The timer function will be canceled when you press TIME key multiple times until the timer icon disappears. Function circulation Press MENU key (if it is the 4-way/Round-way Cassette model, you need press MENU key for 5 seconds) to enter function circulation, use key to switch between different functions. ...
- Page 53 Operation (Humidity setting) → (Up/Down swing) → (Left/Right swing) → (Turbo function) → (Indoor unit quiet) → (Outdoor unit quiet) → (Sleeping) → (Health) → (HRV) → (Energy saving) → (Static pressure) → (Filter cleaning) → (Follow) → (Evade) → (Perception) → 10 (10°C heating) → (Health airflow up) → (Health airflow down) → CL (Self- cleaning). When you select a function, the corresponding icon flashes, then you can use MENU key to set/cancel function or enter the corresponding function setting interface. Humidity setting (only valid for part of models) ...
- Page 54 Operation Swing (1) Press MENU key, you will enter function circulation, use key to switch between different functions. Switch to the Up/Down swing or Left/Right swing, then press MENU key again to enter the setting of swing angle (only valid for part of models). At this time you can use key to adjust the swing angle. After adjustment, press MENU key to exit the setting. (2) After adjustment, if there is no operation within 10 seconds or press MODE / FAN key, it will quit swing setting interface and previous changes are valid.
- Page 55 Operation Health airflow up/down function (only valid for part of models) (1) Press MENU key, you will enter function circulation, use key to switch between different functions. Switch to (health airflow up) or (health airflow down) function, then press MENU key again to set the function. When the function is successfully set, the corresponding icon will be displayed on the main interface. (2) Health airflow up/down function cannot be set at the same time. When the latter function is set, the former will be automatically canceled.
- Page 56 Operation Sleeping (1) Press MENU key, you will enter function circulation, use key to switch between different functions. Switch to function, the sleeping time will display by the which is on the top-left corner. Press TIME key to enter sleeping time setting, use key to adjust the sleeping time by 0.5h once, the range of sleeping time is from 0.5h to 72h, press MENU key to confirm. (2) When the sleeping time is up, the controller will turn off. (3) If the state of the sleeping function is on, when you switch to the sleeping function in the function circulation, pressing MENU key to turn it off.
- Page 57 Operation (2) When the HRV function is turned on, if you want to turn it off, please enter function circulation and switch to icon, then press MENU key , and the function will be turned off. Switch between Fahrenheit and Celsius (1) If the current temperature is displayed in Celsius, adjust temperature in each mode to 30°C(when energy saving function is set currently, the parameter in heating mode will be the highest limit value). Then press key for 15s to switch to Fahrenheit, the interface will display 86°F (when energy saving function is set, its highest limit value of Fahrenheit will be displayed).
- Page 58 Operation Energy saving (1) Press MENU key, you will enter function circulation, use key to switch between different functions. Switch to function, then press MENU key again, energy saving function will be turned on. If the function is turned on, icon will be displayed in the main interface. When the energy saving function is set, press MENU key to enter function circulation and choose , then press MENU key to exit energy saving function.
- Page 59 Operation ② In heating mode, set temperature to 16°C, long press FAN key for 5 seconds to enter energy saving parameter of heating mode setting, the parameter will be displayed in the top-left corner. You can use key to adjust parameter, and the parameter adjustment range is from 16 to 30. After adjustment, press MENU key to confirm changes.
- Page 60 Operation (4) In the state of 10°C heating function, if you change modes or adjust temperature setpoint, you will exit the 10°C heating function. Four-sided air deflector (only valid for part of models) (1) For 4-way/Round-way Cassette, the icon and the icon will be displayed in the main interface. (2) Press MENU key to select the air deflector to be set (By pressing MENU key, you can switch between the air deflector 1,2,3,4 as well as the simultaneous control.), and which air deflector flashing indicates that it is selected. When selecting a certain air deflector, you can use key to adjust its swing angle. (3) After adjustment, you can press MODE / FAN / TIME key or wait 10 seconds to exit the settings.
- Page 61 Operation Motion sensing (only valid for part of models) (1) Motion sensing function includes (Follow): Swing direction follows people. (Evade): Swing direction Evades people. (Perception): If no one is perceived for half an hour(the time is depends on the indoor unit or the setting of move eye), the indoor unit will be off. (2) Press MENU key, you will enter function circulation, use key to switch between different functions. Switch to function, then press MENU key again, function will be turned on. If the function is turned on, icon will be displayed in the main interface.
- Page 62 Operation Mode setting (only valid for part of models) (1) When controller is turned off, and the backlight is lit up, long press MODE key for 5 seconds to enter mode setting interface. The parameter is displayed in the top-left corner, and you can use key to switch it between 00/01/02/03/04/06/07. After adjustment, you need to press MENU key to confirm changes. (2) The correspondence between parameters and mode combinations is as follows: 00------------ [Auto] [Cooling] [Dry] [Fan] [Heating] 01------------ [Heating] [Cooling] [Dry] [Fan] 02------------ [Fan] [Cooling] [Dry]...
- Page 63 Operation Malfunction Display (1) If there is a malfunction, the main interface will display icon. (2) When backlight is on, long press TIME key for 10 seconds to enter malfunction display interface. The malfunction code is displayed in the top-left corner, and the left side of the colon is the current malfunction, and the right side of the colon is the historical malfunction.
- Page 64 Operation Parameter inquiry (1) Keep pressing MENU key for 5 seconds (if it is the 4-way/ Round-way Cassette model, the time is 10 seconds) to enter parameter inquiry interface. The parameter value is displayed in the upper left corner, and middle area displays parameter type (use key to switch it), and the unit number is displayed in the lower right corner ( use TIME key to switch it).
- Page 65 Operation (2) If the communication address flashes, you can change it with key, and the adjustment range is 0~3F. After adjustment, you need to press MENU key to confirm changes. If the communication address is static displayed, it cannot be changed. Child lock (1) Press and MENU keys for 5 seconds to set / cancel child lock.
- Page 66 Operation (2) The slave controller cannot set the static pressure function. (3) You can also use this function by function circulation. Self-cleaning Note: Only valid for the units with self-cleaning function. (1) Press MENU key, you will enter function circulation, use key to switch between different functions. When it switches to the “CL” function, “CL” will flash in the temperature area. Press MENU key to confirm, and the static display of “CL” indicates that the function is turned on. (2) If the state of the “CL” function is on, when you switch to the “CL” function in the function circulation, pressing MENU key to turn it off. (3) When the “CL” function is set, if you switch modes or switch ON/OFF, the “CL”...
- Page 67 Operation Outdoor unit quiet (1) Press MENU key, you will enter function circulation, use key to switch between different functions. When it switches to the outdoor unit quiet function, “OUt” will display in the temperature area and icon flashes. The time parameter of the function on/off is displayed in the upper left corner. You can use TIME key to switch between “OFF → Hours of turn- on time → Minutes of turn-on time → Hours of turn-off time → Minutes of turn-off time → OFF”, use key to adjust parameters. After adjustment, you need to press MENU key to confirm changes.
- Page 68 Operation Low temperature dehumidification (1) Long press MENU and keys for 5 seconds to enter advanced settings. The unit number is displayed in the lower right corner. Parameter is displayed in the upper left corner. middle area displays function code. Press key to switch to A38, and then press MENU key to enter parameter adjustment, use key to adjust parameter to 1(turn on low temperature dehumidification), then press MENU key to...
- Page 69 Operation Light strip function (only valid for part of models) (1) Long press FAN key for 3 seconds to turn on light strip, the middle area briefly displays “PP” to indicate that the function is set. (2) If the function is turned on, long press FAN key for 3 seconds to turn off light strip, the middle area briefly displays “CC” to indicate that the function is off. Communication with central controller (1) After the controller receives the command from the centralized controller. It displays the icon. At this time, all the keys except the ON/OFF key are invalid. (2) After the controller receives the lock command, it displays icon. At this time, all keys are invalid. (3) In central or lock state, backlight is valid, press any keys to wake up screen.
- Page 70 Operation Temperature compensation (1) This function is used to compensate for ambient temperature. In the state of off, and the backlight is lit up, long press FAN key for 5 seconds to enter temperature compensation interface. You can adjust the parameters with key. After adjustment, you need to press MENU key to confirm change. (2) When it is Celsius, the range of parameter adjustment is -4 ~ 4. When it is Fahrenheit, the range of parameter adjustment is -8 ~ 8.
- Page 71 Operation (3) All keys are invalid except ON/OFF key under forced cooling/heating mode. (4) when the forced cooling/heating is set, press ON/OFF key to exit this function. dFg ( Only valid for part of models) (1) Setting method: Press MENU key, you will enter function circulation, use key to switch between different functions. When it switch to the dFg icon and off icon flashes. press MENU key to change, meanwhile return to the main interface. (2) Cancellation method: Press MENU key, you will enter function circulation, use key to switch between different functions. When it switch to ...
- Page 72 Operation VIP ( Only valid for part of models) (1) Setting method: Keep pressing the MENU key + key for 5 seconds to enter the advanced settings, the unit number is displayed in the lower right corner, and the decimal display area of the temperature flashes to display the function classification. Switch to H by clicking the FAN key. The function code is displayed in the integer area of the temperature zone. At this time, press keys to switch function code to 05.
- Page 73 Operation (5) When switching between VIP and non-VIP, you need to exit the current Settings and enter again. Difference between the function of the Master wired controller and Slave wired controller Comparison Master wired Slave wired controller item controller Only the following operations can be performed: (1) ON/OFF, Mode, Fan speed, All functions Temperature setting, Swing, Function are available...
- Page 74 Operation Dip switch Default Function switch 2 setting station Slave wired controller Master wired controller Display ambient temperature Not display ambient temperature Collect ambient temperature from PCB of indoor unit Collect ambient temperature from wired controller Non-volatile memory invalid Non-volatile memory valid Old protocol Self-adaption Reserved...
- Page 75 Operation Default Function setting switch 1 station Reserved Reserved Not display ambient humidity Display ambient humidity Reserved Reserved Reserved Reserved...
- Page 76 Wired Controller Wiring Instruction Wiring Connections of Wire Controller Indoor 1 Indoor 2 Indoor N Indoor 15 Indoor 16 (master unit) Wire controller Wire controller Wire controller Wire controller Wire controller Control wiring of wire controller, polar. Wire controller Indoor 1 Indoor 1 Wire controller Wire controller Polar wire...
- Page 77 Wired Controller Wiring Instruction There are four methods to connect wired controller to the indoor units: 1. Group control shown as Figure A and D: One wired controller can control up to 16 indoor units. 3 pieces of polar wire must be used to connect the wired controller and the master unit (the indoor unit connected with wire controller directly).
- Page 78 Wired Controller Wiring Instruction Communication wiring Communication wiring length (m/ft) Dimensions of wiring 0.3mm x3-core shielded < 100m/328ft wire (22AWG,3wire) 0.5mm x3-core shielded ≥100m/328ft and <200m/656ft wire (20AWG,3wire) 0.75mm x3-core shielded ≥200m/656ft and <300m/984ft wire (18AWG,3wire) Note: • One side of the shielded sheet of communication wire must be earthed. • ...
- Page 79 Wired Controller Wiring Instruction Controller Installation 1. First, put communication wire through the hole in the back cover. Press this button to open the back cover of the wired controller. 2. Fix back cover to the holder. After that, connect communication wire to CON1 port of wired controller. Finally put the front cover of wired controller to back cover to complete the installation.
- Page 80 Wired Controller Wiring Instruction CON1...
Need help?
Do you have a question about the YR-C01A and is the answer not in the manual?
Questions and answers