Table of Contents
Advertisement
Available languages
Available languages
Quick Links
Advertisement
Chapters
Table of Contents

Summary of Contents for CSS MicroSystems RemoSPEAK
- Page 1 DE/EN GEBRAUCHS ANWEISUNG INSTRUCTIONS FOR USE RemoSPEAK...
- Page 2 Instructions for Use also available in other languages. Gebrauchsanweisung V1.0 DE Instructions for Use V1.0 EN (EU) #20319-ABL-DE-EU RemoSPEAK #20319-ABL-EN-EU RemoSPEAK CSS MicroSystems GmbH #20319-ABL-EN-UK RemoSPEAK In den Hofäckern 16 #20319-EW-DE-EU RemoSPEAK 74189 Weinsberg #20319-EW-EN-EU RemoSPEAK Germany www.csslabs.de #20319-EW-EN-UK RemoSPEAK © 2024 CSS MicroSystems GmbH...
-
Page 3: Table Of Contents
8. Inbetriebnahme ........10 Mit Bett koppeln RemoSPEAK ABL ..... . 10 Mit Bett koppeln RemoSPEAK EW . -
Page 4: Einleitung
4 | Gebrauchsanweisung RemoSPEAK 1. Einleitung Danke, dass Sie sich für ein Produkt von CSS entschieden haben. Bitte lesen Sie diese Gebrauchsanweisung sorgfältig durch und beachten Sie beim Betrieb des Gerätes die entspre- chenden Anweisungen. Bitte bewahren Sie die Gebrauchsan- weisung griffbereit am Ort der Nutzung des Gerätes auf. -
Page 5: Sicherheitshinweise
Gebrauchsanweisung RemoSPEAK 4. Sicherheitshinweise Handhabung Bitte behandeln Sie das Gerät sorgfältig. Das Gerät ent- hält empfindliche elektronische Bauteile. Es dürfen keine Veränderungen daran vorgenommen werden. Das Gerät ist nicht lebenserhaltend oder lebensunter- stützend. Das Gerät besteht aus mehreren Kompo- nenten. Eventuell können kleine Einzelteile vom Gerät getrennt werden, wodurch möglicherweise Erstickungs-... -
Page 6: Reinigung Und Desinfektion
6 | Gebrauchsanweisung RemoSPEAK führen. Wenden Sie sich an Ihren Fachhändler oder den Hersteller, wenn das Gerät Schäden aufweist oder nicht ordnungsgemäß funktioniert. Wenn das Gerät oder sein Zubehör mechanisch beschädigt ist, darf es nicht mehr eingesetzt werden. Wechselwirkung mit medizinischen Geräten Das Gerät und seine Komponenten kann elektromagne-... -
Page 7: Lieferumfang
Gebrauchsanweisung RemoSPEAK 6. Lieferumfang • A) RemoSPEAK • B) USB-C-Netzteil • C) Anschlusskabel für AssistX • D) Gebrauchsanweisung • E) Sprachbefehls-Karte • F) Magnet für Handschalter (Variante ABL) -
Page 8: Bedienelemente, Anschlüsse, Anzeigen
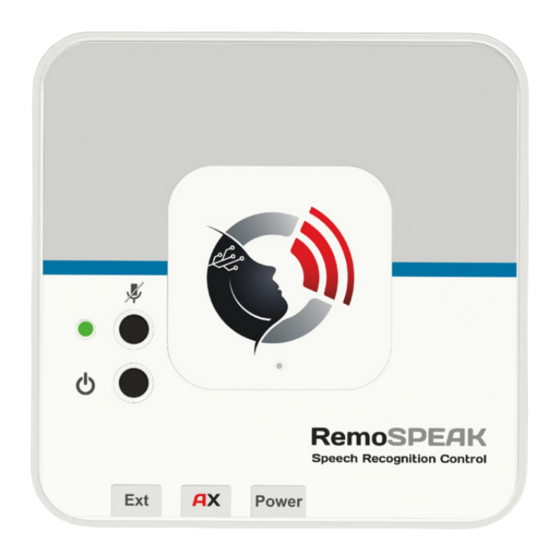
8 | Gebrauchsanweisung RemoSPEAK 7. Bedienelemente, Anschlüsse, Anzeigen Mikrofon Taster Ein/Aus Status-LED Taster Stummschaltung Mikrofon USB-C Stromanschluss Anschluss Ausgang AssistX-Rufsysteme (Klinkenbuchse 3,5 mm) Anschluss externes Mikrofon (Klinkenbuchse 3,5 mm, blau) -
Page 9: Tabelle Der Farben (Led)
Gebrauchsanweisung RemoSPEAK Tabelle Farben der LED Bedeutung Grün (schwach) Findelicht (Standby) Grün blinken Erkennung Befehl für Bettverstellung Violett blinken Tonfolge bei Er - Erkennung Start - (max 15 Sekunden) kennung und Rück - befehl, Befehlser - sprung zu Standby kennung aktiv... -
Page 10: Inbetriebnahme
10 | Gebrauchsanweisung RemoSPEAK 8. Inbetriebnahme Schließen Sie das USB-C-Netzteil an den Anschluss Damit das Gerät mit Strom versorgt und der interne Akku ge- RemoSPEAK laden. ist für den Betrieb mit Netzteil ausge- legt, der Akku dient nur als Backup. - Page 11 | 11 Gebrauchsanweisung RemoSPEAK • Stecken Sie das Netzteil ein und schalten Sie dann Remo direkt anschließend (innerhalb 5 Sek.) ein. Nach SPEAK ca. 10 Sek. ist mit dem Bett gekoppelt. RemoSPEAK • Entsperren mit Handschalter: RemoSPEAK Legen Sie den zugehörigen Magneten (im Lieferumfang...
-
Page 12: Mit Bett Koppeln Remospeak Ew
12 | Gebrauchsanweisung RemoSPEAK • Koppeln Handschalter mit Bett Sollte der Handschalter nicht (mehr) mit dem Bett gekoppelt sein, stecken Sie das Netzteil des Bettes für 10 Sek. aus. Ste- cken Sie das Netzteil ein und drücken Sie gleichzeitig inner- halb von 20 Sek. -
Page 13: Anschluss Assistx-Rufsystem
| 13 Gebrauchsanweisung RemoSPEAK Anschluss AssistX-Rufsystem Sie können am AssistX-Anschluss einen AssistX Mobil-Sen- der oder eine AssistX Call Rufanlage anschließen. Dazu das RemoSPE- mitgelieferte 2polige Klinken-Kabel zuerst am anschließen, dann am AssistX Port von AssistX Mobil oder AssistX Call einstecken. Die Reihenfolge ist wichtig, da es sich bei dem Ausgang um einen Öffner-Kontakt (NC) handelt! -
Page 14: Montage
14 | Gebrauchsanweisung RemoSPEAK Montage RemoSPEAK kann in der Nähe (max 1m Abstand) der nut- zenden Person platziert werden. RemoSPEAK Es ist zu empfehlen, auf einer geeigneten Halterung (von CSS empfohlen) am Bett so zu positionieren, dass ein möglichst direkter akustischer Kontakt zwischen Mik- rofon und Mund besteht. -
Page 15: Sprachbefehl-Karte
| 15 Gebrauchsanweisung RemoSPEAK Sprachbefehl-Karte... -
Page 16: Anwendung Des Geräts
16 | Gebrauchsanweisung RemoSPEAK 9. Anwendung des Geräts Ein-/Ausschalten: Einschalten: Drücken Sie kurz die Ein/Aus-Taste . Die LED fängt daraufhin an blau zu blinken. Sobald die LED schwach RemoSPEAK grün leuchtet, ist bereit. Ausschalten: Drücken Sie die Ein/Aus-Taste mindestens 5 nicht mehr leuchtet. -
Page 17: Ablauf Der Sprachsteuerung - Beispiele
| 17 Gebrauchsanweisung RemoSPEAK Ablauf der Sprachsteuerung - Beispiele: Befehl nach Wahl Befehl wird Startbefehl ausgeführt Beispiele 1 „Hey Remo“ Füße hoch Weiter Beispiele 2 „Hey Remo“ Lampe Lampe an Lampe Lampe aus Beispiele 3 „Hey Remo“ Hilfe Hilferuf durch... -
Page 18: Temporäres Stummschaltung Mikrofon (Mute)
18 | Gebrauchsanweisung RemoSPEAK Wenn Sie für 15 Sek. keinen Sprachbefehl geben, geht das Gerät automatisch wieder in Standby (LED schwach grün). Wenn Sie den Befehl „Schlafen“ geben, geht RemoSPEAK sofort in Standby. Mit den Befehlen zur Bettsteuerung wird das Pflegebett ent- sprechend bewegt, die LED blinkt grün. -
Page 19: Akku
| 19 Gebrauchsanweisung RemoSPEAK Akku RemoSPEAK verfügt über einen internen Akku. Er dient nur als Backup (Laufzeit ca. 3 Std.), das Gerät sollte stehts mit dem Netzteil (USB-C) mit Strom versorgt werden. Bei Akkubetrieb blinkt die LED orange. Sollte der Akku weniger als 10% geladen sein, blinkt die LED rot. -
Page 20: Technische Daten
20 | Gebrauchsanweisung RemoSPEAK 12. Technische Daten Maße: 101 x 101 x 32 mm Gewicht: 150 g / 170 g (ABL) IP-Schutzklasse: IP 54 ABL: für Pflegebett “Dali” von Bur- Variante RemoSPEAK meier oder anderer Pflegebetten von Stiegelmeyer/Burmeier mit entsprechender Ausstattung, Interface Bluetooth® BLE (nur für Verbindung zum Bett). -
Page 21: Umweltschutz Und Entsorgung
| 21 Gebrauchsanweisung RemoSPEAK 14. Umweltschutz und Entsorgung Alle Elektro- und Elektronikgeräte sind getrennt vom allge- meinen Hausmüll über dafür vorgesehene Stellen zu entsor- gen. Dieses Produkt unterliegt der europäischen Richtlinie 2002/96/EC und muss daher sachgemäß bei den Elektro-Alt- gerätesammelstellen entsorgt werden. - Page 23 Pairing RemoSPEAK ABL with bed ..... . 30 Pairing RemoSPEAK EW with bed ..... . . 32 Connecting the AssistX call system .
-
Page 24: Introduction
Burmeier and Stiegelmeyer, which use a protec- ted Bluetooth® control system. These manufacturers have expressly approved the combination of their corresponding beds with the RemoSPEAK. Other nursing beds require a bed control interface with Easy- wave support (RemoBIF or BIF8plus). -
Page 25: Safety Instructions
| 25 Instructions for Use RemoSPEAK 4. Safety instructions Handling Please handle the device carefully. The device contains sensitive electronic components. It is not allowed to do any modification. The device is not life-sustaining or life-supporting. The device consists of several components. Small items may be detached from the device, which may result in suf- focation or other danger to children. -
Page 26: Cleaning And Disinfection
26 | Instructions for Use RemoSPEAK Repair Under no circumstances you should open the device and repair it by yourself. Disassembling the device can per- manently damage the device and cause injury. Contact your reseller or the manufacturer if the device is dama- ged or does not work properly. -
Page 27: Scope Of Delivery
| 27 Instructions for Use RemoSPEAK 6. Scope of delivery • A) RemoSPEAK • B) USB-C power adapter • C) 3,5 mm jack cable for AssistX • D) Instructions for Use • E) Speech command card • F) Magnet for handset (variant ABL) -
Page 28: Device Buttons, Ports, Indicator
28 | Instructions for Use RemoSPEAK 7. Device Buttons, Ports, Indicator Microphone On/Off Button Status LED Mute Button USB-C power connector Output AssistX call systems (3.5 mm jack socket) External microphone (3.5 mm jack socket, blue) -
Page 29: Tabelle Der Farben (Led)
| 29 Instructions for Use RemoSPEAK Table of LED colors Sound Meaning Green (dimly) Finding light (Standby) Green flashing Detection a bed adjustment com - mand Violet flashing Tone sequence Start command de - (max 15 sec) on detection and... -
Page 30: Installation
30 | Instructions for Use RemoSPEAK 8. Installation Connect the USB-C power supply to port This supplies the device with power and charges the internal battery. Remo- SPEAK is designed to be operated with a power supply, the battery is only used as a backup. - Page 31 | 31 Instructions for Use RemoSPEAK • Plug in the power supply and then switch on RemoSPEAK immediately afterwards (within 5 seconds). After approx. 10 seconds, is paired with the bed. RemoSPEAK • Unlock with handset of the care bed:...
-
Page 32: Pairing Remospeak Ew With Bed
(see „Use of the device“). For example, „Hey Remo“ and „backrest up“. The function is now paired. This must be done for all desired func- tions. The bed can now be controlled via RemoSPEAK. -
Page 33: Connecting The Assistx Call System
Call interface to the AssistX output . To do this, first connect the supplied 2-pin jack cable to the RemoSPEAK, then plug it into the AssistX Port of the AssistX Mobil or AssistX Call. The order is important because the output is a normally... -
Page 34: Mounting
34 | Instructions for Use RemoSPEAK Mounting RemoSPEAK should be placed close to the person using it (max. 1m distance). It is recommended to position Remo- SPEAK on a suitable mount (recommended by CSS) on the bed so that there is as direct acoustic contact as possible bet- ween the microphone and the mouth. -
Page 35: Speech Command Card
| 35 Instructions for Use RemoSPEAK Speech command card... -
Page 36: Use Of The Device
(While switching off, the LED flashes red) Speech control To activate RemoSPEAK, say the words „Hey Remo“. You will hear a confirmation tone and the LED flashes purple. You can now say a speech command according to the following table. -
Page 37: Speech Control Process - Examples
| 37 Instructions for Use RemoSPEAK Speech control process - examples: Start command Command of Command is your choice being executed Example 1 Legs up „Hey Remo“ Next Example 2 „Hey Remo“ Lamp Lamp on Lamp Lamp off Example 3 „Hey Remo“... -
Page 38: Temporary Muting Of The Microphone
38 | Instructions for Use RemoSPEAK If you do not give a speech command for 15 seconds, the device automatically goes back into standby (LED dimly green). If you give the command „Sleep“, RemoSPEAK immedia- tely goes into standby. The bed control commands move the nursing bed accordingly, flashes green. -
Page 39: Battery
| 39 Instructions for Use RemoSPEAK Battery RemoSPEAK has an internal battery. It only serves as a backup (running time approx. 3 hours), the device should al- ways be powered by the power supply (USB-C). When run- ning on battery power, LED flashes orange. -
Page 40: Technical Specifications
40 | Instructions for Use RemoSPEAK 12. Technical specifications Dimensions: 101 x 101 x 32 mm Weight: 150 g / 170 g (ABL) IP Rating: IP 54 ABL variant: for Burmeier “Dali” care bed or RemoSPEAK other Stiegelmeyer/Burmeier care beds with corresponding equipment, Bluetooth®... -
Page 41: Environmental Protection & Disposal
| 41 Instructions for Use RemoSPEAK 14. Environmental protection & disposal All electrical and electronic devices must not be disposed with general household waste, but must be disposed at designa- ted disposal points. This product is subject to the European Directive 2002/96/EC and must therefore be properly dispo- sed at the WEEE collection points. - Page 44 ASSISTIVE TOOLS FOR A BETTER LIFE...
Need help?
Do you have a question about the RemoSPEAK and is the answer not in the manual?
Questions and answers