Table of Contents
Advertisement
Advertisement
Table of Contents

Subscribe to Our Youtube Channel
Related Manuals for KJK KJK230

Summary of Contents for KJK KJK230
- Page 1 KJK230 Wi-Fi Trail Camera User Manual V24031501...
-
Page 2: Table Of Contents
TABLE OF CONTENT 1. IN THE BOX..............2. IMPORTANT NOTE............2.1. Battery Requirements..........2.2. Battery Caution............2.3. Battery Preservation..........2.4. Memory Card Specification........2.5. Regarding App Wi-Fi Connection....... 2.6. Remove Protective Films........... 2.7. On-Screen Information..........3. INTRODUCTION............. 03-04 3.1. About the Camera............3.2. - Page 3 7.1. OFF Mode..............7.2. SETUP Mode............. 7.3. ON Mode..............Shortcut Keys/Functions..........16-231 8. Wi-Fi CONNECTION..........8.1. Download TrailCam Go Mobile APP...... 6-17 8.2. Enable Wi-Fi and Bluetooth........8.3. Add Your Camera............8.4. Choose Device Type..........8.5. Search Your Camera and Link......19-21 8.6.
-
Page 4: In The Box
1.IN THE BOX 1x Trail Camera, 1x Mounting Strap, 1x Base of Stand Set, 1x USB Cable, 1x Memory Card, 1x User Manual Note: A memory card has been inserted into the card slot. 2.IMPORTANT NOTE 2.1.Battery Requirements This camera requires a total of eight (8) 1.5V AA Alkaline or 1.5V... -
Page 5: Memory Card Specification
If you encounter connectivity issues or a weak signal, please try moving your phone closer to the camera step by step to establish a stable connection. Note:KJK230 WiFi trail camera can’t connect to home Wi-Fi router. Legal Attribution: Apple and the Apple Logo are trademarks of Apple Inc.,... -
Page 6: On-Screen Information
3.INTRODUCTION 3.1.About the Camera The KJK230 heralds a new era in trail cameras. Overflowing with advanced features, this camera is meticulously crafted to enhance your outdoor monitoring experience. With a built-in Wi-Fi and Bluetooth module, the KJK230... -
Page 7: Applications
built-in 2.0 inch color screen, simplifying programming and media review • Two modes available: Motion detection and Timelapse • Swift performance with a 0.05s trigger time, 0.05s recovery time, long 100ft trigger distance, and a 130° detection angle • Each capture includes an info strip displaying Date, Time, Temperature, and Moon phase •... -
Page 8: Parts And Controls
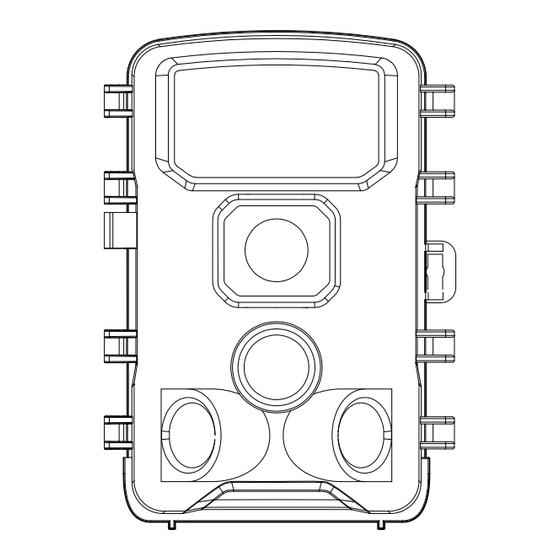
indoor and outdoor applications where evidence of intrusion or monitoring is needed. 4. PARTS AND CONTROLS The camera is equipped with 45pcs built-in high efficiency infrared LEDs, LED Indicators, Lens, 3pcs PIR Sensors, Lock Holes in front view (Figure 1). Motion Indicator LED Light (The LED Blinks... - Page 9 The camera provides the following connections for external devices: USB port and memory card slot etc. (Figure 2). Tripod Base 1/4"-20 DC 6V/1.5A 3.5x1.35mm Memory Card Slot Type-C Port Figure 2: Bottom View www.kjkcam.com...
- Page 10 The camera has 2 strap holes on the back. The strap can be put through the strap holes and fastened securely around the tree trunk by pulling the end of the strap firmly (Figure 3). Strap Hole Lock Buckle Figure 3: Back View...
- Page 11 The camera has a 2.0-inch built-in LCD screen, which can be used for reviewing pictures or videos and menu display- ing, and unique keypad design for easy program and opera- tion, 8 AA batteries slot. Color Screen Battery Compartment Switch Figure 4: Inside View www.kjkcam.com...
-
Page 12: Installing The Batteries And Memory Card
MENU SHOT Key (Taking photos and recording UP Key as videos Video Mode manually in SETUP Mode.) OK (Save Key) DOWN Key as Video Mode REPLAY (Only TEST Mode) Figure 5: Operation Keys and Shortcut 5. INSTALLING THE BATTERIES AND MEMORY CARD Before you begin learning how to use your camera, you will first need to install a set of batteries and insert an memory card. -
Page 13: Loading Batteries
5.1.Loading Batteries After opening the battery compartment cover, you'll notice that the camera features eight battery slots (Figure 6). To ensure the camera operates correctly, it's essential to insert all eight batteries with the correct polarity, ensuring the negative or "flat" end aligns with the long spring in each battery slot. -
Page 14: Inserting The Memory Card
Figure 6: Loading the Batteries 5.2.Inserting the Memory Card Insert the memory card (with the camera's power switch in the OFF position) before beginning to operate the camera. Don't insert or remove the memory card when the power switch is in the ON or SETUP mode. The camera uses a regular memory card to save photos (in . - Page 15 not be able to insert it without force, there up, you will is only one correct way to insert cards. If the memory card is not installed correctly, the device will not display an memory card icon on the screen in SETUP mode. Formatting Memory card by using the camera's "Memory Card...
-
Page 16: Using The Camera
6.USING THE CAMERA Once you've prepared your camera with the correct installa- tion of batteries and an memory card, you can simply take it outdoors and secure it to a tree (or based on your specific application scenario). Switch it ON and leave it to capture potential great photos that match your expectations. -
Page 17: Off Mode
7.1.OFF Mode The OFF mode is the "safe" mode when any actions must be taken, e.g., replacing the memory card or batteries, or transporting the device. And of course, when you are storing or not using the camera, you will switch it to OFF. Please note that in the OFF mode the camera consumes little power. -
Page 18: On Mode
7.3.ON Mode Anytime after the batteries and memory card have been inserted, you can switch on the camera. When the power switch is moved to the ON position, the camera will enter into the ON (Surveillance) mode. The camera will countdown 15-second delay and then be ready to capture images. -
Page 19: Wi-Fi Connection
8. Wi-Fi CONNECTION 8.1.Download TrailCam Go Mobile APP Before using the Wi-Fi functionality, please download the "TrailCam Go" App. You can download the app from the app store by scanning the following QR code. NOTES: The screenshots provided in this section are for reference purposes only. -
Page 20: Enable Wi-Fi And Bluetooth
Local Network permission to ensure seamless App operation. This will help maintain connectivity and ensure the App functions as intended. Note:KJK230 WiFi trail camera can’t connect to home Wi-Fi router. 8.2.Enable Wi-Fi and Bluetooth Enabling both Wi-Fi and Bluetooth on your mobile phone before launching the App is a mandatory step. -
Page 21: Add Your Camera
8.3.Add Your Camera Make sure your camera is in ON Mode, and that it is near you. To get a stable connection, please get close to your camera no farther than 45ft away with no obstacles between you and the camera, such as walls, glass doors etc. To add your camera, simply tap the "+"... -
Page 22: Search Your Camera And Link
8.5.Search Your Camera and Link By default, in the list the camera will be indicated as ID "KJK_XXXX". The App automatically searches for all Wi-Fi trail cameras nearby, please make sure your camera is within the Wi-Fi range. This process may take up to 15 seconds. - Page 23 Figure 12: Connect Figure 13: Allow Wi-Fi- camera Connection on iOS Device A system pop-up message will show (Figure 13). Please tap "Join" to allow Wi-Fi connection. The string "KJK_XXXX" is the name of Wi-Fi hotspot on the camera to allow Wi-Fi connection.
- Page 24 1. **Forget WiFi Network**: - Open Settings on your iPhone. - Navigate to WiFi and forget the currently connected Wi-Fi network. - Reattempt to connect your phone to the camera's Wi-Fi network. 2. **Check App Permissions**: - Ensure that the app has necessary permissions to access Bluetooth and Wi-Fi on your iPhone.
-
Page 25: App Navigation
8.6.App Navigation Features Details Refer to Camera Preview, Manual taking pictures or videos. Figure 14 Camera status, including battery level, Memory Card capacity and used size, internal temperature of the camera, Status Figure 15 number of pictures and videos stored on the Memory Card, camera model, firmware version number, etc. -
Page 26: Advanced Settings
Figure 16: Settings Figure 17: Gallery 9. ADVANCED SETTINGS The trail camera comes with preset manufacturer settings. You can change the settings to meet your requirements. Please make sure that the camera is in the SETUP mode. Once the camera screen is on, press MENU key to enter/ex- it the menu. - Page 27 Settings Description Parameter (Bold=default) Mode Select different mode to monitor Motion Detection Timelapse normal Timelapse video Photo or Photo Select whether still photo , Video Video video, photo&video clips are taken. Photo+Video Photo Smart Best Select desired resolution for resolution Photo still photos from 2 to 84megapixels.
- Page 28 Audio Selecting On will record video with sound. Recording Shot Lag 10 seconds, Select the shortest length of time that the optional from camera will wait until it responds to any 5s to 60min subsequent triggers from the PIR sensor after a game is first detected.
- Page 29 time to 1H, and the camera will take a photo or record a video every hour (confirm whether to take a photo or record video based on your work mode), the camera will take 24 photos within 24H. This is helpful when observing cold-blooded animals like snakes, or the process of flowering etc.
- Page 30 Date D/MY Select date format which will be shown on Format M/D/Y the screen and each capture Y/M/D Time Select time format which will be shown on Format the screen and each capture.12h-AM/PM. Motion Test This feature helps you aim the camera at your target area.
-
Page 31: Mounting And Positioning The Camera
10. MOUNTING AND POSITIONING THE CAMERA 10.1.MOUNTING After you've set up the camera's parameters to your person- al preferences at home, you're ready to take it outside and slide the power switch to ON. When setting up the camera for scouting game or other outdoor applications, you must be sure to mount it in place correctly and securely. -
Page 32: Sensing Angle And Distance Test
Figure 18: Strap 10.2.SENSING ANGLE AND DISTANCE TEST To test whether the camera can effectively monitor the area you choose, this test is recommended checking the sensing angle and monitoring distance of the camera. To perform the test: Switch the camera to the SETUP mode. Select Motion Test in the Menu. -
Page 33: Switching On The Camera
within the area where you expect the game or subjects to be. Try different distances and angles from the camera. The screen shows the number of times triggered. The results of your testing will help you find the best placement when mounting and aiming the camera. -
Page 34: Review Photos Or Videos
11. REVIEW PHOTOS OR VIDEOS After you have setup, mounted and activated your CAMERA, you will be eager to return later and review the images it has captured for you. The camera stores photos and videos in the folder \DCIM in the memory card. Photos are saved with file names like DSCF0001.JPG and videos like DSCF0001.MP4. -
Page 35: Technical Specifications
12.TECHNICAL SPECIFICATIONS Element Description Max. Pixel Size 84MP Lens FOV=90° IR Flash 100ft LCD Screen 2.0" Color Screen Keypad 8 Keys, 1 Power Switch SD, SDHC or SDXC memory card, Memory max capacity 128GB Smart Best Photo/2M/8M/16M/24M/ Picture Size 32M/42M/48M/64M/84M Smart Best Video/720P/1080P/2.7K/ Video Size 4K/6K/8K... -
Page 36: Important Note
Time Lapse 3 Sec. ~ 24 Hours Power Supply 8x1.5V AA Batteries Auto Stand-by (Surveillance mode) in 2min. Auto Stand-by while no operation in SET mode Type C-USB, Memory Card holder, Interface External Power (DC 6V/ 1.5A, Plug 3.5x1.35mm) Mounting Strap, Tripod Base ( 1/4"-20) Waterproof IP67... - Page 37 voltage can lead to improper operation. After the battery is depleted, the camera will only have a few hours of operation remaining (the camera will display a low battery warning). • When using the trail camera for the first time or if the camera cannot recognize the memory card, please format the memory card before use.
-
Page 38: Warranty
14. WARRANTY TWO-YEAR LIMITED WARRANTY Your KJK trail camera is backed by a two-year warranty starting from the date of original purchase. We assure you that your camera is designed to be free from defects in materials and workmanship when used under standard conditions. -
Page 39: Fcc Compliance Statement
15. FCC COMPLIANCE STATEMENT This device complies with Part 15 of the FCC Rules. Operation is subject to the following conditions: (1)This device may not cause harmful interference (2)This device must accept any interference received, including interference that my cause undesired operation. Please Note: This equipment has been tested and found to comply with the limits for a Class B digital device, pursuant to part 15 of the FCC Rules. - Page 40 Caution: To comply with the limits for an FCC Class B computing device, always use the signal cord and power cord supplied with this unit. The Federal communications Commission warns that changes or modifications to the unit not expressly approved by the party responsible for compliance could void the user’s authority to operate the equipment.
- Page 41 Find us support@kjkcam.com @KJKcam @KJKcam @KJKcam For any questions about the product, you can always contact us through the official website www.kjkcam.com. We will respond within 24 hours.
Need help?
Do you have a question about the KJK230 and is the answer not in the manual?
Questions and answers
do i need all the time bluethoot conection on the camera? Im trying to connect but i can not because im far a way and i dont have bluethoot home
No, the KJK KJK230 camera does not require a Bluetooth connection at all times for operation. It uses Bluetooth and Wi-Fi (via hotspot) primarily for connecting to a phone and using the app, but it can still function as a trail camera independently.
This answer is automatically generated
KJK230 käyttöohjeen yläreunassa oleva sivukaavio vie tilaa niin paljon että sivujako ei mene tasan eli sivu tulostuu kahdelle arkille. kuinka voin saada sivun tulostumaan yhdelle arkille?
The KJK230 user manual is likely multiple pages long, so printing it on one sheet instead of two will depend on the printer settings. You can try the following steps:
1. Adjust Print Layout: In the print settings, select "Multiple Pages per Sheet" and choose "2 Pages per Sheet" or more, depending on readability.
2. Reduce Margins: Decrease the page margins in the print settings to fit more content.
3. Use a Smaller Font: If possible, reduce the font size in the document before printing.
4. Print Double-Sided: If your printer supports duplex printing, enable double-sided printing.
5. Convert to Booklet Format: Some printers have a "Booklet" option that arranges pages efficiently.
Check your printer settings for the best configuration that maintains readability.
This answer is automatically generated
Manuel en français
Bonjour Je viens d acquérir une caméra KJK230, mais je ne connais pas l anglais Puis avoir le manuel en français SVP
Ci sono spiegazioni in italiano?