
Related Manuals for TOOLSTATION Hawksmoor CS4100A-5

Summary of Contents for TOOLSTATION Hawksmoor CS4100A-5
- Page 1 Original User’s Instructions 41cc Petrol Chainsaw SKU: 75716 ASSEMBLY & STARTING GUIDANCE VIDEO READ BEFORE USE PLEASE KEEP THESE INSTRUCTIONS FOR FURTHER REFERENCE...
-
Page 2: Table Of Contents
CONTENT ∫ WHAT’S IN THE BOX ---------------------------------------------------------- 3 ∫ SPECIFICATIONS -------------------------------------------------------------- 4 ∫ EXPLANATIONS AND SYMBOLS, CAUTIONS AND WARNINGS ---------- 5 ∫ IMPORTANT SAFETY WARNINGS -------------------------------------------- 7 ∫ PRODUCT DESCRIPTION AND IDENTIFICATIONS ------------------------ 14 ∫ ASSEMBLY AND OPERATING INSTRUCTIONS -----------------------------15 ∫... -
Page 3: What's In The Box
WHAT'S IN THE BOX Bar cover x 1 Chain saw x 1 Oregon chain x 1 Brake cover x 1 Oregon bar x 1 Petrol 40:1 FUEL MIXING BOTTLE Hex key x 1 Socket wrench/ slotted Screw driver x 1 Fuel bottle x 1 screw drive x 1 If you do not have all these items, please contact:... -
Page 4: Specifications
SPECIFICATION Technical Data Model CS4100A-5 Engine displacement 41cm Engine 1.4kW Cutting length 37.5cm Chain gauge (0.050˝), 1.27mm Idling speed 3100±300/min Maximum speed with cutting equipment 11000/min Maximum chain speed 21m/s Fuel tank capacity 260ml Oil tank capacity 210ml Anti-vibration function Chain wheel teeth 6 Teeth * 9.525mm Chain brake... -
Page 5: Explanations And Symbols, Cautions And Warnings
EXPLANATIONS AND SYMBOLS, CAUTIONS AND WARNINGS NTENDED USE This machine may only be used outdoors for cutting wood and in combination with the original cutting chains. This machine is not designed for heavy-duty or commercial use. Any use of the machine that deviates from its intended use, and is not included in these instructions, is considered unauthorised use and relieves the manufacturer from his or her legal liability. - Page 6 Wear robust footwear when using the device. Wear protective gloves when using the device. Guaranteed sound power level data (114dB), in accordance with Directive 2000/14/ Beware of kickback (recoil). Avoid contact with the tip of the guide bar (chain return point). This will result in kickback of the chainsaw.
-
Page 7: Important Safety Warnings
IMPORTANT SAFETY WARNINGS GENERAL SAFETY WARNINGS Safety Warnings WARNING! Read all safety warnings and instructions. Failure to follow the warnings and instructions may result in electric shock, fire and/or serious injury. WARNING! Read all safety warnings and instructions designated by the symbol. Save all warnings and instructions for future reference. - Page 8 GENERAL SAFETY • The chain is designed exclusively for sawing wood. You may only fell trees if you have received the appropriate training. The manufacturer cannot be held liable for damage caused by improper or incorrect usage. PLEASE NOTE: Our equipment has not been designed for use in commercial, trade or industrial applications.
- Page 9 • Carry the chainsaw with the engine stopped, the chain bar and saw chain facing rearwards, and with the exhaust away from your body. • NEVER use a chainsaw which is damaged, incorrectly set, incomplete or loosely assembled. Make sure that the chain rotation stops when the chain brake is applied.
- Page 10 • The engine will create toxic exhaust fumes as soon as the engine is started. Never work in enclosed areas or in areas with poor ventilation. • NOTE: The chainsaw is designed for noncommercial, occasional use and for general work, such as stump grubbing, and cutting firewood, etc.
- Page 11 • NOTE: With a basic understanding of kickback, you can reduce or eliminate the element of surprise. Sudden, unexpected action contributes to accidents. • Keep a good firm grip on the saw with both hands: the right hand on the rear handle, and the left hand on the front handle, when the engine is running.
- Page 12 Beware of the following: Rotary recoil. A = Recoil direction. B = Recoil reaction zone. Impact/jamming recoil and pulling reactions: When cutting from under an object (see Pic. D) using the top of the chain, the object may pinch the chain and cause either a forward force on the chainsaw or a rearward force on the object (see Pic.
- Page 13 • Replace worn or damaged parts for safety. • If the fuel tank has to be drained, this should be done outdoors. NOTE: Dispose of soiled maintenance material and operating materials at the appropriate collection point. Recycle packaging material, metal and plastics. Do not dispose of with domestic, household waste.
-
Page 14: Product Description And Identifications
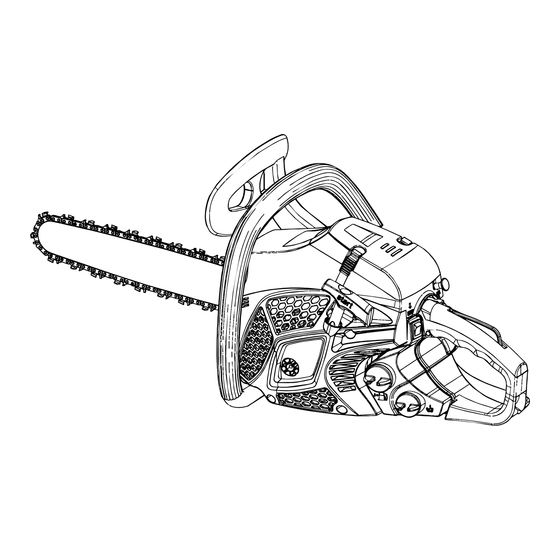
PRODUCT DESCRIPTION AND IDENTIFICATIONS 1. Chain and saw 2. Chain brake 3. Handle 4. Air filter cover 5. Chock 6. Prime bulb 7. Safety trigger lock 8. Oil tank 9. Petrol tank 10. On/off Switch 11. Starter Not all the accessories illustrated or described are included in standard delivery. www.coreservice.co.uk Hotline: +44 01904 947568 Email support@coreservice.co.uk... -
Page 15: Assembly And Operating Instructions
ASSEMBLY AND OPERATING INSTRUCTIONS PREPARING TO ASSEMBLE THE CHAINSAW Safety Features a. LOW KICKBACK SAW CHAIN: helps significantly reduce kickback, or the intensity of kickback, due to specially designed depth gauges and guard links. i. CHAIN BRAKE: is a safety feature designed to reduce the possibility of injury due to kickback by stopping a moving saw chain in milliseconds. - Page 16 a. Assembly of the chain guide IMPORTANT: The machine must not be started during assembly. Wear protective gloves when handling the blade. Chain brake supplied with disengaged (backward) condition. If engaged, pull it backwards manually before assembly. 1) Pull the lever of the hand wheel and to unscrew the hand wheel. Remove the chain cover. 2) Install the guide and mount the chain on the pinion and guide in the direction shown below 2) Install the guide and mount the chain on the pinion and guide in the direction shown below 3) Attach the bracket and screw it in place.
- Page 17 4) Reinstall the chain cover in place. 5) Check if the chain is well install on the guide. Rotate the chain with your hand to check that it is turning without excessive resistance and that it is properly tightened. Repeat the installation if the chain is not tight. b.
- Page 18 STEP 1 - CHAIN BRAKE MECHANICAL TEST WARNING! The purpose of the chain brake is to reduce the possibility of injury due to kickback; however, it cannot provide the intended measure of protection if the saw is operated carelessly. Always test the chain brake before using your saw and periodically while on the job. Your chainsaw is equipped with a chain brake that reduces the possibility of injury due to kickback.
- Page 19 Hold the guide by its tip. Adjust the tension until the chain teeth touch the bottom of the guide. Turn the chain tension adjustment clockwise until the chain is tight. Do not stretch the chain too much. Check the tension of the chain and check if the casing is properly tightened. If this is not the case, please repeat the procedure.
- Page 20 Using a funnel and keeping the bottle level, pour the petrol firstly in the left hand side (B) up to the required level and pour oil up to the (A) marking level. Shake vigorously to mix the petrol and oil prior to pouring into the tank (C).
- Page 21 OPERATING STEP 1 - START THE ENGINE WARNING! Do not start the engine whilst holding the chainsaw in one hand. There is a risk that the chainsaw may touch your body. This is very dangerous. Start the cold engine 1. Set the switch to the ‘1’ position. START switch 2.
- Page 22 3. Press and release the primer bulb 10 times. 4. Pull the choke control out to engage. primer bulb choke control 5. While holding the saw unit securely on the ground (one foot holding down the rear handle, left hand holding the front handle), pull the start handle four times to warm the engine. At this stage, the engine will usually not start.
- Page 23 6. Push the choke control in to disengage. (Failure to do this may cause the engine to flood). 7. Pull the start handle in a smooth action to start the engine; the engine will usually start after 5 pulls. If the engine does not start, remove the spark plug, dry it with a paper towel and replace. Repeat the starting procedure.
- Page 24 8. After the engine starts, allow the saw to run and warm up in this position for 15 seconds. Operate the safety trigger lock and trigger. Fail or forget to do step 8 will result in chain brake cover burning or smoking, which is unrepairable. trigger lock throttle trigger 9.
- Page 25 After starting the engine, run the chain at medium speed and see if chain oil is being dispensed as shown. With the chainsaw switched off, the chain oil flow can be changed by inserting a screwdriver in the hole on the bottom of the side of the clutch. Increase or decrease the oil flow according to your work conditions.
- Page 26 1. Turn off the engine and leave until it is cold. 2. With the chainsaw on a flat surface and the chain tensioned correctly, engage the chain brake by pushing it forward until an audible click is heard. Then, wearing protective gloves, attempt to move the chain by hand in the direction of normal rotation;...
- Page 27 STEP 6 - FELLING A TREE WARNING! You should have received training from a suitable person before attempting to fell a tree. When you fell a tree, be sure to warn anyone in close proximity of the danger. 1. When deciding the felling direction, consider the wind, lean of the tree, location of heavy branches, ease of job after felling, and other factors.
- Page 28 STEP 7 - BUCKING AND LIMBING WARNING! • Always ensure a stable foothold; do not stand on the log. • Be alert to the rolling over of a cut log, especially when working on a slope, and stand on the uphill side of the log. •...
- Page 29 Cutting the limb of a fallen tree (Fig. C) First check to which side the limb is bent. Then make an initial cut from the bend side and finish by sawing from the opposite side. WARNING! Be alert to the spring back of a cut limb. Pruning of a standing tree (Fig.
-
Page 30: Care And Cleaning
CARE AND CLEANING MAINTENANCE AND STORAGE LIST OF VULNERABLE PARTS Description Models or specifications Spark plug L8RTF Guide bar 160SDEA041 Saw chain 91P057X MAINTENANCE AFTER EACH USE WARNING! Before cleaning, inspecting or repairing your unit, make sure that the engine has stopped and is cool. - Page 31 2. Oiling port Detach the chain bar and check the oiling port (A) for clogging. 3. Chain bar When the chain bar is dismounted, remove sawdust from the bar groove and the oiling port. Grease the nose sprocket through the grease port on the tip of the bar. 4.
- Page 32 HOW TO REPLACE THE SAW 1. Pull the chain brake back and ensure that it has been released (the chain cover can only be removed with the chain brake disengaged). 2. Loosen the chain cover tightening wheel and the chain cover. 3.
- Page 33 4. Adjust the tension to ensure that there is not too much slack in the chain. Make sure the tensioner pin (B) is located in the assembly hole (A) on the bar. Pay attention to the correct direction of the saw chain.
- Page 34 PERIODICAL SERVICE POINTS 1. Start assembly 2. Fan cover 3. Fan 4. Cylinder fins 5. Engine cover Air cooling system Dust clogging around the cooling system and the cylinder fins will cause overheating of the engine. Periodically check and clean the cooling system and the cylinder fins with a brush after removing the cylinder cover, the air cleaner and the recoil case.
- Page 35 Cutter setting guidance WARNING! Be sure to wear safety gloves. Before filing: 1. Make sure the saw chain is held securely. 2. Make sure the engine is stopped. 3. Use a round file with the proper size for your chain. NOTE: Chain type: 91PJ File size: 5/32 in (4mm).
- Page 36 Chain Bar 1. Reverse the bar occasionally to prevent partial wear. 2. The bar rail should always have parallel internal faces (see diagram). Check for wear of the bar rail. Apply a ruler to the bar and the outside of a cutter. If a gap is observed between them, the rail is normal.
-
Page 37: Trouble Shooting
TROUBLE SHOOTING CAUTION! Always switch off the engine and pull the ignition cable before starting any inspection or adjustment work. If, after making an adjustment or repair to the engine, you let it run for a few minutes, remember that the exhaust and other parts will get hot. Do not touch parts that emanate heat, as these may burn you. -
Page 38: Declaration Of Conformity / Performance
Product Description: Hawksmoor 41cc 40.6cm Petrol Chainsaw 1.Toolstation (company number 04372131) This declaration of conformity is issued under the sole responsibility of Toolstation 2.Object of the declaration The object of the declaration described above is in conformity with the relevant Community... -
Page 39: Environmental Information
ENVIRONMENTAL INFORMATION Old products are potentially recyclable and do not, therefore, belong in your household rubbish. You are requested to assist us and our contribution to saving resources and protecting the environment by handing in this product at an equipped collection centre (if there is one available). -
Page 40: Guarantee
Toolstation products are individually tested before leaving the factory. If you are a consumer and you experience a problem with your Toolstation product, which is found to be defective due to faulty materials or workmanship within the Guarantee Period, this Toolstation Guarantee will cover repair or - at the discretion of Toolstation –...
Need help?
Do you have a question about the Hawksmoor CS4100A-5 and is the answer not in the manual?
Questions and answers