
Summary of Contents for Getinge 1009.25B0
- Page 1 Instructions for use 1009.25B0 Universal remote control IFU 1009.25 EN 01 2024-05-07...
- Page 2 Subject to technical modification! Due to further development of the product, the figures used and technical specifications given in these Instruc- tions for Use may slightly differ from the current state of the product. V01 05 07-05-2024 1009.25B0 IFU 1009.25 EN 01...
-
Page 3: Table Of Contents
Charging the stationary charging station (1009.24A0/C0) ............. 20 3.2.3 Charging the control device via the cable ................21 Remove/insert the locking plugs......................Operation and use....................24 Notes on use ............................Transmission power ..........................1009.25B0 3 / 92 IFU 1009.25 EN 01... - Page 4 Activate / deactivate safety functions ..............46 5.3.9 [Decubitis timer] menu ......................47 5.3.10 [Feedback-LED] menu ......................48 5.3.10.1 Activating / deactivating the feedback light messages ........48 5.3.10.2 Setting the brightness of the feedback light ............48 1009.25B0 4 / 92 IFU 1009.25 EN 01...
- Page 5 Cleaning and disinfection ..................75 General information ..........................7.1.1 No mechanical preparation ....................76 Cleaning agents and disinfectants......................7.2.1 Suitable cleaning agents......................77 7.2.2 Suitable disinfectants ......................77 7.2.3 Non-usable products / substances..................77 Manual preparation..........................1009.25B0 5 / 92 IFU 1009.25 EN 01...
- Page 6 Electro magnetic transmission and resistance to interference..........86 9.5.2 Resistance to electro magnetic interference - Testing process ..........86 9.5.3 Transmitting and receiving RF energy ................... 88 10 Approved accessories..................... 89 10.1 Accessories universal remote control ....................Index.......................... 90 1009.25B0 6 / 92 IFU 1009.25 EN 01...
-
Page 7: Introduction
Reference to other pages within this document [...] Key / Module / Mode bold Menu / on-screen button [italics] Field to be filled in 1122.33XX Order number with different variants (XX) Tab. 1: Symbols and formatting 1009.25B0 7 / 92 IFU 1009.25 EN 01... -
Page 8: Definitions
ENVIRONMENT Information regarding proper disposal. Tab. 3: Structure of notes 1009.25B0 8 / 92 IFU 1009.25 EN 01... -
Page 9: Definition For 3-Dimensional Coordinate System
Definition of terms for the 3-dimensional coordinate system Frontal plane (horizontal plane) Transverse plane Sagittal plane 1.1.3.4 Definition of inclination and tilt Fig. 2: Definition of inclination and tilt Reverse Trendelenburg Lateral tilt Trendelenburg (head down) Inclination 1009.25B0 9 / 92 IFU 1009.25 EN 01... -
Page 10: Definition Of Patient Orientation
The blue dot is located on the touchscreen of The legs are located above the longer sec- the control device to the right of the operating tion of the operating table base. table column. 1009.25B0 10 / 92 IFU 1009.25 EN 01... -
Page 11: Symbols Used
Labelling in accordance with the IEC 60601-1 standard. Symbol for "Follow Instructions for use". Labelling in accordance with the ISO 15223-1 standard. Symbol for "Consult instructions for use". Tab. 4: Symbols 1009.25B0 11 / 92 IFU 1009.25 EN 01... - Page 12 Symbol for "Do not dispose of product via the municipal collection points for used electrical equipment". Labelling in accordance with the ISO 15223-1 standard. Symbol for "Name and address of the importer". Tab. 4: Symbols 1009.25B0 12 / 92 IFU 1009.25 EN 01...
-
Page 13: Disposal
1.3.1 Old products Getinge will take back used products or those which are no longer in service. For further informa- tion, please contact your personal Getinge representative. Used products or parts thereof may be contaminated. In order to avoid potential infection risks, the product must be cleaned and disinfected prior to its return/disposal. -
Page 14: Basic Requirements
The product may only be operated by medically trained staff within the OR environment. Any use other than described above is deemed not to be in accordance with the intended use. 1009.25B0 14 / 92 IFU 1009.25 EN 01... -
Page 15: Mounting Points
• OTESUS OR table (1160.01A0/B0/C0/D0) 1.4.5 Variants The product is available in the following versions: • 1009.25B0 Universal remote control 1.4.6 Product features 1.4.6.1 Essential performance features The product corresponds to IEC 60601-1 and its collateral standards with the following essential performance features: •... -
Page 16: Safety Notes
During adjustments, observe the OR table, the transporter, the table top and ac- cessories constantly and avoid collisions. Ensure that tubes, cables and drapes are not trapped. 1009.25B0 16 / 92 IFU 1009.25 EN 01... -
Page 17: Safety Notes For The Product
• Before use, check the proper working order and fully functional state of the product. • Stop using faulty or defective products and inform the Getinge representative. Safety notes for the product AR NI NG Risk of injury! Magnetic fields with a magnitude greater than 0.5 mT may influence the func- tionality of the product. -
Page 18: Safety Notes Regarding The Use Of Accessories
AR NI NG Hazard of injury! The use of accessories, cables or spare parts not specified by GETINGE may result in increased electromagnetic interference emissions or reduced elec- tromagnetic immunity of the product or affect the safety of the product. -
Page 19: Initial Operation
7200.01, CORIN 7700.01 operating tables The mobile charger/the stationary charging station have several functions: • Safe storage of the control device • Charging the control device • Automatic unlocking of the activated sleep mode [8 Page 41] 1009.25B0 19 / 92 IFU 1009.25 EN 01... -
Page 20: Charging Of The Control Device With The Mobile Charging Station (1009.24B0)
Ø The control device is charged as long as the green LED is flashing. 2. Check for firm seating. Fig. 7: Attaching a control device 1009.25B0 20 / 92 IFU 1009.25 EN 01... -
Page 21: Charging The Control Device Via The Cable
[8 Page 29]. If the rechargeable battery of the control device is defective, the control device can continue to be used as a corded control device. 1009.25B0 21 / 92 IFU 1009.25 EN 01... - Page 22 OR table is detected. Charging can always be re-enabled by activating "Active Cable Charging" in this menu. Fig. 10: Active Cable Charging 1009.25B0 22 / 92 IFU 1009.25 EN 01...
-
Page 23: Remove/Insert The Locking Plugs
2. Make sure that the arrow on the plug is exactly aligned with the arrow on the con- nector socket of the control device. Fig. 11: Remove/insert the locking plugs 1009.25B0 23 / 92 IFU 1009.25 EN 01... -
Page 24: Operation And Use
(for instance by a person). In this case, change the direction or position of the control device slightly and repeat the adjustment. 1009.25B0 24 / 92 IFU 1009.25 EN 01... -
Page 25: Acoustic Signals Of The Control Device
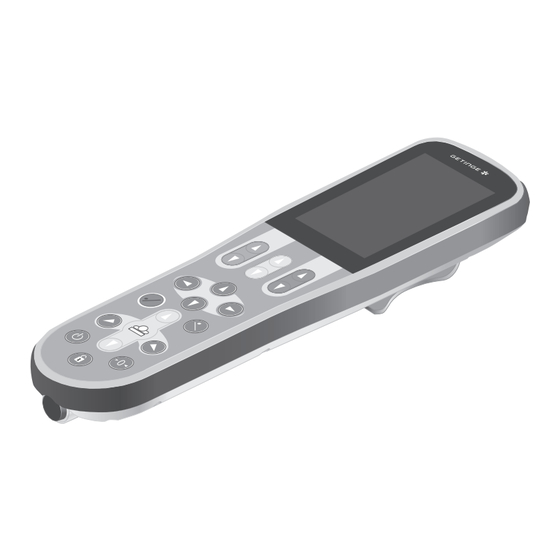
Multifunctional buttons: Buttons with several functions for operation in combination with the touchscreen Adjustment buttons: Buttons for adjusting the OR table Fig. 12: Overview of the control device 1009.25B0 25 / 92 IFU 1009.25 EN 01... -
Page 26: Button Assignment And Functions
8 [Lateral tilt left] button 18 [Zero.position] button 9 [Stand-by] button 19 [UNLOCK] button / Lock OR table quick ac- cess menu 10 [Magenta joint up] button * see the display on the touch screen 1009.25B0 26 / 92 IFU 1009.25 EN 01... -
Page 27: Colour Concept Of The Touchscreen With The Touchscreen Buttons
OR table or other accessories. Remove the control device from the side rail before adjusting the table top. 1. Attach the bracket to the side rail Fig. 14: Mounting the control device to the side rail 1009.25B0 27 / 92 IFU 1009.25 EN 01... -
Page 28: Operating Menu
External power supply of the operating table with mobile/independently manoeuvrable column Control bar area (optional) Battery symbol of the operating table with mo- bile/independently manoeuvrable column 10 Connection active PATIENT SELECT ORIENTATION Fig. 15: Overview of start screen 1009.25B0 28 / 92 IFU 1009.25 EN 01... -
Page 29: Display Adjustment Procedure
Battery of the control device is fully charged. The battery charge level of the control unit is in the range of approx. 83 %. The battery charge capacity is sufficient. Tab. 7: Symbols for status bar 1009.25B0 29 / 92 IFU 1009.25 EN 01... -
Page 30: Main Menu [Menu]
Adjustment Speed menu [8 Page 42] Adjustment Feedback Safety Settings m [8 Page 46] menu Drive Speed Light Feedback Light menu [8 Page 48] Active Cable Charging menu [8 Page 21] Safety 10 Lock OR table menu Settings Fig. 17: Overview of main menu 1009.25B0 30 / 92 IFU 1009.25 EN 01... -
Page 31: Menu [Or Table Connection]
14 - OR-01 table is displayed. 2. Touch the Connect to new OR table 15 - OR-02 button. Fig. 19: Connect a new OR table Ø The window for entering the IR code appears. 1009.25B0 31 / 92 IFU 1009.25 EN 01... - Page 32 • OR tables BETACLASSIC 1118.01, ALPHACLASSIC 1118.02/03, ALPHACLASSIC PRO 1118.06 • OR table BETASTAR 1131.12 • OR tables ALPHASTAR 1132.11, ALPHASTAR PLUS 1132.13, ALPHASTAR PRO 1132.21/22 • ALPHASTAR TOP 1132.17 OR table 1009.25B0 32 / 92 IFU 1009.25 EN 01...
-
Page 33: Reconnecting The Known Or Table
14 - OR-01 2. Touch already known operating table from the list. 15 - OR-02 Ø Operating table is connected. Fig. 22: Connect a known OR table Ø The OR Table Connection menu is open. 1009.25B0 33 / 92 IFU 1009.25 EN 01... -
Page 34: Disconnect The Or Table
Enter OR table name virtual keyboard is displayed. OR-01: 2. Enter the name of the operating table. 3. Touch the OK button. Ø Operating table has been renamed. Fig. 24: Rename OR table 1009.25B0 34 / 92 IFU 1009.25 EN 01... -
Page 35: Show Ir Code
OR Table Information 1. Touch the Sound ON button. Ø The menu item Sound ON is greyed Fig. 26: Switch sound on/off out. 2. Touch the OK button. Ø The sound is switched off. 1009.25B0 35 / 92 IFU 1009.25 EN 01... -
Page 36: Selecting The Zero-Position Variant
OR01-14 date for the next maintenance of the OR table. CANCEL OR TABLE SETTINGS Sound ON Zero-position variants Next maintenance 00.00.0000 Connected Functions OR Table Information Fig. 28: Next maintenance 1009.25B0 36 / 92 IFU 1009.25 EN 01... -
Page 37: Select Network
Ø A window with a more specific descrip- tion will open. Info text 3 3. Touch the BACK button. Info text 4 Ø An overview of available information will be displayed once again. Fig. 30: Display operating table information 1009.25B0 37 / 92 IFU 1009.25 EN 01... -
Page 38: Menu [Device Settings]
Ø The status display next to the selected Fig. 32: Set the language language lights orange. 3. Touch the OK button. Ø The menu Device Settings is shown. 4. Touch the OK button. Ø The selected language is set. 1009.25B0 38 / 92 IFU 1009.25 EN 01... -
Page 39: Resetting The Control Device
Key combination not allowed 2. Touch the corresponding log file Stored position requires Ø The complete log file and the corres- NORMAL patient orientation ponding error code are displayed. Fig. 34: Open log files 1009.25B0 39 / 92 IFU 1009.25 EN 01... -
Page 40: Set The Date / Time
StatCrcErr: 0 HW-ID Main: 0 IR: 0 KEY: 0 LCD: 0 Date / Time: 2010-01-01-00-00 Bat. t2empty: 0 min, SoH: 0 % Bat. pcharge: 0 mAh, cycle count: 0 Fig. 36: Access system information 1009.25B0 40 / 92 IFU 1009.25 EN 01... -
Page 41: Activating / Deactivating Sleep Mode
75%. During charging, the [Stand-by] button flashes. Ø Sleep mode is activated when the bat- tery is 75% charged. The [Stand-by] button stops flashing. 5. Remove the control device from the char- ging cradle. 1009.25B0 41 / 92 IFU 1009.25 EN 01... -
Page 42: Menu [Adjustment Speed]
To avoid unwanted adjustments, it is recommended to scroll up and down on the left side of the touch screen. The speed of the various adjustment functions can be increased or decreased via the Adjustment Speed menu. 1009.25B0 42 / 92 IFU 1009.25 EN 01... -
Page 43: Use Maximum Adjustment Speed For A Short Period Of Time
Ø As long as the button is touched, the adjustment takes place at the maximum adjustment speed. L: 30° TREND: -20° 30° TILT: 0° R: -30° PATIENT SELECT ORIENTATION Fig. 40: Use maximum speed 1009.25B0 43 / 92 IFU 1009.25 EN 01... -
Page 44: Menu [Operating Table Lock]
1. Touch the OR Table Lock - or - button Table Top Lock. Ø The status display is greyed out. 2. Touch the OK button. Ø Operating table lock or operating table top lock is deactivated. 1009.25B0 44 / 92 IFU 1009.25 EN 01... -
Page 45: Locking The Or Table [Lock]
Wheel Lock disabled • The function is deactivated. 1. Touch the External Control Lock button. Ø The status display will be illuminated or- ange. Unlock Lock Fig. 43: Locking the operating table [LOCK] 1009.25B0 45 / 92 IFU 1009.25 EN 01... -
Page 46: Menu [Drive]
The OR table goes into standby mode approx. 15 seconds after the last time a but- ton is pressed. Once the OR table is reactivated, the safety function is activated once again as well. 1009.25B0 46 / 92 IFU 1009.25 EN 01... -
Page 47: Decubitis Timer] Menu
Ø The decubitus timer is set and started. Ø The remaining time is displayed in the Decubitus timer menu and on the start Initial interval screen. 01:00:00 Repeating interval 00:30:00 START STOP TIMER TIMER Fig. 45: Decubitus timer 1009.25B0 47 / 92 IFU 1009.25 EN 01... -
Page 48: Feedback-Led] Menu
Ø The main menu will be displayed. Ø Setting was adopted. 5.3.10.2 Setting the brightness of the feedback light The brightness of the feedback lights can be regulated in the Feedback Light menu. 1009.25B0 48 / 92 IFU 1009.25 EN 01... -
Page 49: Set The Patient Orientation
Patient orientation structions. NORMAL (active) 2. Touch the PATIENT ORIENTATION but- ton. Patient orientation REVERSE Ø The window for setting the patient ori- entation is displayed. HIGHLIGHT Fig. 48: Set the patient orientation 1009.25B0 49 / 92 IFU 1009.25 EN 01... -
Page 50: Or Table Positions] Menu
3. To move to the selected OR table position, press the highlighted multifunction button [Up] on the control device. Fig. 49: Available OR table positions Ø The selected OR table position will be approached. 1009.25B0 50 / 92 IFU 1009.25 EN 01... -
Page 51: User-Defined Operating Table Position
OR01-14 STORE Ø The list with the previously saved BACK POSITION folders is displayed. USER-DEFINED POSITIONS Folder 01 Folder 02 Folder 03 Dr. Kruger Dr. Kruger_02 EDIT EDIT Fig. 51: menu USER-DEF. POSITION 1009.25B0 51 / 92 IFU 1009.25 EN 01... - Page 52 Ø The window for renaming the position is opened. 3. Enter the new name of the folder and con- firm with the OK button. Ø The folder is saved with the new name. 1009.25B0 52 / 92 IFU 1009.25 EN 01...
-
Page 53: Save A User-Defined Operating Table Position
2. Enter the name of the new OR table posi- tion. 3. Touch the OK button. Ø The new user-defined OR table position will be saved in the list in the menu USER-DEF. POSITION. 1009.25B0 53 / 92 IFU 1009.25 EN 01... -
Page 54: Selecting And Approaching A User-Defined Or Table Position
EDIT EDIT Ø The Move to position window and the following operating notification are dis- Fig. 55: Move to a user-defined OR table posi- played. tion Move to position 1009.25B0 54 / 92 IFU 1009.25 EN 01... -
Page 55: Editing A User-Defined Or Table Position
1. Touch the EDIT button Folder 01 Ø The EDIT INDIVIDUAL POSITION win- dow is displayed. Folder 02 Folder 03 Dr. Kruger Dr. Kruger_02 EDIT EDIT Fig. 57: Editing a user-defined OR table position 1009.25B0 55 / 92 IFU 1009.25 EN 01... -
Page 56: Quick Saving A User-Defined Or Table Position
Move to quick memory position 2. Touch the Store current OR table position button Ø Query Store current OR table position? is displayed. TREND: -20° L: 30° 30° TILT: 0° R: -30° Fig. 59: Quick-saving a position 1009.25B0 56 / 92 IFU 1009.25 EN 01... -
Page 57: Move To Quick-Save Memory Position
TREND: -20° L: 30° 30° TILT: 0° R: -30° 3. Press the displayed multifunction button [Up] on the control device. Fig. 61: Move to quick-save memory position Ø Moves to selected quick-save position. 1009.25B0 57 / 92 IFU 1009.25 EN 01... -
Page 58: User-Defined Sequences
Folder 02 1. Touch the CREATE NEW SEQUENCE Folder 03 button Dr. Kruger Ø The window for creating a new se- quence is opened. Dr. Kruger_02 EDIT EDIT Fig. 62: Save new sequence 1009.25B0 58 / 92 IFU 1009.25 EN 01... - Page 59 Create the new sequence in a folder Ø The window for creating a new se- quence is opened. 3. Adjust the operating table using the but- tons on the operating device. Once the desired intermediate position is reached: 1009.25B0 59 / 92 IFU 1009.25 EN 01...
-
Page 60: Selecting And Approaching A User-Defined Sequence
The control device will automatically switch to stand-by mode after several seconds with no input. If the control device is in stand-by mode, the [Stand-by] button flashes as soon as movement is detected. 1009.25B0 60 / 92 IFU 1009.25 EN 01... - Page 61 Ø The control device will be switched into stand-by mode, and the light on the control device will switch off. Ø If the control device is moved, the Fig. 65: Activating / deactivating stand-by mode [Stand-by] button will be illuminated. 1009.25B0 61 / 92 IFU 1009.25 EN 01...
- Page 62 Operating menu Activate control device from stand-by mode / set to stand-by mode 1009.25B0 62 / 92 IFU 1009.25 EN 01...
-
Page 63: Restarting The Control Device
[8 Page 36]. For further information on how to horizontally align the table top and the available reset/zero-posi- tion variants, please refer to the OR table's operating instructions. 1009.25B0 63 / 92 IFU 1009.25 EN 01... -
Page 64: Inclining The Table Top
Always secure the patient using suitable aids (e.g. straps) and maintain continuous observation. Depending on the currently connected OR table, the movable and mobile columns have limited bending. For further information refer to the OR table operating in- structions. 1009.25B0 64 / 92 IFU 1009.25 EN 01... -
Page 65: Moving The Table Top Longitudinally
Ø The table top moves in the selected dir- ection. Ø When the end position is reached, this is indicated on the display and a signal is sounded. Fig. 68: Moving the table top longitudinally 1009.25B0 65 / 92 IFU 1009.25 EN 01... -
Page 66: Adjusting The Height Of The Or Table
1. Press and hold the [Blue joint up] [Magenta joint down] button. Ø The single piece accessory is adjusted upwards. Ø The adjustment angle is displayed on the touchscreen. Fig. 70: Adjusting single-piece accessories 1009.25B0 66 / 92 IFU 1009.25 EN 01... -
Page 67: Adjusting The Pair Of Leg Plates Or Single Leg Plate
- or - Ø The selected leg plate is shown in magenta on the touch screen. PATIENT SELECT ORIENTATION Fig. 71: Select the pair of leg plates or single leg plate 1009.25B0 67 / 92 IFU 1009.25 EN 01... -
Page 68: Displacing / Locking The Or Table
Remove potential hindrances before moving / adjusting the mobile operating table and avoid collisions. AU TION Property damage! When moving the OR table use at least one hand in order to prevent any collisions. 1009.25B0 68 / 92 IFU 1009.25 EN 01... -
Page 69: Status Display [Lock] / [Unlock]
Ø The swivel castors extend automatically. Ø The LED below the [UNLOCK] button on the override control panel will light up. Ø The OR table can be moved. 3. Use two people to guide the OR table. 1009.25B0 69 / 92 IFU 1009.25 EN 01... -
Page 70: Moving The Or Table Using Autodrive [Unlock]
Ø The OR table can be moved. Ø Hold the OR table with at least one hand. Fig. 73: Moving the operating table using the motor 1009.25B0 70 / 92 IFU 1009.25 EN 01... - Page 71 3. Guide the OR table with at least one hand. 4. Release [Multifunction button right] [Multifunction button left] at the desired position. Ø The OR table stops moving. 1009.25B0 71 / 92 IFU 1009.25 EN 01...
-
Page 72: Locking The Or Table [Lock]
Ø The OR table is locked. Ø The display in the menu Lock OR table switches to Wheel Lock enabled Unlock Ø The OR table can be adjusted. Lock Fig. 75: Locking the OR table [LOCK] 1009.25B0 72 / 92 IFU 1009.25 EN 01... -
Page 73: Display Notes
With every status message, the error code is displayed under the attention symbol. If the error cannot be corrected, note the error code and forward it to the service technician authorised by Getinge. OTICE For further status notices and information, please refer to the operating instructions for the operating table. -
Page 74: Warning Notices
With every status message, the error code is displayed under the attention symbol. If the error cannot be corrected, note the error code and forward it to the service technician authorised by Getinge. OTICE For further warning notices and information, please refer to the operating instruc- tions for the operating table. -
Page 75: Cleaning And Disinfection
If necessary, take further protective measures. AN GE R Potentially fatal electrical shock! • Make sure that the mains connection is disconnected before cleaning and dis- infection. • Ensure that no liquids can penetrate any live parts. 1009.25B0 75 / 92 IFU 1009.25 EN 01... -
Page 76: No Mechanical Preparation
Observe the manufacturer's instructions for concentrations of cleaning agents and disinfectants • Perform visual and functional inspections after each cleaning and disinfection process. 7.1.1 No mechanical preparation AU TION Property damage! Do not use any mechanical cleaning or disinfection processes. 1009.25B0 76 / 92 IFU 1009.25 EN 01... -
Page 77: Cleaning Agents And Disinfectants
Products that scratch the surface (e.g. scouring agents, wire brushes, steel wool, cleaning sponges containing iron) • Standard commercial solvents (e. g. benzene, thinner) • Water containing particles of iron • Products containing acid (e.g. hydrochloric acid) • Saline solutions 1009.25B0 77 / 92 IFU 1009.25 EN 01... -
Page 78: Manual Preparation
7.3.3 Drying Wipe-down disinfection does not require any drying, as excess disinfectant evaporates. 1. Observe the drying time specified by the disinfectant manufacturer. 7.3.4 Inspections 1. Carry out visual and functional inspections. 1009.25B0 78 / 92 IFU 1009.25 EN 01... -
Page 79: Maintenance
Comment: 2 Are the selected adjustment □ □ 1. Do not continue to use the functions not executed? product. 2. Notify Getinge authorised service. Comment: 3 Are there damages to mechan- □ □ 1. Do not continue to use the ical parts? product. -
Page 80: Malfunctions And Troubleshooting
Defects are present No defects 6 Are there damages to the insu- □ □ 1. Do not continue to use the lation of electrical cables? product. 2. Notify Getinge authorised service. Comment: 7 (Space for other tests) □ □ Comment: Tab. 11:... - Page 81 2. operate the OR table using the override control panel or another control device. The control device is defective. 1. Have the control device checked by authorised service technicians. Tab. 12: Faults and troubleshooting 1009.25B0 81 / 92 IFU 1009.25 EN 01...
-
Page 82: Mobile Charging Station
5 Orange LED (error display) flashes Error in the supply voltage of the stationary char- slowly. ging station. 1. Have the mobile charging station checked by an authorised service technician. Tab. 13: Faults and troubleshooting 1009.25B0 82 / 92 IFU 1009.25 EN 01... -
Page 83: Stationary Charging Station
5 Orange LED (error display) flashes Error in the supply voltage of the stationary char- slowly. ging station. 1. Have the product checked by an authorised ser- vice technician. Tab. 14: Faults and troubleshooting 1009.25B0 83 / 92 IFU 1009.25 EN 01... -
Page 84: Maintenance
If available: Serial number (see type plate) • Construction year (see type plate) Hotline for Germany: +49 (0) 180 32 12 144 Hotlines for other countries can be found at www.getinge.com. Type plate Position of the type plate on the product. -
Page 85: Technical Specifications
Electrical specifications Internal operating voltage IPS SELV DC 3.6 V Rechargeable battery Li-ion 7.92 Wh / 2.2 Ah Protection against ingress of liquids IP X4 (spray water protection) Dimensions Length 254 mm Width 65–75 mm Height 26-37 mm Weight Net weight 0.4 kg 1009.25B0 85 / 92 IFU 1009.25 EN 01... -
Page 86: Electromagnetic Compatibility (Emc)
Interference immunity to static discharge ±8 kV contact discharge ±2 kV, ±4 kV, ±8 kV, ±15 kV air discharge IEC 61000-4-2 Interference immunity to high-frequency 3 V/m electromagnetic fields 80 MHz – 2.7 GHz 80 % AM at 1 kHz IEC 61000-4-3 1009.25B0 86 / 92 IFU 1009.25 EN 01... - Page 87 50 Hz IEC 61000-4-8 Interference immunity to magnetic fields in 134,2kHz, pulse modulation 2.1 kHz, 65 A/m a frequency range of 9 kHz to 13.56 MHz 13,56MHz, pulse modulation 50 kHz, 7.5 A/m IEC 61000-4-39 1009.25B0 87 / 92 IFU 1009.25 EN 01...
-
Page 88: Transmitting And Receiving Rf Energy
(ITU) ent Isotropic Ra- diated Power) WLAN 2.4 GHz 2400 - CCK, DSSS, 20 / 40 MHz 17 dBm ±1 dB IEEE 802.11 b/g/n 2483.5 MHz OFDM Bluetooth LE 2400 - GFSK 2 MHz 8 dBm ±1 dB 2483.5 MHz 1009.25B0 88 / 92 IFU 1009.25 EN 01... -
Page 89: Approved Accessories
Only accessories listed in this chapter may be mounted to this product. 10.1 Accessories universal remote control 1009.24A0 Stationary charging station 1009.24B0 Mobile charging station 1009.24C0 Stationary charging station 1009.27A0 Cable Tab. 15: Accessories universal remote control 1009.25B0 89 / 92 IFU 1009.25 EN 01... -
Page 90: Index
Lowering 66 Batteries 13 Raising 66 Cleaning and disinfection 13 OR table position Packing 13 preset 50 Product 13 quick-save 56 Rechargeable battery 13 Save 53 Select 50 Error reports open 39 1009.25B0 90 / 92 IFU 1009.25 EN 01... - Page 91 65 Temperature 85 Transverse 9 Trendelenburg 9 Reverse Trendelenburg 9 Troubleshooting 80 Type plate 84 Use in accordance with the intended purpose 14 Used electrical devices 13 Visual and functional inspections 79 1009.25B0 91 / 92 IFU 1009.25 EN 01...
- Page 92 MAQUET GmbH · Kehler Str. 31 · 76437 Rastatt · GERMANY · Phone: +49 7222 932-0 www.getinge.com UK responsible person and importer in the Great Britain market: Getinge Ltd. · 14-15 Burford Way Boldon Business Park · NE35 9PZ Sunderland · Great Britain IFU 1009.25 EN 01 2024-05-07...
Need help?
Do you have a question about the 1009.25B0 and is the answer not in the manual?
Questions and answers