Table of Contents
Advertisement
Quick Links
Advertisement
Table of Contents

Summary of Contents for Scewo BRO Loader
- Page 1 Car Ramp "BRO Loader" User Manual Publication date 18 July 2024...
- Page 2 Manufacturer Scewo AG Technoparkstrasse 7 8406 Winterthur Schweiz Tel: +41 44 500 86 03 E-Mail: info@scewo.ch Web: www.scewo.com UID: CHE-315.209.303 EU Contact Scewo Germany GmbH Bohlinger Straße 25 78224 Singen (Hohentwiel) Deutschland...
-
Page 3: Table Of Contents
Car Ramp "BRO Loader" Scewo AG Table of Contents 1. General ..........................5 1.1. -
Page 5: General
Pay special attention to the safety instructions. The safety and functionality of the car ramp has been tested with the Scewo BRO electric wheel- chair. We cannot guarantee that other loads are suitable for the car ramp. We recommend using the car ramp only with the BRO. -
Page 6: Configurations & Technical Data
• Rated load (pair): 190 kg • Minimum angle to the ground: 28° • Maximum angle to the ground: see the load's operating instructions. For the BRO from Scewo, the maximum angle is 36° The car ramp must be adjusted according to the vehicle's loading edge height. You can find the... -
Page 7: Caution Stickers
There are stickers on the car ramp that contain important information regarding safe and proper use. The stickers must not be removed and must always be visible. If a sticker is damaged or illegible, you can order a new one from Scewo or a dealer. TYPE LABEL Figure 1. - Page 8 Scewo AG Car Ramp "BRO Loader" The sticker indicates that the maximum load for the car ramp is 190 kg. Figure 5. Angle restriction The sticker indicates that the angle between the roadway of the car ramp and the ground must be at least 28°...
-
Page 9: Safety Instructions
Car Ramp "BRO Loader" Scewo AG 2. SAFETY INSTRUCTIONS • Never use the product while sitting on the wheelchair. • Set the car ramp to the configuration suitable for your vehicle according to the chapter Configu- rations & Technical Data [6] •... -
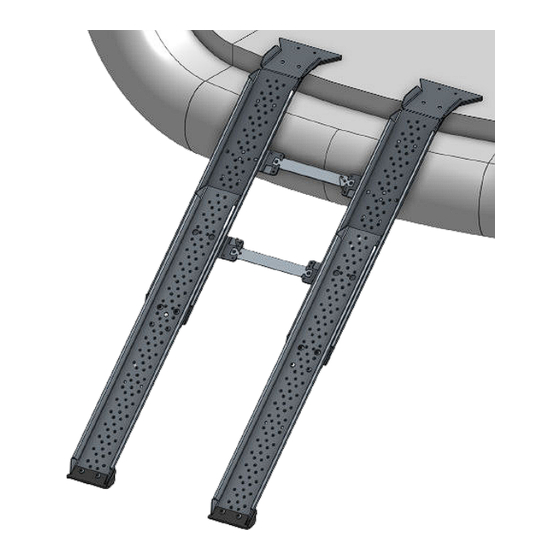
Page 10: Using The Car Ramp
3. USING THE CAR RAMP This chapter explains how the car ramp should be used to load a load. Scewo recommends that you have a qualified person show you how to load an electric wheelchair into a car before using the car ramp for the first time. -
Page 11: Conversion Of The Car Ramp For A Different Loading Sill Height
Car Ramp "BRO Loader" Scewo AG 4. CONVERSION OF THE CAR RAMP FOR A DIFFERENT LOADING SILL HEIGHT 4.1. STARTING POINT: LARGE CONFIGURATION CONVERSION TO MEDIUM CONFIGURATION Loosen two M6 x 20 mm screws to separate the base from the hinge. - Page 12 Scewo AG Car Ramp "BRO Loader" CONVERSION TO SMALL CONFIGURATION Loosen the two M6 x 20 mm and the two M6 x 12 mm screws to separate the hinge, base and head. The hinge is not needed for the small configuration.
-
Page 13: Starting Point: Medium Configuration
Car Ramp "BRO Loader" Scewo AG 4.2. STARTING POINT: MEDIUM CONFIGURATION CONVERSION TO LARGE CONFIGURATION Loosen two M6 x 20 mm screws to separate the base from the hinge. Screw the base back onto the hinge. To do this, you will need all the parts removed in the first step. -
Page 14: Starting Point: Small Configuration
Scewo AG Car Ramp "BRO Loader" Four M6 x 16 mm screws, four M6 all-metal lock nuts and six M6 washers are required to screw the base to the head. At the bottom position, one washer must be placed between the base and the head for each screw. - Page 15 Car Ramp "BRO Loader" Scewo AG Screw the hinge to the head with two M6 x 12 mm screws and two M6 all-metal lock nuts. Make sure that the hinge is aligned parallel to the head. Tighten the screws with a torque of 4.7 Nm.
- Page 16 Scewo AG Car Ramp "BRO Loader" Screw the base to the hinge. This requires two M6 x 20 mm screws, two M6 washers, two M6 all-metal lock nuts and a hinge support (blue component in the image to the side). For the middle configuration, screw the base to the hinge in the middle position.
-
Page 17: Additional Plate For Stepped Trunks
Car Ramp "BRO Loader" Scewo AG 5. ADDITIONAL PLATE FOR STEPPED TRUNKS For stepped trunks, there is the option of an additional plate. This can be ordered in addition to the car ramp and enables the support wheels to roll down in a controlled manner into a stepped trunk. - Page 18 Scewo AG Car Ramp "BRO Loader" Cover the locking nuts, which are mounted on the hinge on the head side, with cover caps. When using the additional plate for stepped trunks, it must be ensured that the additional plate touches the floor of the trunk (see picture).
-
Page 19: Storing The Car Ramp
Car Ramp "BRO Loader" Scewo AG 6. STORING THE CAR RAMP General storage: The car ramp should be stored in a dry place. Storing while driving: Store the car ramp safely in the trunk of the vehicle. If there is not enough space, the car ramp can be stored in the back seat in a safe place that will prevent the car ramp from sliding forward in the event of an emergency stop. -
Page 20: Maintenance And Cleaning
Scewo AG Car Ramp "BRO Loader" 7. MAINTENANCE AND CLEANING Check your car ramp regularly for worn, loose or damaged parts. If you find any of the parts damaged, stop using the car ramp and contact your dealer. Check that all screws and nuts are tight once a month and tighten them if necessary.
Need help?
Do you have a question about the BRO Loader and is the answer not in the manual?
Questions and answers