
Summary of Contents for SolarGateway SolarGatewayPRO GSE-A010
- Page 1 Quick installation guide Model GSE-A010 and GSE-A010-POE English page 1-11 Nederlands pagina 12-22 V2.3.0...
- Page 3 Quick installation guide English English page 1-11 Nederlands pagina 12-22...
- Page 4 Disclaimer By using this product, the user acknowledges and accepts this disclaimer. The SolarGatewayPRO is designed for use in electrical systems, but it is not a safety device. It is the responsibility of the user to ensure that the system is properly equipped with the necessary safety measures to protect against any potential hazards.
- Page 5 In the box 1x SolarGatewayPRO 1x DC input connector 3x RS485 connector 1x GPIO connector 1x Quick installation guide All provided connectors are already plugged into the device...
-
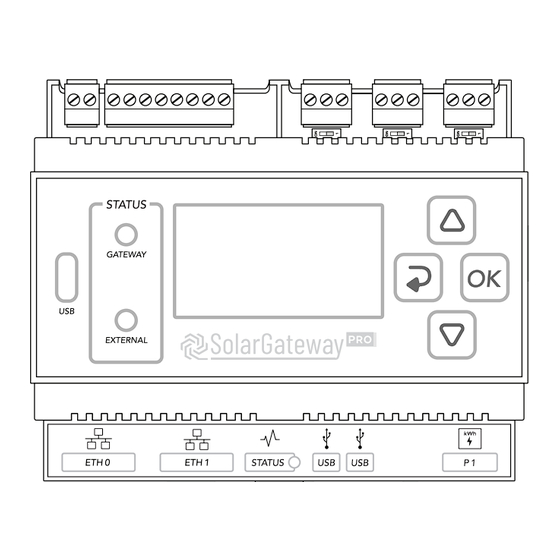
Page 6: Product Overview
Product overview 16. X10 120 16. X10 120 termination switch termination switch USB port 0 1. X14 DC input port 17. X11 120 17. X11 120 termination switch termination switch 10. USB port 1 2. X13 GPIO port 18. X12 120 18. -
Page 7: Port Description
Label 1. Serial Number (SN) 4. PIN code 2. MAC adresses 5. Datamatrix 3. Product Name (PN) Port description X10, X11 & X12 RS485 PORTS Name Description Port Description RS485 Negative signal Default inverter port RS485 Positive signal Default meter port RS485 Shield Default auxiliaries port X13 GPIO PORT... -
Page 8: Installation
Step 1 Installation Connect a DC power supply to the X14 connector and connect the ETH0 port to a network with internet access. OR optionally for GSE-POE devices connect the ETH0 port to a PoE+ enabled network to supply the device and connect it with internet. Wait until the device is started and displays the first start menu. -
Page 9: Inverter Configuration
Inverter configuration Step 2 Go to the “Config” page in the menu and open the “Config (fig. 4) settings” with the button. The basic system settings are done in (fig. 5) this menu. (fig. 4: Config page) (fig. 5: Config settings) Configuring Inverters Select and open the “Inverters”... -
Page 10: Meter Configuration
Step 3 Meter configuration Go back to the “Config settings” with the button, or navigate (fig. 6) to it again if the menu has disappeared. (fig. 6: Config settings) Configuring grid meters (To configure a meter other than the grid meter, refer to the SolarGatewayPRO User Manual). Select and open the “Meters”... -
Page 11: Grid Settings
Step 4 Grid settings Go back to the “Config settings” with the button, or navigate to (fig. 7) it again if the menu has disappeared. (fig. 7: Config settings) Configuring Grid settings Select and open the “Grid settings” wizard in which the power and current limits for the plant can be defined. -
Page 12: Apply Settings
Step 5 Apply settings Go back to the “Config settings” with the button, or navigate (fig. 11) to it again if the menu has disappeared. (fig. 11: Config settings) Apply settings Select and open the “Apply settings” wizard in which a strategy can be selected. - Page 13 Portal registration Step 6 Go to https://hub.embion.nl and login or create a new account on the register page. Join or create the namespace where the device needs to be added. Visit the device application by clicking the symbol in the menu. Add a device by filling in the serial number and PIN code.
-
Page 14: Input Description
Input description On the SolarGatewayPRO there are multiple inputs required like IP addresses, IP adress ranges and names. The steps below will (fig. 16) explain how to use the buttons to insert characters. (fig. 16: Input wizard) Use the buttons on the SolarGatewayPRO to select one of the four input options related to the position of the pressed button. - Page 15 Snelle installatiehandleiding Nederlands English page 1-11 Nederlands pagina 12-22...
- Page 16 Disclaimer Door dit product te gebruiken, erkent en accepteert de gebruiker deze volledige disclaimer. De SolarGatewayPRO is ontworpen voor gebruik in elektrische systemen, maar het is geen veiligheidsapparaat. Het is de verantwoordelijkheid van de gebruiker om ervoor te zorgen dat het systeem is uitgerust met de nodige veiligheidsmaatregelen om te beschermen tegen mogelijke gevaren.
- Page 17 In de doos 1x SolarGatewayPRO 1x DC ingang connector 3x RS485 connector 1x GPIO connector 1x Snelstart handleiding Alle bijgeleverde connectoren zijn al ingestoken in het apparaat...
- Page 18 Productoverzicht 1. X14 DC ingang poort USB poort 0 16. X10 120 16. X10 120 busafsluiting busafsluiting 2. X13 GPIO poort 10. USB poort 1 17. X11 120 17. X11 120 busafsluiting busafsluiting 3. X12 RS485 poort C 11. P1 slimme meter poort 18.
- Page 19 Labeloverzicht 1. Serienummer (SN) 4. PIN code 2. MAC adressen 5. Datamatrix 3. Productnaam (PN) Poortomschrijving X10, X11 & X12 RS485 POORTEN Naam Omschrijving Poort Omschrijving RS485 Negatief signaal Standaard omvormer poort RS485 Positief signaal Standaard meter poort RS485 Afscherming Poort voor randapparatuur X13 GPIO POORT Naam...
- Page 20 Installatie Stap 1 Verbind de DC voeding aan de X14 connector en verbind de ETH0 poort aan een netwerk met internettoegang. OF optioneel voor GSE-POE varianten verbind de ETH0 poort aan een netwerk met PoE+ ondersteuning om het apparaat te voorzien van voeding en internet.
- Page 21 Omvormer configuratie Stap 2 Ga naar de “Config” pagina in het menu en open de “Config (afb. 4) instellingen” met de knop. Hier kunnen de basis (afb. 5) systeeminstellingen gedaan worden. (afb. 4: Configuratie pagina) (afb. 5: Config instellingen) Configuratie van omvormer(s) Selecteer en open de “Omvormers”...
- Page 22 Stap 3 Meter configuratie Ga terug naar de “Config instellingen” met de knop, of (afb. 6) navigeer er opnieuw naartoe. (afb. 6: Config instellingen) Configuratie van netmeter(s) (Om een meter anders dan netmeter te configureren, volg de SolarGatewayPRO handleiding). Selecteer en open de “Meters” wizard. Selecteer en open de meter groep “Nieuw 1”.
- Page 23 Net configuratie Stap 4 Ga terug naar de “Config instellingen” met de knop, of (afb. 7) navigeer er opnieuw naartoe. (afb. 7: Config instellingen) Configuratie van net instellingen Selecteer en open de “Net instellingen” wizard waarin de net limieten kunnen worden ingesteld voor de installatie. Voer de maximale waarde van de netstroom in.
- Page 24 Stap 5 Instellingen toepassen Ga terug naar de “Config instellingen” met de knop, of (afb. 11) navigeer er opnieuw naartoe. (afb. 11: Config instellingen) Instellingen toepassen Selecteer en open de “Activeer config” pagina waarin een strategie geselecteerd kan worden. Selecteer een strategie voor de installatie. (afb.
- Page 25 Portal registratie Stap 6 Ga naar https://hub.embion.nl en login of registreer een nieuw account op de registratie pagina. Open of maak een namespace waarin je het apparaat wilt toevoegen. Ga naar de apparatenpagina door op het symbool te klikken in het linker menu.
- Page 26 Karakter invoer Op de SolarGatewayPRO zijn meerdere vrije tekst invoeren nodig, (afb. 16) zoals: IP adresses, IP adres bereiken en namen. Deze stappen leggen uit hoe je de knoppen kan gebruiken voor het invoeren van karakters. (afb. 16: Invoer wizard) Gebruik de knoppen op de SolarGatewayPRO om een van de vier invoeropties te selecteren die verwant zijn aan de positie van de knoppen.
- Page 28 Links SolarGatewayPRO User Manual (and more documents) For more information about using the SolarGatewayPRO, visit the documentation page by scanning this QR-code. The user manual contains detailed information and step-by-step guides about: specifications, installation, configuration and all features of the SolarGatewayPRO that are not included in this quickstart guide.
Need help?
Do you have a question about the SolarGatewayPRO GSE-A010 and is the answer not in the manual?
Questions and answers