Table of Contents
Advertisement
Quick Links
Advertisement
Table of Contents

Related Manuals for Wizard CMC 9000

Summary of Contents for Wizard CMC 9000
- Page 1 Wizard™ CMC Model 9000 Getting Started Guide FrameShop FrameShop™ 20-34300-1A...
-
Page 2: Table Of Contents
Wizard™ International, Inc., 4600 116th St. SW, Mukilteo, WA 98275 888/855-3335 Wizard CMC Model 9000 Getting Started Guide Contents Check Contents ......................4 Equipment Required ....................4 Where to Find More Information ...................4 Knowledge Base .......................4 Website ........................4 CMC Components .....................5 Head Labeled ......................5... - Page 3 This product and its documentation are protected by copyright and are distributed under license restricting its use, copying, distribution and decompilation. No part of this software product may be copied, reproduced or disassembled without written permission from Wizard International, Inc. and its licensors, if any.
-
Page 4: Check Contents
Review equipment upon arrival for shipping damage. Contact Wizard if any damage is noticed. Verify that the contents shown in the packing slip are received. Please save the packaging. Equipment Required The CMC Stand or wall mount - must be assembled first before unpacking the Wizard™ CMC (Computerized Mat Cutter) Electrical outlet Air source - You will need an air compressor that supplies between 100psi and 120psi. -
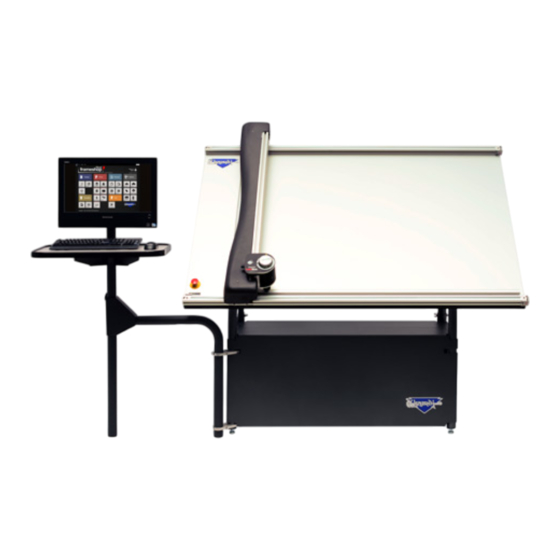
Page 5: Cmc Components
Wide *Some systems do not include all of these cartridges. The ECU may contain its own power supply (black) or the power supply may be separate (blue). 20-34300-1A GettingStartedManual9K-70FrameShop Wizard™ CMC Model 9000 Hardware and Software Getting Started Guide 02/23/24... -
Page 6: Air Regulator
Wizard™ International, Inc., 4600 116th St. SW, Mukilteo, WA 98275 888/855-3335 Air Regulator CMC Parts Labeled 20-34300-1A GettingStartedManual9K-70FrameShop Wizard™ CMC Model 9000 Hardware and Software Getting Started Guide 02/23/24... -
Page 7: Setting Up The Cmc
Setting up the CMC Congratulations on acquiring the Wizard™ computerized mat cutter (CMC). The following instructions will walk you through unpacking and setting up the CMC. Begin by clearing an area for the CMC. Refer to the Stand Instructions for the minimum amount of space needed. -
Page 8: Removing The Shipping Blocks
Wizard™ International, Inc., 4600 116th St. SW, Mukilteo, WA 98275 888/855-3335 Removing the Shipping Blocks 1. Locate the four shipping blocks holding the gantry in place. There are two on top of the upper gantry; one to the left of the gantry on the underside of the top rail, and one to the right of the gantry on the top of the rail. -
Page 9: Check Squareness
6. Connect the head power plug (square connection) to the head grabber arm. 7. Locate the Head Assembly Power Cable Strain Relief and the two 5/8” screws. 20-34300-1A GettingStartedManual9K-70FrameShop Wizard™ CMC Model 9000 Hardware and Software Getting Started Guide 02/23/24... -
Page 10: Hooking Up The Gantry And Air Lines
Wizard™ International, Inc., 4600 116th St. SW, Mukilteo, WA 98275 888/855-3335 8. Slide the tines of the Head Assembly Power Cable Strain Relief around the base sides of the Head Power Plug connection. 9. Line up the holes of the Head Assembly Power Cable Strain Relief to the holes on the head grabber arm. -
Page 11: Attaching The Air Lines
Ferrite tube, which looks like a black donut. Open the Ferrite tube, wind the ECU power supply output cable around the inside of the Ferrite three times, then close it shut. 20-34300-1A GettingStartedManual9K-70FrameShop Wizard™ CMC Model 9000 Hardware and Software Getting Started Guide 02/23/24... -
Page 12: Connect The Ecu
Wizard™ International, Inc., 4600 116th St. SW, Mukilteo, WA 98275 888/855-3335 3. Place the ECU and its power supply into the ECU bracket on the back of the board. 4. Locate one of the zip ties. Slip it through the... -
Page 13: Power Up Sequence
Double-click on the FrameShop icon to start the software. Creating Your First Mat Edit New Mat 1. Click New Mat Design on the main screen to create a new design. 20-34300-1A GettingStartedManual9K-70FrameShop Wizard™ CMC Model 9000 Hardware and Software Getting Started Guide 02/23/24... - Page 14 Wizard™ International, Inc., 4600 116th St. SW, Mukilteo, WA 98275 888/855-3335 2. Stay on the Single tab. There are three tabs to select from: Single, Multi, and Array. Opening Size 1. Enter 5x7 (approx. 13x18 cm) for width and height of the opening.
-
Page 15: Cut Your First Mat
For this project, leave it at the default cartridge, which is the 45° bevel cartridge. Cut Your First Mat 1. Click Send to CMC to take the design to the Cut Preview. 20-34300-1A GettingStartedManual9K-70FrameShop Wizard™ CMC Model 9000 Hardware and Software Getting Started Guide 02/23/24... - Page 16 Wizard™ International, Inc., 4600 116th St. SW, Mukilteo, WA 98275 888/855-3335 Matboard Size 1. Make sure the matboard size is sufficient for the mat being cut. Since we’re cutting a small design, the default setting should be acceptable. Outside Cut 1.
-
Page 17: Prepare To Cut
See “Cartridge Change and Depth Setting” page 18 for more depth. information. Prepare to Cut Homing and Alignment 1. Rotate the footblock into the 12 O’Clock position, with the blade cartridge on top of the head. 20-34300-1A GettingStartedManual9K-70FrameShop Wizard™ CMC Model 9000 Hardware and Software Getting Started Guide 02/23/24... -
Page 18: Cartridge Change And Depth Setting
Wizard™ International, Inc., 4600 116th St. SW, Mukilteo, WA 98275 888/855-3335 2. Holding it about an inch above the bottom rail, slide the gantry and the head assembly to the left edge of the CMC until it stops. 3. It will stop against the Magnetic Stop. -
Page 19: Create Another Mat
4. Template Library opens. Note: There are several pages of templates you can scroll through. 5. Click on any template thumbnail to select it. 6. The new template is displayed. 20-34300-1A GettingStartedManual9K-70FrameShop Wizard™ CMC Model 9000 Hardware and Software Getting Started Guide 02/23/24... - Page 20 Wizard™ International, Inc., 4600 116th St. SW, Mukilteo, WA 98275 888/855-3335 Proceed to Cutting 1. Click Send to CMC to go to the Cut Preview screen. Outside Cut 1. Click the Outside Cut toggle to On. We will be putting in a larger piece of matboard to cut the outside.
-
Page 21: Blade Depth Settings
Depth, the new blade depth number would listed next to the current layer. NOTE: Returning to Editor then back to Cut Preview reloads the default blade depth and dense settings. 20-34300-1A GettingStartedManual9K-70FrameShop Wizard™ CMC Model 9000 Hardware and Software Getting Started Guide 02/23/24... -
Page 22: Variable Pressure Optimization (Vpo) Feature
Wizard™ International, Inc., 4600 116th St. SW, Mukilteo, WA 98275 888/855-3335 Variable Pressure Optimization (VPO) Feature Adjusting for Regular or Dense Matboard The head air regulator is located on the left side of the head and controls the pressure of the Footblock against the matboard as it is cutting. -
Page 23: Cutting An Extra Dense Layer With The 90° Cartridge
6. Click OK. The Cut Preview displays the dense layer with a pound sign and indicates that this layer is extra dense. 7. Click Cut the cut the mat and Align the Head if requested. 20-34300-1A GettingStartedManual9K-70FrameShop Wizard™ CMC Model 9000 Hardware and Software Getting Started Guide 02/23/24... -
Page 24: Changing The Blade
Wizard™ International, Inc., 4600 116th St. SW, Mukilteo, WA 98275 888/855-3335 8.The Head plunges at the home position and applies the current pressure and prompts for the requested pressure. 9. Pull out the air regulator pressure knob by pulling it to the left. -
Page 25: Using The Pen Cartridge
2. A prompt to click OK to release the motors will display. Click OK and the motors will immediately release. 20-34300-1A GettingStartedManual9K-70FrameShop Wizard™ CMC Model 9000 Hardware and Software Getting Started Guide 02/23/24... -
Page 26: Troubleshooting
Wizard™ International, Inc., 4600 116th St. SW, Mukilteo, WA 98275 888/855-3335 3. Grasp the head and manually lower the head back to the home position. 4. Pull out the Emergency Stop button and realign the head. See “Homing and Alignment” page 17” for instructions on how to Align the Head. -
Page 27: Hardware Maintenance
Click check for corners on the license screen. FrameShop will use the internet connection to download corners. If not connected to the internet, FrameShop can connect to Wizard via a modem. Q: My FrameShop keeps opening in demo mode and will not cut. What should I check? Make sure that the ECU is properly hooked up, plugged in and turned on. -
Page 28: Maintenance Schedule
Wizard™ International, Inc., 4600 116th St. SW, Mukilteo, WA 98275 888/855-3335 Maintenance Schedule Do not spray anything directly on the CMC; spray onto a cloth and then wipe. Daily: 1. With compressed air or soft brush, clean lower rail, horizontal/vertical clamps and head of any matboard debris. - Page 29 No part of this publication may be reproduced or transmitted in any form or for any purpose without the express permission of Wizard International. The information contained herein may be changed without prior notice.
Need help?
Do you have a question about the CMC 9000 and is the answer not in the manual?
Questions and answers