Advertisement
Introduction .......................................................2
Important Safety Information ....................3
Features ..............................................................5
Controls & Operation .....................................6
Frigidaire.com USA 1-800-374-4432
Espresso Maker
use
&
Care & Cleaning .............................................. 11
Troubleshooting ............................................. 13
Warranty ........................................................... 15
FREMLIT0124 (
Frigidaire.ca Canada 1-800-265-8352
care
April
2024)
Advertisement
Table of Contents

Subscribe to Our Youtube Channel
Related Manuals for Frigidaire FREM100SS


Summary of Contents for Frigidaire FREM100SS
-
Page 1: Table Of Contents
Espresso Maker & care Introduction ............2 Care & Cleaning ..........11 Important Safety Information ....3 Troubleshooting ..........13 Features ..............5 Warranty ............15 Controls & Operation ........6 April FREMLIT0124 ( 2024) Frigidaire.com USA 1-800-374-4432 Frigidaire.ca Canada 1-800-265-8352... -
Page 2: Introduction
Definitions discarded, they must be sent to an This is the safety alert symbol. It is Frigidaire Authorized Service so that they used to alert you to potential personal have a suitable destination. injury hazards. Obey all safety messages... -
Page 3: Important Safety Information
IMPORTANT SAFETY INFORMATION IMPORTANT SAFEGUARDS SAFETY PRECAUTIONS breaking its shielding. Do not use the electrical cord to pull or drag the Read all instructions before using the product electric appliance. The following basic precautions should always be followed. • Do not let cord hang over the edge of table or counter, or touch hot •... - Page 4 IMPORTANT SAFETY INFORMATION IMPORTANT SAFEGUARDS • The heating element surface is • The use of accessory attachments not recommended by the appliance subject to residual heat. manufacturer may result in fire, • When the steam function is used electric shock or injury to persons. there can be some hot water •...
-
Page 5: Features
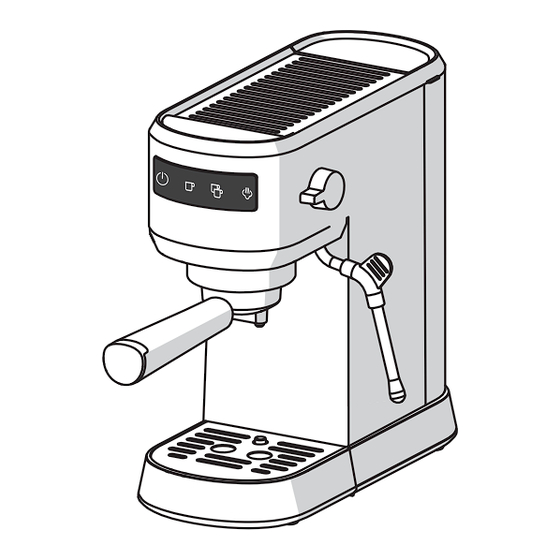
FEATURES A. Power Button J. Water Tank Lid B. One-shot Button K. Water Tank Handle C. Two-shot Button L. Water Tank D. Steam Button M. Cup Warmer E. Brewing Head N. Steam Knob F. One-shot Filter Cup O. Hot Water/Steam Nozzle (Milk Frother) G. -
Page 6: Controls & Operation
CONTROLS & OPERATION Getting Started 3. Preheating is complete when the buttons stop blinking. Press the Place the machine on a flat surface. Single or Double shot button to start The Power Indicator button lights the brewing process. up once the machine is plugged in. - Page 7 CONTROLS & OPERATION Make Espresso 3. Put a warm cup no taller than 3.5" on the drip tray. When the Power Put the one-shot filter (F) or the and Cup buttons are solid, press two-shot filter (G) into the filter either the One or Two-cup button to holder.
- Page 8 CONTROLS & OPERATION Make Hot Water NOTE In Ready Mode when the Power and Cup buttons are lit, turn the Buttons will blink if the boiler is too hot Steam knob to the on position for as a warning it needs to cool down. hot water to come out of the steam nozzle.
- Page 9 CONTROLS & OPERATION 2. Press the Steam button when in 4. Place the pitcher under the steam Ready mode. The Steam button nozzle and immerse in milk about starts blinking while the water is 1/4" before turning on the knob. heating up.
- Page 10 CONTROLS & OPERATION 6. Pour the frothed milk into the 2. Press and hold the cup buttons for prepared espresso. Sweeten to taste 3 seconds to restore factory volume and sprinkle the froth with cocoa settings. powder if desired. NOTE After using the steam function, make sure the boiler has cooled.
-
Page 11: Care & Cleaning
CARE & CLEANING Cleaning Descaling 1. Turn the machine off and unplug the 1. Descaling is recommended when all power cord. Let the machine cool indicators blink 5 times with 5 beeps down completely before cleaning. when powering the machine on. The Wipe all outer surfaces with a damp descaling warning will repeat 2 more cloth. - Page 12 CARE & CLEANING NOTE Use only an environmentally friendly descaling agent and always follow the manufacturer’s instructions. 3. In Ready mode when the Power and Cup buttons are lit, long press the Two Cup and Steam Buttons for 3 seconds to start the descaling process.
-
Page 13: Troubleshooting
TROUBLESHOOTING Problem Possible Cause Solution Water leaking from the There is too much water in Clean the drip tray bottom of coffee maker the drip tray The coffee maker has Please contact the malfunctioned authorized service facility for repairing Water leaks outside of Coffee grounds on the Clean the filter cup filter cup... - Page 14 The filter cup is blocked Clean the filter cup with the cleaning pin Model FREM100SS Voltage 120V Frequency 60Hz Power 1350W Pressure 20 Bar...
-
Page 15: Warranty
LIMITED WARRANTY Your appliance is covered by a one year limited warranty. For one year from your delivery original date of , Electrolux will pay all costs for repairing or replacing any parts of this appliance that prove to be defective in materials or workmanship when such appliance is installed, used and maintained in accordance with the provided instructions. - Page 16 Our home is your home. Visit us if you need help with any of these things: owner support accessories service registration (See your registration card for more information.) Frigidaire.com 1-800-374-4432 Frigidaire.ca 1-800-265-8352...
Need help?
Do you have a question about the FREM100SS and is the answer not in the manual?
Questions and answers