Table of Contents
Advertisement
Quick Links
Advertisement
Table of Contents

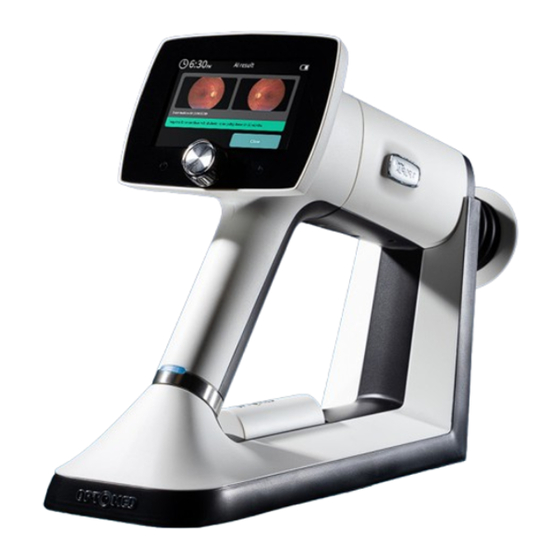
Summary of Contents for Aurora AEYE
- Page 1 USER MANUAL...
- Page 2 Aurora AEYE Camera User manual of Aurora AEYE ophthalmic camera Contact information: Manufacturer Optomed Oyj (Plc) Yrttipellontie 1, FI-90230 Oulu, Finland Tel: +358 20 741 3380 info@optomed.com www.optomed.com Optomed USA, Inc Royal Centre One 11675 Great Oaks Way, Ste 110...
- Page 3 Aurora AEYE - User Manual...
-
Page 4: Table Of Contents
3.4 Start up and camera software set up ��������������������������������������������������������������������������23 Imaging with Aurora AEYE 4.1 Overview of Aurora AEYE study �����������������������������������������������������������������������������������25 4.2 Image capture during Aurora AEYE study with Retinal Module ������������������������������28 4.2.1. Image analysis ��������������������������������������������������������������������������������������������������������������30 4.2.2. Image saving and transfer ������������������������������������������������������������������������������������������32 4.3 Image capture during Other study ������������������������������������������������������������������������������32 4.3.1. Imaging settings for Other study �������������������������������������������������������������������������������34... - Page 5 A. Appendix – Wireless Local Area Network (WLAN), Client, and Cloud A.1 Connecting to Cloud ������������������������������������������������������������������������������������������������������74 A.2 Wireless connections settings ��������������������������������������������������������������������������������������75 A.3 AEYE-DS Service via Cloud ���������������������������������������������������������������������������������������������77 A.4 Aurora AEYE Client PC software (only for transferring images to PC) ��������������������78 Aurora AEYE - User Manual...
-
Page 6: Safety
Safety The information in this manual applies to the Aurora AEYE ophthalmic camera. The specifications in this manual are subject to change without prior notice due to continuing product development. The latest version of this manual can be downloaded at www.optomed.com/us/auroraaeye where you can also find more material. - Page 7 Power supply designed primarily for indoor use only according to IEC 60471 Plug socket for power supply (Positive polarity) Voltage and current Disposal specification Disposal in accordance with WEE and/or in accordance with local disposal and recycling laws Aurora AEYE - User Manual...
- Page 8 The first four digits of the serial number indicates the week (digits 1-2) and year (digits 3-4) of the manufacture. Global trade item number Reference number GS1 Unique Device Identification Keep away from water Fragile Handle with care. Do not use hand hooks Keep out of direct sunlight Aurora AEYE - User Manual...
-
Page 9: Intended Use
Atmospheric pressure limitations 1.2 Intended use Aurora AEYE Camera is a medical digital camera that is used with dedicated optics modules intended to capture images and video of the fundus of the eye and surface of the eye. Aurora AEYE Camera with Retinal Module is intended to capture digital images and video of the fundus of the human eye. - Page 10 ClinicalTrials.gov [Internet]. Bethesda (MD): National Library of Medicine (US). 2000 Feb 29 - . Identifier NCT04612868, Efficacy and Safety of AEYE-DS Software Device for Automated Detection of Diabetic Retinopathy From Digital Fundus Images; 2020 Nov 3 [cited 2022 June 28]; [1 page]. Available from: https://clinicaltrials.gov/ct2/show/record/NCT04612868.
-
Page 11: Contraindications And Limitations
WARNING! Aurora AEYE is classified as Group 2 based on standard ISO 15004-2:2007. The light emitted from this instrument is potentially hazardous. The longer the duration of exposure and the greater the number of pulses, the greater the risk of ocular damage. -
Page 12: Precautions
1.4 Precautions WARNING! Aurora AEYE is not suitable for use in explosion risk areas or in the presence of flammable anesthetics. WARNING! Place the PC and Charging Station outside the patient environment at a distance of at least 1.5 meters from the patient. - Page 13 For more information, go to www.P65Warning.ca.gov CAUTION! Aurora AEYE is intended for use inside, in normal room temperature and normal humidity. Do not use the device in an environment where there is a possibility of water condensation on or inside the device.
- Page 14 Service or an Optomed-certified service facility. CAUTION! Repair and maintenance work may only be performed by authorized specialists. Contact Optomed Customer Service or an Optomed-certified service facility for repairs and maintenance work on the device. Aurora AEYE - User Manual...
-
Page 15: Device Overview
Device overview Aurora AEYE Camera is a modular ophthalmic camera that is designed for use in a medical environment. It is intended to capture digital images and video of the human fundus of the eye and surface of the eye for documentation, screening, and consultation. The camera is used with interchangeable optics modules: Retinal Module and Anterior Module. - Page 16 Aurora AEYE Camera has a WLAN module which enables wireless data transfer to a PC and Cloud. In addition to WLAN, captured images and videos can also be transferred to a PC via USB connection when encryption setting is disabled, and the camera is placed on Charging Station.
-
Page 17: Getting Started
Getting started 3.1 Part list and unpacking The Aurora AEYE carry case contains the following items: Device 1. Aurora AEYE Camera 2. Retinal Module 3. Anterior Module Accessories 4. Charging Station 5. USB Cable 6. Power Supply 7. Eye Cup (2 pcs) 8. -
Page 18: Preparations
Place Charging Station (4) to the table outside the patient environment at a distance of at least 1.5 meters from the patient. Connect the Power Supply (6) cable to Charging Station and to the mains. No need to connect USB cable to the PC since Aurora AEYE study uses wireless data transfer. - Page 19 (8) connectors to match with the Charging Station (4) connectors and put the spare battery in place. The spare battery charging indicator LED on Charging Station blinks when the battery is being charged and is lit when the spare battery is fully charged. Aurora AEYE - User Manual...
- Page 20 Charging Station connectors. If Aurora AEYE Camera is not used for more than two minutes, the device enters power save mode. It wakes up from power save mode by using any control button. The camera will power off if not used in 10 minutes.
-
Page 21: Controls And Display Icons
3.3 Controls and display icons Battery level Study Fixation target WLAN indicator Brightness level Cloud indicator Diopter value Client indicator Power button Back button Optoroller Battery charging indicator LED Shutter button Eject button Aurora AEYE - User Manual... - Page 22 Aurora AEYE Camera is powered on and off by pressing the power button for few seconds. Powering on switches the lights on and turning off in turn opens a notification about powering off. Opening the Quick menu is done by pressing Optoroller, which is also used for navigating in the menu together with back button.
-
Page 23: Start Up And Camera Software Set
Both Retinal Module and Anterior Module are attached to Aurora AEYE Camera by connecting firmly the bayonet legs of the optics module to the bayonet holes of the camera. Optics modules are detached by pressing the eject button on the top of the camera. - Page 24 Sync Off; Select Set time manually. Select month, day, year, hour, minutes, and AM or PM by rotating and pressing Optoroller Cloud; for configuration of AEYE-DS Service and Aurora AEYE Portal. Username and password are the same as for Aurora AEYE Portal.
-
Page 25: Imaging With Aurora Aeye
When Aurora AEYE Camera is powered on, select the user, and enter the passcode followed by a press of back button to log in. With Aurora AEYE study, the user is guided to take a macula centered image of both eyes and then send images to AEYE-DS analysis. - Page 26 A notification is shown if some imaging settings are automatically changed according to recommendations for Aurora AEYE study. These include a capture mode (still), a fixation target (macula centered), a focus (auto), an exposure (auto), an IR image (off), additional images (none), and capture settings in image (off).
- Page 27 • retake the image in case image quality is insufficient When both images are taken, study can be sent to AEYE-DS analysis by selecting Send to AI • Images are saved automatically to Archive • If Cloud connection is not available and the images cannot be sent to AEYE-DS Service, they...
-
Page 28: Image Capture During Aurora Aeye Study With Retinal Module
Camera shows the AI analysis result which is also sent to Aurora AEYE Portal • It is possible to get the result in addition by email by enabling the option in Aurora AEYE Portal Failed analysis with a red More than mild diabetic... - Page 29 Optoroller and choosing proper value for it in case image quality is not sufficient with automatic exposure. If image is underexposed, increase brightness level. If overexposed, reduce brightness level. See section 4.3.1 for more information on brightness setting. Aurora AEYE - User Manual...
-
Page 30: Image Analysis
User can exit the Aurora AEYE study by pressing back button for few seconds and selecting Leave. All images captured in the study will be saved to Archive. Later user may use AEYE-DS analysis service from Archive if a good quality image of both eyes is available for the AEYE-DS. - Page 31 Archive. You can try sending the images again from Archive for AI analysis.” If the study is closed before finishing the two-image sequence the image(s) are saved to Archive but they cannot be sent to AI analysis. The study must be repeated for the patient. Aurora AEYE - User Manual...
-
Page 32: Image Saving And Transfer
When study is ready and user selects Close by pressing Optoroller, user is asked if they want to start new Aurora AEYE study. If Yes, new Aurora AEYE study is created for a new patient; if No, camera goes back to Live view and creates an anonymous study. Images captured in Live view are saved to the active anonymous study. - Page 33 Retinal Module; to capture fundus images and video • Anterior Module; to capture images and video of the surface of the eye and surrounding areas Aurora AEYE Camera has two capture modes in optics-specific settings menu • Still imaging •...
-
Page 34: Imaging Settings For Other Study
To change the focus window, select the focus window item, then rotate Optoroller left or right to choose a suitable area and press Optoroller to set the focus window area. Aurora AEYE - User Manual... -
Page 35: Retinal Module
Aim help is red, retina is not fully in view. b) Aim help circle turns green when retina is in full view and focusing starts. c) Green rectangle indicates that focusing is ready thus shutter button can be pressed. d) Red rectangle indicates that focusing has failed. Focusing starts again. Aurora AEYE - User Manual... -
Page 36: Anterior Module
Ask patient to look in different directions so that different areas can be imaged. Capturing still images: • Autofocus: Automatic focusing begins when the dual action shutter button is pressed halfway down. After successful focusing, an image is captured when the dual action shutter Aurora AEYE - User Manual... -
Page 37: After Imaging
If the image quality analysis is enabled, the results are shown in the top right corner of the image. Occasionally artifacts may occur in images. If the imaging distance is not optimal the light may Aurora AEYE - User Manual... - Page 38 Central reflection is caused by internal reflection of the light source of the objective lens. Normally it is not seen but if there are stains or dust on the objective lens the reflection may be stronger. Instructions for cleaning can be found in chapter 6.3. Aurora AEYE - User Manual...
-
Page 39: Image Saving And Transfer
PC via USB. Writing to the memory card from PC is disabled by default. When the memory card or image counter is full, Aurora AEYE Camera will display a message with request to erase the study memory. First copy the images to a safe location and then select Erase study memory from the Camera settings to erase images and videos taken by all users from the camera memory card. -
Page 40: Features
Client connection Active study folder number (in Aurora AEYE study or anonymous Other study) or patient initials (in Other study) Fixation target; filled dot indicates the fixation target for current imaging Brightness; AE for automatic exposure or a number of manually chosen value Focus;... -
Page 41: Quick Menu
(both eyes) image (left eye) BRIGHTNESS In auto exposure mode, Aurora AEYE Camera calculates the optimal image brightness (exposure) value automatically for imaging. Automatic brightness is on by default. The brightness can be adjusted in manual mode from 0 to 10, and the default value is 5. - Page 42 STUDIES In Studies menu it is possible to create a new study for images (Other study), select Aurora AEYE study for two-image sequence, or browse studies from Archive. Other study A new patient study is recommended for each patient. Select the Other study item by pressing Optoroller.
- Page 43 When both images are taken, study can be sent to AEYE-DS analysis by selecting Send to AI. When AI analysis is ready, user can view result in camera display and in Aurora AEYE Portal.
- Page 44 AI results, or analyze it (only Aurora AEYE study) if not already done. Then select the desired image from the selected study by rotating and pressing the Optoroller. When the image is shown, the image can be zoomed by pressing Optoroller.
-
Page 45: Settings
15 times in a row. Admin user may reset the passcode to enable new login. LOGOUT User can log out from the camera by selecting Logout with Optoroller. Aurora AEYE - User Manual... -
Page 46: Advanced Optics Settings
Users can be added manually or by loading a user list from PC via USB connection by copying a userlist.txt file to camera (Aurora AEYE drive) and lifting the camera from Charging Station (USB write protection must be set off). - Page 47 In addition to default imaging mode, there is an alternative additional imaging mode in Aurora AEYE: Red free. In Red free setting the camera saves a red reduced image in addition to the original image. To save only the original image, choose None.
- Page 48 Uniformity: If there is a reflection in the upper part of the image, the imaging distance is too short, and if the reflection is in the lower part of the image, the imaging distance is too long. Aurora AEYE - User Manual...
- Page 49 Centering allows adjustment of the imaging area to correspond with the view area. First select vertical or horizontal adjusting by using Optoroller. Move the image to the middle of the screen by rotating Optoroller. NOTE! There is no need to change the centering in normal use. Aurora AEYE - User Manual...
-
Page 50: Optics Settings For Anterior Module
Autofocus: image is captured after focusing when the dual action shutter button is kept pressed halfway down CAPTURE MODE There are two capture modes in Aurora AEYE: still imaging and video recording. To choose capture mode, use Optoroller. 5.3.4. Camera settings... -
Page 51: Connections
5.3.4.1. Connections Aurora AEYE has a WLAN module that enables wireless connection to a PC and Cloud service. To change wireless settings press Optoroller. Appendix A provides additional instructions for wireless settings; WLAN, Cloud, Client. -
Page 52: Advanced Camera Settings
The network mode is the only option to connect the camera to AEYE-DS Service in Aurora AEYE study. Wireless data transfer after Other study can be done either with network mode or access point. - Page 53 (Device ID), press Optoroller. START QUERY Choose the start query; Aurora AEYE study, Study (Other study), None, or Erase (Erase study memory). The camera prompts the start query after powering on the device. When the Erase query is chosen, the camera will ask whether all images and videos should be deleted.
-
Page 54: Other Information
°F) or fall below -20 °C (-4 °F). Please note that electromagnetic compatibility information and recommended separation distances between portable and mobile RF communications equipment and Aurora AEYE are given in Chapter 6.8. Protection against harmful ingress of water or particulate matter is defined as IPX0 (Equipment not protected against the ingress of water). -
Page 55: Error Messages
6.2 Error messages Aurora AEYE will display error messages to indicate error situations. An error message is always displayed with an explanatory message providing information about possible actions. ERROR MESSAGE POSSIBLE ACTION Please detach the optics module, place it back, and restart Optics failure # the camera. - Page 56 - Camera not active: Cloud service is not purchased, or starting date is not chosen - Login failed: either username or password was incorrect If the device behaves abnormally, Aurora AEYE Camera can be forced to shut down by pressing the power and back buttons simultaneously for seven seconds or longer.
-
Page 57: Cleaning
6.3 Cleaning Aurora AEYE has been tested to verify that it is compatible with the approved disinfectant agents. Clean and disinfect device parts on a routine basis according to your facility’s protocols and standards or local regulations. Aurora AEYE is a precision optics instrument that should be handled with care. - Page 58 Optomed Customer Service. The eye cup should be replaced when: • Discolored • Deteriorated • Shattered, cracked, or disintegrated NOTE! If disposable eye cups are in use, they should be discarded after each patient. Aurora AEYE - User Manual...
-
Page 59: Service And Repair
Use only lightly moistened cleaning cloth. Aurora AEYE has been tested to verify these instructions as being capable of preparing Aurora AEYE for re-use. You must ensure that cleaning and disinfection as actually performed by your personnel, with your equipment and materials, achieves the desired results. -
Page 60: Disposal
Aurora AEYE Camera has a rechargeable Li-ion battery that is charged when the camera is placed on Charging Station, which is connected to the mains. Charging Station can also be used as an external battery charger for the spare battery included in sales case. -
Page 61: Technical Description
CAMERA Aurora AEYE Camera Model: CMOS, 5.0 Megapixels Image sensor: 0.317X Magnification: Internal 16 GB memory Image memory type: 4'', TFT-LCD, 800x480 pixels, 16.7 M colors Display: JPEG (file extension: jpg) Image format: Aurora AEYE - User Manual... - Page 62 Li-ion cell with integrated safety circuit Approximately 2 h Usage time: Approximately five years Device lifetime: OPTICS FOR RETINAL IMAGING Retinal Module Model: 69 (w) x 74 (h) x 160 (d) mm Dimensions: 324 g Weight: Aurora AEYE - User Manual...
- Page 63 Pixel pitch on fundus: Spectral output at working distance: White and Infrared LED when operated in continuous mode OPTICS FOR ANTERIOR IMAGING Anterior Module Model: 71 (w) x 80 (h) x 78 (d) mm Dimensions: 105 g Weight: Aurora AEYE - User Manual...
- Page 64 Spectral output at working distance: White LED when operated in continuous Blue LED when operated in continuous mode mode CHARGING STATION Charging Station Model: 107 (w) x 147 (h) x 300 (d) mm Dimensions: 683 g Weight: Aurora AEYE - User Manual...
-
Page 65: Electromagnetic Compatibility
Optomed. If the performance of Aurora AEYE is lost or degraded due to electromagnetic disturbances, it may cause unexpected or adverse operation of the device. If a malfunction cannot be rectified, please contact Optomed Customer Service. - Page 66 MANUFACTURER’S DECLARATION – ELECTROMAGNETIC IMMUNITY Aurora AEYE maintains basic safety and performance when used in the electromagnetic environment specified below. The customer or the user of the device should ensure that it is used in such an environment.
- Page 67 8 ф angles; typical commercial or hospital environment. at 8 ф angles; interruptions, 0% 1 cycle; If the user of the Aurora AEYE requires 0% 1 cycle; and voltage continued operation during power variations on 70% UT for...
- Page 68 If the measured field strength in the location in which the Aurora AEYE is used exceeds the applicable RF compliance level above, Aurora AEYE should be observed to verify normal operation. If abnormal performance is observed, additional measures may be necessary, such as re-orienting or relocating the Aurora AEYE.
- Page 69 MANUFACTURER’S DECLARATION – ELECTROMAGNETIC EMISSIONS Aurora AEYE maintains basic safety and performance when used in the electromagnetic environment specified below. The customer or the user of the device should assure that it is used in such an environment. EMISSION TEST COMPLIANCE ELECTROMAGNETIC ENVIRONMENT –...
-
Page 70: Compliance
• Aurora AEYE is classified for continuous operation Aurora AEYE complies with FDA 21 CFR 886.1120 and ISO 13485:2016 standard. Declaration of Conformity is available upon request. The product is also in conformity with EU/2015/863 (ROHS3) on the restriction of the use of certain hazardous substances in electrical and electronic equipment. - Page 71 Group 2 Group 2 2:2007 IEC 62471:2006 Exempt Group Exempt Group ANSI Z80.36- Group 2 Group 2 2016 This declaration shall be rendered invalid if changes are made to the product without the manufacturer’s authorization. Aurora AEYE - User Manual...
-
Page 72: Appendix - Wireless Local Area Network (Wlan), Client, And Cloud
- Enter network password - Select Connect Set up Date & Time Set up Cloud connection; username and password are the same as for Aurora AEYE Portal Enter Cloud username; fill in your email address • Enter Cloud password; fill in your password •... -
Page 73: Wireless Connections Settings
A.2 Wireless connections settings Aurora AEYE Camera has a WLAN module that enables wireless connection to a PC or other client device. In order to change wireless connections, open the Connections menu from camera settings by using Optoroller. Wireless First set wireless connection on to enable WLAN. When wireless connection is on, either network mode (a) or Access Point mode (b) can be used, but not at the same time. - Page 74 In case there are slowness or other issues with wireless communication between the camera and the PC, the images will transfer slowly. You can follow the progress of the transfer from Aurora AEYE Client PC software. Client PC software will inform, if the wireless communication between the camera and the PC fails and images cannot be transferred.
-
Page 75: Aeye-Ds Service Via Cloud
The AI-algorithm grades the fundus images within minutes and the results are then sent back to Aurora AEYE Camera and to Aurora AEYE Portal as well as by email if chosen in Portal. AEYE-DS supports only diabetic retinopathy (DR) screening results. -
Page 76: Aurora Aeye Client Pc Software (Only For Transferring Images To
(only for transferring images to PC) Aurora AEYE Client PC software enables WLAN connectivity from PC or another client device to Aurora AEYE Camera. With Client software you can wirelessly connect PC or other device to Camera and define the image destination folder into which images will be transferred. - Page 77 Aurora AEYE - User Manual...
- Page 78 Notes Aurora AEYE - User Manual...
- Page 79 Select side of imaged eye Serial number 8, 54 Software version Sterilization 61, 72 Transferring images to PC 39, 75-76, 78 USB connection 74, 76 Wireless/WLAN connection 16, 20, 23, 32, 74-77 Zoom 27, 29, 37, 44-45 Aurora AEYE - User Manual...
- Page 80 https://www.optomed.com/us...
Need help?
Do you have a question about the AEYE and is the answer not in the manual?
Questions and answers