Table of Contents
Advertisement
Quick Links
Advertisement
Table of Contents

Related Manuals for Hummingbird HMOD1000


Summary of Contents for Hummingbird HMOD1000
- Page 1 GPS TRAILER ODOMETER GPS TRAVEL DISTANCE LOGGING DEVICE HMOD1000...
-
Page 2: Table Of Contents
CONTENTS Overview Set the Password Warnings and Safety Information Set Service Date and Distance Kit Contents Set the Step Installation — GPS Antenna Troubleshooting Installation — Display Settings Controls Technical Specifications Menu Navigation FCC Declaration Home Screen Guide Warranty Menu Guide OVERVIEW The GPS Trailer Odometer is a permanently mounted device for recording trailer travel distance. -
Page 3: Warnings And Safety Information
SAVE THESE INSTRUCTIONS — this manual contains important safety instructions. Do not operate the device unless you have read and understood this manual. DISCLAIMER: Hummingbird Electronics accepts no liability for any injury, loss or property damage which may occur from the improper or unsafe installation or use of its products. -
Page 4: Kit Contents
KIT CONTENTS 1.8" DISPLAY with 12 V accessory plug (cig socket plug) BOLT & WASHER Fitted to rear of display GPS BULKHEAD ANTENNA... - Page 5 QUICK START INSTALL Antenna with clear view of the sky SET ADMIN Password and Service Distance and Date WAIT for satellite acquisition PLUG into powered vehicle accessory socket Begin travelling...
-
Page 6: Installation - Gps Antenna
INSTALLATION — GPS ANTENNA These mounting instructions are for a permanent installation. 1. Select a mounting location that meets the following requirements: 3 Has an unobstructed view of the sky for the best possible GPS signal. 3 Has a mounting surface thickness no thicker than 6 mm (0.24"). 3 Is not subject to extreme weather or temperatures. - Page 7 Antenna Body Ø6.5 mm Adhesive (1/4") Foam Pad Mounting Surface Hex Nut Clean and dry the mounting surface thoroughly...
-
Page 8: Installation - Display
INSTALLATION — DISPLAY These mounting instructions are for a permanent installation into a panel within the trailer/vehicle. 1. Select a mounting location for the Display. The thickness of the mounting surface must not exceed 3 mm (1/8"). 2. Mark the centres of the two holes 20.7 mm (13/16") apart. 3. - Page 9 Antenna Socket Min. Ø11 mm Display (7/16") (clearance) Mounting Surface Antenna Plug Antenna Cable Ø6.5 mm (1/4") Washer Bolt...
-
Page 10: Controls
CONTROLS The GPS Trailer Odometer can be configured via the Menu using the three buttons on the Display. Press to access the Menu, then press to navigate the Menu options. Press to select an option. To return to the Home Screen, select "Exit" from the Menu and press UP/DOWN —... -
Page 11: Menu Navigation
MENU NAVIGATION Home Screen (Odometer Display Mode) Menu Odometer Admin Exit Press Enter from the Home Screen to display the Menu. Mode Press the Up and Down buttons to scroll through the Menu Items. Exit Display Mode Mode Press Enter from the Menu to display the options for the Odometer selected Menu Item. -
Page 12: Home Screen Guide
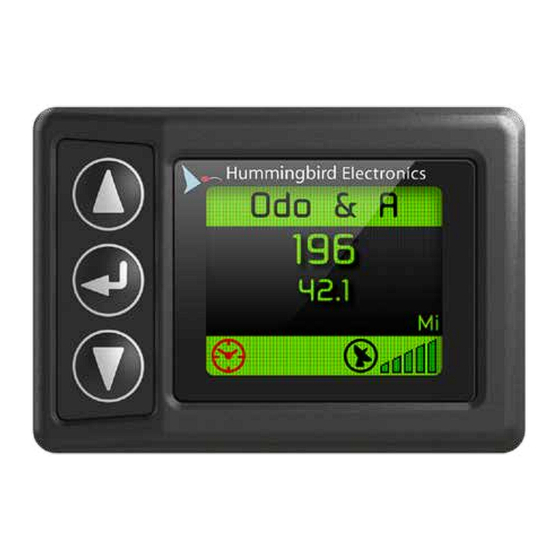
HOME SCREEN GUIDE MODE — The current Display Mode. ODOMETER — The total distance travelled. TRIP A/B — The distance travelled since resetting Trip A/B. Press together from the Home Screen to reset the Trip to '0'. GPS CONNECTIVITY — Black icon indicates that GPS is connected. Alternating red/black indicates then there an insufficient GPS lock and no distance will be accrued on the odometer. - Page 13 Odometer ODOMETER Displays the total distance. Odo & A ODO & A/B Displays the total distance, and the 42.1 Trip A (or B) distance. From the Home Screen, press together to reset the Trip to '0'. Trip A TRIP A/B 42.1 Displays the Trip A/B distance.
-
Page 14: Menu Guide
MENU GUIDE EXIT — Select to exit the Menu and return to the Home Screen. MODE (DISPLAY MODE) — Select a Home Screen layout; Odometer, Odo & B, Odo & A,Trip B, Trip A SERVICE (NEXT SERVICE) — Select service to view the current odometer reading, distance set for next service, and the date for next service. -
Page 15: Set The Password
SET THE PASSWORD You cannot access the Admin Settings unless you know the password. The pre‑set password is '00000'. 1. From the Home Screen, press to open the menu. 2. Navigate to "Admin" then press 3. To access the options you need to enter the correct password by pressing to change the number, then press to move to the next field. -
Page 16: Set Service Date And Distance
SET SERVICE DATE AND DISTANCE You cannot access the Admin Settings unless you know the password. The pre‑set password is '00000'. 1. From the Home Screen, press to open the menu. 2. Navigate to "Admin" then press . If there is a password already saved, you will need to enter the correct password to access the options. -
Page 17: Set The Step
SET THE STEP 'Set Step' sets the increments for the service distance, to make the input of large distances faster. 1. From the Home Screen, press to open the menu. 2. Navigate to "Admin" then press . If there is a password already saved, you will need to enter the correct password to access the options. -
Page 18: Troubleshooting
TROUBLESHOOTING Unit does not power on Make sure the cable is firmly connected to the vehicle accessory socket, and that the cable is in good condition. If it appears to be OK, see if the socket is faulty by testing the device in another vehicle. Cannot acquire a GPS/satellite signal •... -
Page 19: Settings
SETTINGS Display Mode (Mode) Trip A, Trip B, Odo & A, Odo & B, Odometer Display Units (Units) miles, kilometers Next Service (Service) Displays service info: Current, Next, Date Buzzer Mode (Buzzer) Disabled, Beep Continuously, Beep for 5 Seconds, Beep Once Brightness (Bright.) 1 to 10 About... -
Page 20: Technical Specifications
TECHNICAL SPECIFICATIONS Part number HMOD1000 Mounting Bolt and Washer Dimensions: Display (W × H × D) 70 × 50 × 18 mm (2.75" × 1.96" × 0.7") Antenna (W × H) 45 × 17 mm (1.77" x 0.66") Antenna Cable length 5 m (16'40") Weight 178 g (6.27 oz) Display 1.8"... -
Page 21: Fcc Declaration
FCC DECLARATION This devices complies with part 15 of the FCC Rules. Operation is subject to the following two conditions: (1) This device may not cause harmful interference, and (2) this device must accept any interference received, including interference that may cause undesired operation. -
Page 22: Warranty
WARRANTY For full warranty terms and conditions, visit the Warranty page of the REDARC website at www.redarcelectronics.com/warranty. Australia & New Zealand REDARC Electronics Pty Ltd 23 Brodie Road (North), Lonsdale SA 5160, Australia Australia ..................+61 8 8322 4848 Zealand..................+64 9 222 1024 North America REDARC Corporation, c/o Shallco, Inc. - Page 23 REDARC Electronics Pty Ltd, 23 Brodie Road (North), Lonsdale SA 5160, Australia Design, product configuration and technical specifications are subject to change without notice. Copyright © 2024 REDARC Electronics Pty Ltd. All rights reserved. | Hummingbird Electronics® is a trademark of REDARC Electronics Pty Ltd.
- Page 24 Tech Support 1300 REDARC (1300-733-272) Australia +61 8 8322 4848 New Zealand +64 9 222 1024 +1 (704) 247-5150 Canada +1 (604) 260-5512 Mexico +52 (558) 526-2898 www.redarcelectronics.com HE-DOC045-3...
Need help?
Do you have a question about the HMOD1000 and is the answer not in the manual?
Questions and answers