Table of Contents
Advertisement
Quick Links
Advertisement
Table of Contents

Summary of Contents for GROM Audio VLINE MB45
- Page 1 INSTALLATION MANUAL MB45 www.gromaudio.com www.gromaudio.com/support.html...
-
Page 2: Table Of Contents
CONTENTS Package contents......................3 CHAPTER 1 — INSTALLATION..............3 1.1 Before Installation 1.2 Tools 1.3 Vehicle Installation 1.4 Safety Guidelines & Appropriate Use Connect VLine video cable to car stereo.............4 Connect VLine interface cable to car stereo.............5 Reconnect fiber-optic connector to MCFMB45 cable. -
Page 3: Package Contents
GROM-VLINE SYSTEM PACKAGE CONTENTS VLine module MCFMB45 Power VHSDMF (VHSDMB45) Harness Video Display Cable GPS Antenna USB Extension cable CHAPTER 1 — INSTALLATION 1.1 Before Installation Before starting work with any wiring, please wait 90 seconds after turning the Ignition to the OFF position and disconnecting the negative (-) terminal of the battery. -
Page 4: Safety Guidelines & Appropriate Use
wiring installation requires special technical skills and experience. If you do not feel comfortable doing the installation please consult with your local car audio shop or installation professional for instructions or assistance if necessary. Carefully remove the factory Stereo and Display out of the dash cavity with proper tools. -
Page 5: Connect Vline Interface Cable To Car Stereo
If the port is empty, plug in supplied video display cable VHSDMF (VHSDMB45) into the port and leave female portion of the cable with nothing attached. If there is the cable plugged in, disconnect factory display cable (typically gray in color). Then plug in supplied VHSDMF Y-shaped cable and reconnect disconnected cable into female plug of the supplied video display cable. - Page 6 Remove the fiber-optic wires from main stereo harness quadlock by gently pressing on the small clip on top of the fiber-optic connector, and sliding the wires and the connector out. Illustration 2 - main stereo harness Illustration 3 - fiber-optic connector Place the fiber-optic wires and connector inside MCFMB45 quadlock connect- or, into the exactly the same spot as it was on the factory quadlock connector.
-
Page 7: Connecting To Vline
Connecting to VLine Route the unused ends of VHSDMF display video cable and MCFMB45 power interface harness to the VLine module and connect them to the cor- rectly labeled ports. Make sure to avoid hard bends of the VHSDMF cable next to the connector. -
Page 8: Using Factory Microphone
Using factory microphone VLine will use factory microphone for its operation. Connect the 3.5mm male connector from power interface cable (MCFMB45) to the microphone port of VLine (see p. 9 for reference). There are no any additional steps needed to connect or operate VLine with the vehicle factory microphone. - Page 9 3. Select 7.HW Setting and scroll down to 7.7 HU Parameter. 4. Once in 7.7 HU Parameter menu, scroll down to (3) Audio AUX Off, and press on the knob to turn it On. Once the Audio AUX is On, you will be able to select the AUX mode of your stereo.
-
Page 10: Installting Optional Touchscreen Overlay
Installing the optional touchscreen overlay If you decide to install an optional touchscreen overlay (V-VOLSRTH) to add touchscreen functionality to your factoryMercedes Benz display, please follow the installation instructions supplied with the touchscreen overlay package. You must install and connect the touchscreen before mounting the display and the stereo back. -
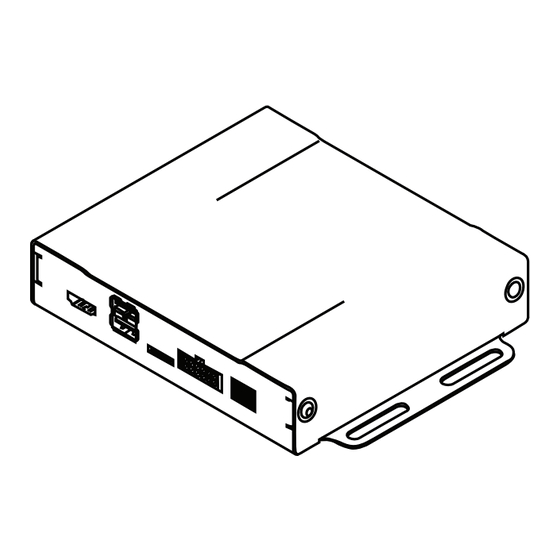
Page 11: Understanding Vline Ports
Understanding the VLine Ports HDMI WiFi / Bluetooth Output Antenna USB1 iPhone GPS / AV / Camera Input USB 1 HDMI IN HDMI OUT USB 2 CAMERA AV1 HDMI Input MicroSD Card Microphone (Pin side up*) USB2 OTG/USB storage USB1 iPhone connection Any other USB device (Keyboard / Mouse) USB2... -
Page 12: Chapter 2 - Getting Started
CHAPTER 2 — GETTING STARTED 2.1 Functions The GROM VLINE emulates the factory AUX mode of the stereo. No factory functions of the stereo will be disabled, except factory AUX. Factory Bluetooth, Navigation, Radio and CD player will remain func- tional. -
Page 13: Support
2.3 Other Stereo Functions 2.3.1 Adjusting Display Brightness / Contrast Sometimes the VLine or CarPlay / Android Auto image might appear washed out. This isbecause the factory display is not optimized for VLine or CarPlay / Android Auto colors. Adjust the display brightness and contrast to your liking by using the DISP button, if available, or going to the Factory UI (see above) and adjusting the display settings for the VLine mode of your stereo. -
Page 14: Warranty
Unless otherwise prescribed by law, GROM Audio shall not be liable for any personal injury, property damage and or any incidental or consequential damages of any kind (including water damage) resulting from malfunctions, defects, misuse, improper installation or alteration of this product. -
Page 15: Grant Of License
IN CONNECTION WITH ANY BUSINESS, LOSS OF ANY GOODWILL, OR DAM- AGES. THE TERM ‘INCIDENTAL DAMAGES’ REFERS TO THE EXPENSES OF TRANSPORTING THE PRODUCTS TO THE GROM AUDIO SERVICE CENTER, LOSS OF THE END-USERS [ORIGINAL PURCHASER’S] TIME, LOSS OF THE USE OF THE PRODUCT, BUS FARES, CAR RENTALS OR OTHER COSTS RELATED TO THE CARE AND CUSTODY OF THE PRODUCT. - Page 16 PROPERLY, RESULTING FROM THE USE OR INABILITY TO USE THE PRODUCTS, INCLUDING ANY DAMAGES INCURRED DUE TO THE NEGLIGENT OPERATION OF A MOTOR VEHICLE, IN CONJUNCTION WITH THE USE OF SAID PRODUCTS. THE END USER ACKNOWLEDGES ITS RESPONSIBILITY FOR THE USE OF THE PRODUCT.
- Page 17 - in a manner that would distract the driver or that may otherwise cause injury or death to vehicle occupants or bystanders. GROM Audio is not in any way responsible for any such use by you. In all cases, GROM Audio may limit or revoke your use for any reason and at any time.
- Page 18 By using the Third Party Materials, you agree to comply with the use terms of the provider of such Third-Party Materials. GROM AUDIO does not warrant or endorse and does not assume and will not have any liability or responsibility to you or any other person for any Third Party Materials or for any other materials, products, or services of third parties.
- Page 19 A. INDEMNIFICATION OF GROM AUDIO, ITS AGENTS AND EMPLOYEES. By Purchasing, Installing and Using the Products, You, the End- User, agree to indemnify, defend and hold harmless, GROM AUDIO, and it s Affiliates, Directors, Officers, Agents and Employees from any Liabilities, Damage, Loss, Claim and Expense (including reasonable Attorney’s Fees) arising out of the...
- Page 20 GROM AUDIO. Quantit- ies are subject to availability. E. ENTIRE AGREEMENT. These terms and conditions constitute the entire...
Need help?
Do you have a question about the VLINE MB45 and is the answer not in the manual?
Questions and answers