Table of Contents
Advertisement
Quick Links
Advertisement
Table of Contents

Related Manuals for Link KN1007B/E

Summary of Contents for Link KN1007B/E
- Page 1 User Manual...
- Page 3 Thank you for joining the LINK coffee roasting community. We strive to empower our users to roast, brew and cup coffee to the best of its potential, in an accessible and approachable way.
-
Page 4: Important Safety
IMPORTANT SAFETY This is an electrical appliance that contains sophisticated electronics. Like other cooking appliances, such as a toaster, if something goes wrong it could start a fire. Read all safety instructions before use. For indoor use only, or under a covered surfact outside. Use upright on a solid level surface. - Page 5 16. If liquid enters the roast chamber or any other part of the appliance, unplug the power supply and allow 24 hours in a warm place for the interior of the appliance to dry completely before attempting to use the appliance again. If damaged, the supply cord must be replaced by a qualified technician.
-
Page 6: Table Of Contents
Memory Structure Density Tube Profiling App and Fan Adjustments Advanced Dial-in Sample Profile Parameters Timer Mode Resetting Firmware Updates Link Software Difficulty Modes DTR Activation Arabica Advanced Batch Size snd Variable Batch Size Profile Packs/Roast Plans Editing a Profile Altitude Calibration... -
Page 7: Parts List
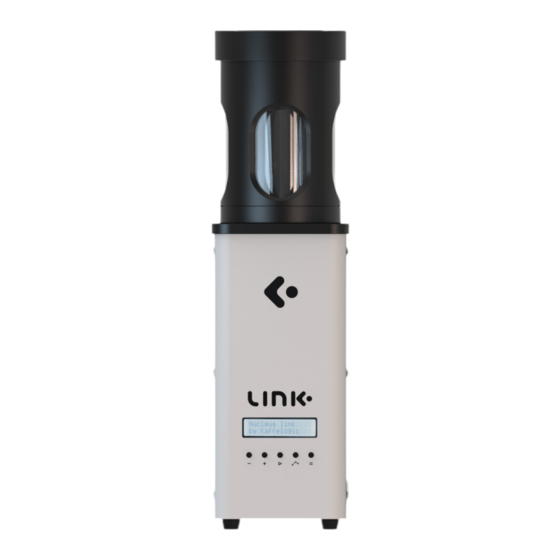
PARTS LIST Chaff Collector Hopper Body Control Display Control Buttons On/Off Button... - Page 8 WELCOME TO THE LINK The LINK is a professional coffee sample roaster, created in collaboration between Nucleus Coffee Tools and Kaffelogic. Designed for samples between 50g - 100g, it is comprised of three components: a specialised smartphone app, a desktop-based program and the roaster itself.
-
Page 9: Accessories
ACCESSORIES Travel Case Dosing Cup Density Tube Tray... -
Page 10: Before First Use
Please read ‘The basics’ section below and familiarize yourself with the ‘Safety’ section above. Download both (i) the LINK App by Nucleus Coffee Tools, and (ii) the LINK Studio pro logging software to your computer desktop, via the Nucleus Coffee Tools website. -
Page 11: The Basics
STEP 2 Set your power (eg. 220v) and Density Tube using the Preferences Tab in the LINK App. Unsing the ‘Profile Selector’ tab, enter the Processing and Varietial of the green coffee you to recieve a profile recommendation. - Page 12 STEP 4 Put the chaff collector back on, select the profile that the LINK App has chosen for you and click the start ) button to begin roasting. Ensure chaff collector lid is in place as shown in the diagram.
-
Page 13: Aging The Coffee
The purpose of resting is to let the coffee degas allow clarity of qualities to be improved. The Link profiles are designed to allow quick assessment if you’re in a rush. You can cup or brew immediately post-roast with the certainty of a fair assessment. - Page 14 Plug the supplied Tether cable into the back of the roast unit and your computer. Click on the connection icon in the link pro software that is located next to the green tick. Then, click the Profiles tab and select the Roast Style, Roast Plan/Profile Profile, and Profile/Power Curve that was suggested by the profile selection app.
-
Page 15: Logs
To archive or delete click on the connection icon in the link pro software that is located next to the green tick. Then click the log tab. At the top left of that screen, you will see an open folder link in blue. -
Page 16: Density Tube
Remove the lid and weigh the green coffee in the density tube on the scale you previously used. This weight is the density number, ready to type into the Profile Selector in the LINK App. 10. For higher precision, we recommend repeating this measurement two-three times and calculating the average number for the app. - Page 17 After this, push Play to start. Fan adjustments: Since May 2024, the LINK and its firmware have included the option of fan adjustments prior to starting a roast. The profile provided by the LINK App may also have a fan adjustment recommendation (eg.
-
Page 18: Advanced Dial-In
Select this profile on your unit via the menu tab or send it to the roaster when the tether connection is made by first selecting the new profile in the Link pro software profile inbox and then clicking the send to roaster button in the bottom right corner. -
Page 19: Sample Profile Parameters
% (DTR). To provide an honest assessment of a coffee we strive to get as close to the target with through the LINK App and its profile selector function. The standard range for a coffee sample (Cupping) is between 7-12% development and 4-6 degrees Celcius temperate increase after First Crack. -
Page 20: Timer Mode
FIRMWARE UPDATES The LINK roaster has frequent updates to its operating firmware, which are provided at no cost to all users. This includes new features, new profiles, and improvements to existing features and functions. - Page 21 Once you’re familiar and comfortable with the LINK operating firmware software, you can yourself greater access to the link software capabilities. To do this, click on the Options tab in the LINK Studio and select a different difficulty setting to unlock more features (eg. Engineer Mode).
- Page 22 LOGGING STAGES CC you click CC after the drying phase is complete and when you see the coffee bean colour starting to change to a light straw through the visual sight. This will log time spent in the drying phase and mallard reaction phase shown as a proportion of the overall roast % and total temperature increase during each of those phases.
-
Page 23: Difficulty Modes
Engineer mode unlocks all attributes of the roaster. Please note that this mode should only be utilised by someone with prior experience in kaffelogic or link studio functionality. 10. In all modes, we advise you don’t deviate from the advice of recommended settings the program will suggest for you. -
Page 24: Dtr Activation
Failure to follow advice may lead to damaging the unit and voiding a users warranty. ARABICA ADVANCED The Arabica Advanced feature of the LINK App allows users to receive more specific recommendations for roast profiles, based off the screen size of their coffee. - Page 25 BATCH SIZE The Link system is designed to be optimised in a range of 50g-100g. Your selection of the volume of coffee you can input can be made as small as a single gram difference between the optimised range. On the LINK roaster, you make your batch size selections when first pushing the play button.
-
Page 26: Profile Packs/Roast Plans
PROFILE PACKS/ROAST PLANS The LINK comes with a wide range of profile packs/roast plans for each Roast Style, which contain the roast Profiles. A Profile Pack/Roast Plan can be thought of like a folder. Each follows a specific development percentage, rate of rise increase, time of 1st crack and arc of the roast curve. - Page 27 Access Through Studio Access through the Link studio start by connecting the tether cord between the Link unit and your computer. When the green tick appears to show connection, click on the bonbon icon to the immediate left of this to open the menu. At the top of this pop-up menu, there will be three tabs. Click on the middle one called ‘Profiles”.
- Page 28 ESPRESSO FILTER CUPPING OMNI * The hundreds of roast profiles for the LINK system are divided into different Roast Plans, also referred to as ‘Profile Packs’. These are like folders of profiles, each of which has a different approach to roasting based on the roasting style and the qualities of the coffee.
-
Page 29: Editing A Profile
LINK Studio software. These profiles can also be exported and shared with other LINK users. To edit a profile, access the profile you wish to edit via the LINK Studio (p.27). Rather than exiting the “Profiles” tab, select the pencil icon next to the Profile number. -
Page 30: Altitude Calibration
Download or open a mobile app that allows you to see your current M.A.S.L (Metres Above Sea Level). Once your MASL has been established open your Link App. Click on the fan calibration selection to the right . When the next screen opens populate your altitude in the top box. -
Page 31: Auto-Hold Of The First Crack
This means that if you did not load a refreshed version of the core profile and the Link... -
Page 32: Further Information
FURTHER INFORMATION This appliance is not intended for use by persons (including children) with reduced physical, sensory or mental capabilities, or lack of experience and knowledge, unless they have been given supervision or instruction concerning the use of the appliance by a person responsible for their safety. -
Page 33: Warranty
TROUBLESHOOTING AND FREQUENTLY ASKED QUESTIONS (FAQs) In the event of an issue with the LINK roaster, or if you need to troubleshoot an error or unexpected occurence, we invite you to reach out to our team or to use one of the following resources: •... - Page 34 NOTES...
- Page 36 nucleuscoffeetools.com...
Need help?
Do you have a question about the KN1007B/E and is the answer not in the manual?
Questions and answers