
Summary of Contents for TSC Fuido Irrigation
- Page 1 User Manual ® Fluido Irrigation Date of issue: July, 2022 Original instructions Version: INT/R347-EN/2-07/22...
- Page 3 This page is intentionally left blank.
-
Page 4: Table Of Contents
Contents 1 General information........................5 1.1 About this manual........................5 1.2 Warning, caution and note.....................5 1.3 Intended use...........................6 1.4 Indications for use........................6 1.5 Contact........................... 6 1.6 Frequently asked questions (FAQ)..................6 1.7 Warranty..........................6 1.8 Authorisation of personnel and training................. 7 1.9 Disclaimer and intellectual property statement.............. - Page 5 5.3.1 Warming up fluids......................30 5.3.2 Deaerating the deaeration chamber................31 5.3.3 Suppressing the audible signal..................31 ® 5.3.4 Extra functions of the Fluido Irrigation device............32 5.4 Post-operative procedures....................33 5.4.1 Post-operative non-heated irrigation................33 5.4.2 Stopping the device......................34 ® 5.4.3 Resetting the Fluido Blood and Fluid Warmer............34 6 Maintenance..........................
-
Page 6: General Information
Make sure that you have the most recent version of this manual. The updated manuals can be found at the website: www.tsc-group.com/ptm. Read this manual carefully. Complete all the procedures. Perform the procedures in the sequence given. Always keep the manual with the system. -
Page 7: Intended Use
The Fluido Irrigation is subject to a warranty declaration, which can be found on the company’s website: www.tsc-group.com/ptm or obtained through your local distributor. Users are advised to take note of the relevant terms and conditions of this warranty. User Manual - General information... -
Page 8: Authorisation Of Personnel And Training
All users are therefore strongly advised to make sure that they consult the most recent version of the manual. The updated manuals are available for download at the The Surgical Company International B.V. website: www.tsc-group.com/ptm. This manual contains proprietary information of The Surgical Company International B.V. and... - Page 9 reproduced, republished, disclosed to third parties, transmitted, displayed, broadcast or otherwise exploited in any manner whatsoever without the explicit prior written consent of The Surgical Company International B.V. The name and logo of The Surgical Company International B.V. and all related trademarks, trade names, and other intellectual property are and shall remain the exclusive property of The Surgical Company International B.V.
-
Page 10: Contraindications, Warnings, Cautions, Notes And Symbols
Contraindications, warnings, cautions, notes and symbols The device was designed and built with safety in mind. Read and understand the contraindications, warnings, cautions and notes before using the system. General safety precautions 2.1.1 Warnings Warning! • Use the device as intended. Refer to Intended use on page 6. [W053] •... -
Page 11: Cautions
Operation Warning! • Do not position the device close to the head of the patient if inhaler therapy is being used. [W024] • The disposable set should not be used for longer than 24 hours. [W027] • Make sure that the pressure on the line does not exceed 300 mmHg when using the system. -
Page 12: Notes
• Keep the device away from portable and mobile radio-frequency communications equipment and high-frequency surgical instruments or endocardial catheters. Portable and mobile radio-frequency communication equipment and high-frequency surgical instruments or endocardial catheters may cause the system to operate incorrectly. [C006] •... -
Page 13: Device Safety Symbols
P. S. Heathcote and P. M. Dyer, “The Effect of Warm Irrigation on Blood Loss during Transurethral Prostatectomy under Spinal Anaesthesia,” Br. J. Urol., vol. 58, no. 6, pp. 669– 671, Dec. 1986. Device safety symbols ® This section contains a list of symbols used for the Fluido Irrigation. - Page 14 Transport and storage relative humidity limits Transport and storage atmospheric pressure limits Type CF applied parts (according to IEC 60601-1) AC voltage Fuse Make sure that the pressure does not exceed 300 mmHg. Equipotentiality Read the user manual. Consult the instructions for use. CE marking of conformity User Manual - Contraindications, warnings, cautions, notes and symbols...
- Page 15 As to electrical shock, fire, and mechanical hazards only: ANSI/AAMI ES60601-1:2005 + C1:2009 + A2:2010 + A1:2012, IEC 60601-1-6:2010 + A1:2013, CAN/CSA-C22.2 No. 60601-1:2014, CAN/CSA-C22.2 No. 60601-1-6:2011 + A1:2015 Dispose according to local regulations. Expiry date (year/month) Caution. Consult the instructions for use for important cautionary information. Single patient use only.
- Page 16 Do not use the device if the package is damaged. Keep away from sunlight. Keep away from rain. Temporarily audible signal suppression - "audio paused" Non-pyrogenic Device power On/Standby Repair required User Manual - Contraindications, warnings, cautions, notes and symbols 15 of 54...
-
Page 17: Description
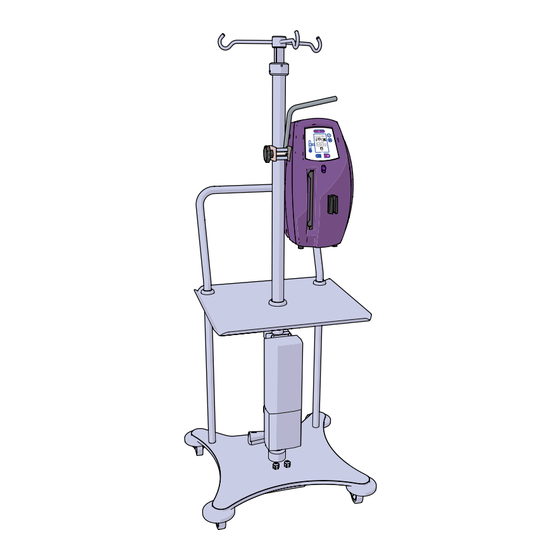
Description ® The Fluido Irrigation is a Fluid Warming System. The system is suitable for all applications, from ® moderate to high flows. The Fluido Irrigation uses infrared heating technology to warm fluids. ® Based on in-line sensors, the Fluido Irrigation calculates the energy required to safely warm the fluid. -
Page 18: Irrigation
® ® The Fluido Irrigation can also be mounted on the Fluido IV Pole. [N004] Irrigation ® The Fluido Irrigation is an easy-to-operate fluid warmer. This section describes the different parts of the device. 3.2.1 Overview ® The Fluido Irrigation is the module that uses infrared technology to warm up the fluids. The ®... -
Page 19: Control Panel
3.2.2 Control panel The control panel is located at the front of the device and can be operated by pressing the buttons located in the panel. All settings are visible on the display and the desired temperature can be selected by pressing the temperature selection buttons. By pressing the flow/volume button, the display will indicate the total volume dispensed by the unit. - Page 20 Display Description Between 1500-2000 operating hours: If you switch on the device, the display shows the symbol continuously. You can still operate the device, but maintenance must take place before 2001 operating hours. After 2000 operating hours: If you switch on the device, the display shows the symbol continuously and a continuous audible signal will sound.
-
Page 21: Disposable Sets
Indication State Cause The control thermometer is not The device does not warm the fluid in the illuminated. cassette. The lower section is green. The end temperature is more than 1 °C lower than the set temperature. The lower and middle sections are The end temperature is equal to the set green. -
Page 22: Fluido ® Irrigation Uro Set
® ® The Fluido Irrigation may only be used with the following Fluido disposable sets and accessories: ® • Fluido Irrigation URO Set ® • Fluido Irrigation URO Patient line ® • Fluido Irrigation URO Spike Set Caution! ® ® ®... -
Page 23: Fluido ® Irrigation Uro Patient Line
® 3.3.2 Fluido Irrigation URO Patient line ® The Fluido Irrigation URO Patient line is a patient line with an extra Luer Lock cap. This patient ® line must only be used in combination with the Fluido Irrigation URO Set and/or URO Spike Set. Clamp Roller clamp Patient line connector... - Page 24 ® Fluido Irrigation Funnel connector ® Fluido Irrigation Luer Lock Male connection User Manual - Description 23 of 54...
-
Page 25: Set-Up
Set-up Transport and storage Transport and store the system and modules according to the Environmental conditions for transport and storage on page 43. Transport and store the disposable sets according to the Environmental conditions for transport on page 45 and Environmental conditions for storage on page 45. ®... -
Page 26: Operation
Operation Safety instructions before operation Warning! • Before operating the system, first read the sections Materials and Prior to operation in Warnings on page 9. [W033] ® • Make sure all the modules are securely attached to the Fluido IV Pole before operation. -
Page 27: Preparation Before Operation
Preparation before operation Warning! ® Ensure that the Fluido Irrigation is not damaged and that the ventilation grids (on the side and bottom of the device) are not covered. [W061] Caution! ® • Before using the Fluido Irrigation, it should be attached to a ®... -
Page 28: Switching On The Irrigation
5.2.1 Switching on the Irrigation ® Follow these steps to turn on the Fluido Irrigation. Before you turn on the module, make sure that no disposable set has been inserted into the device. [N011] Connect the mains plug of the power supply cord adapter to an earthed wall socket. -
Page 29: Priming The Disposable Set
In the following pictures the disposable lines are not shown. [N013] Follow these steps to insert a disposable set. Hold the cassette (2) by the clamp (3). Insert the cassette into the slot (1) until you hear a "click" sound. The display will show the temperature and the flow rate. - Page 30 ® Follow these steps to prime the Fluido Irrigation URO Set. Close the clamps (4), (8) of the disposable set. Connect the spikes (9) to the hospital irrigation fluid bag. Open the clamps of the disposable set (4), (8). Make sure not to open the clamp of the unused spike. Hold the drip chamber (7) upside down.
-
Page 31: Operate The Device
Operate the device Before you operate the system, prepare the device (refer to Preparation before operation on page 26). 5.3.1 Warming up fluids Warning! ® • Make sure that the display on the control panel of the Fluido Irrigation shows the initial temperature (37°C) before warming up fluids. -
Page 32: Deaerating The Deaeration Chamber
5.3.2 Deaerating the deaeration chamber If the deaeration chamber is filled more than one quarter with air, the chamber must be deaerated as follows: Remove the deaeration valve cap from the deaeration chamber (3). Put a syringe (1) into the deaeration valve and lightly press the syringe to open it. -
Page 33: Extra Functions Of The Fluido ® Irrigation Device
® 5.3.4 Extra functions of the Fluido Irrigation device The display on the control panel of the Fluid Warming System can show additional information with respect to the fluid supplied. Follow this step to change the flow/volume display (6). Press the flow/volume button (2) to alternate between the display of: •... -
Page 34: Post-Operative Procedures
Post-operative procedures Do not perform post-operative procedures while the device is in use. 5.4.1 Post-operative non-heated irrigation Follow these steps to stop warming fluids but continue irrigating. Close all clamps (4), (7), (8). ® Disconnect the used URO patient line from the Fluido Irrigation URO Set (1). -
Page 35: Stopping The Device
5.4.2 Stopping the device Follow this step to stop warming fluids. ® Press the on/standby button (1) on the Fluido Irrigation. The on/standby indicator (1) will light orange. When the device enters the standby mode, fluids will not be warmed up by the device. However, the administration of fluids will continue. - Page 36 Follow this step to reset the device. Press the temperature selection buttons (4) together with the flow/ volume button (2) for 2 seconds. The device will perform a power cycle to the display and the error should disappear. If the problem persists, do not use the device and contact the hospital service department or the local supplier.
-
Page 37: Maintenance
Maintenance If a problem occurs with the device, please refer to Troubleshooting on page 38. Precautions Warning! • Maintenance may only be performed by trained biomedical technicians or engineers. [W049] • Preventive maintenance needs to be performed on an annual basis. Please refer to the ®... -
Page 38: Disinfection
After each use, clean all exterior surfaces of the reusable components according to the following validated cleaning procedure: Visually inspect the components to ensure there is no visible damage or deterioration of the enclosures such as cracks, or deterioration of the labels and power cord. Do not clean if there is a defect and contact The Surgical Company International B.V. -
Page 39: Troubleshooting
Troubleshooting Power supply interruption When the mains power is turned off, the device should respond as follows. Device Response Irrigation Will turn off. ® If the mains power is restored within 30 seconds, the Fluido Irrigation will skip the self-test and continue with the previous temperature setting. - Page 40 Indicator Problem Possible cause Solution The on/standby Malfunction. Contact the hospital indicator is off. service department or the local supplier. An audible signal sounds. Indicator Problem Possible cause Solution The on/standby Power failure. Restore the power. indicator turns off If the power is not during use.
- Page 41 Indicator Problem Possible cause Solution The control Malfunction. Stop using the device thermometer is entirely and contact the red. hospital service department or the local supplier. The display shows the maintenance symbol. An audible signal sounds. Indicator Problem Possible cause Solution The bottom section The flow is too high.
- Page 42 Indicator Problem Possible cause Solution The top or bottom One of the lamps is Contact the hospital bar of the lamp defective. service department or replacement indicator the local supplier. flashes. The control thermometer is entirely red. The display shows the maintenance symbol.
- Page 43 Indicator Problem Possible cause Solution The display shows an Malfunction. Press the temperature error code. setting buttons (+/-) to obtain the error code during an audible signal. Reset the error code to check whether the current error code is the actual error code: Press and hold the temperature setting buttons (+/-) together...
-
Page 44: Specifications
Specifications Environmental conditions for operation Description Specification Ambient temperature 15 °C ~ 30 °C Relative humidity 30% ~ 75% Atmospheric pressure 70-106 kPa Modules 8.2.1 Environmental conditions for transport and storage Description Specification Ambient temperature -40 °C ~ 50 °C Relative humidity 10% ~ 90% (non-condensing) Atmospheric pressure... - Page 45 Description Specification Accuracy of flow meter ± 20% Warming and measurement technology Infrared Warming lamps 300 W (4×) Flow lamp 150 W (1×) GMDN code 47623 Classification (IEC 60529) IPX1 Classification (IEC 60601-1) Class I, Cardiac Floating Classification (MDR (EU) 2017/745) Class IIb - 0344 Product lifetime 7 years...
-
Page 46: Disposable Sets
Description Specification Product lifetime 7 years Disposable sets 8.3.1 Environmental conditions for transport Description Specification Ambient temperature -20 °C ~ 40 °C Relative humidity 10% ~ 90% (non-condensing) Atmospheric pressure 50-106 kPa 8.3.2 Environmental conditions for storage Description Specification Ambient temperature 2 °C ~ 30 °C Relative humidity 10% ~ 90% (non-condensing) -
Page 47: Fluido ® Irrigation Uro Patient Line
® 8.3.4 Fluido Irrigation URO Patient Line Description Specification Part number 680801-B Total length 225 cm GMDN code 45644 ® 8.3.5 Fluido Irrigation URO Spike Set Description Specification Part number 680803-B Number of spikes Total length 75 cm GMDN code 45644 Accessories ®... -
Page 48: Fluido ® Irrigation Male Connector
® 8.4.2 Fluido Irrigation Male Connector Description Specification Part number 680911 Total length 16 cm Connector side A Male Luer Connector side B Male Luer GMDN code 45644 ® 8.4.3 Fluido Irrigation Catheter Connector Description Specification Part number 680912 Total length 21 cm Connector side A Male Luer... -
Page 49: Fluido ® Irrigation Uro Male Connection
® 8.4.5 Fluido Irrigation URO Male Connection Description Specification Part number 680805 Total length 10 cm Connector side A Male Luer Connector side B URO Connector GMDN code 45644 User Manual - Specifications 48 of 54... -
Page 50: Electromagnetic Compatibility
Electromagnetic compatibility Warning! • Use of accessories, transducers and cables other than those specified or provided by The Surgical Company International B.V. of this device could result in increased electromagnetic emissions or decreased electromagnetic immunity of this device and result in improper operation. [W054] •... -
Page 51: Electromagnetic Immunity
Electromagnetic immunity Guidance and manufacturer’s declaration The device is intended for use in the electromagnetic environment specified below. The customer or the user of the device should ensure that it is used in such an environment. Immunity test IEC60601 test level Electromagnetic discharge (ESD) ±... -
Page 52: Electromagnetic Emissions
Electromagnetic emissions Guidance and manufacturer’s declaration The device is intended for use in the electromagnetic environment specified below. The customer or the user of the device should ensure that it is used in such an environment. Emissions test Compliance RF emissions Group 1 CISPR 11 (2015) RF emissions... - Page 53 • At 80 MHz and 800 MHz, the separation distance for the higher frequency range applies. [N033] • These guidelines may not apply in all situations. Electromagnetic propagation is affected by absorption and reflection from structures, objects and people. [N034] User Manual - Electromagnetic compatibility 52 of 54...
-
Page 54: Disposal
Disposal Warning! • After applying blood products, clean the hospital administration set with saline. [W031] • The device and its disposables may be a potential biohazard during and after use. Handle and dispose of in accordance with accepted medical practice and applicable local regulations. [W032] 10.1 Active devices The active devices may be a potential biohazard during and after use. - Page 56 The Surgical Company International B.V. Beeldschermweg 6F 3821 AH Amersfoort +31 (0)33 450 72 50 www.tsc-group.com/ptm info.ptm@tsc-group.com...
Need help?
Do you have a question about the Fuido Irrigation and is the answer not in the manual?
Questions and answers