Table of Contents
Advertisement
Quick Links
4CH Digital Wireless Security System
:
Model
GD8107
EU Environmental Protection
Waste electrical products should
not be disposed of with household
waste. Please recycle where
facilities exist. Check with your
local authority or retailer for
recycling advice.
GD8107
Model
Version 1.7
Please read this user manual carefully before using this product.
Failure to understand operation procedures may result in injury.
Advertisement
Table of Contents

Subscribe to Our Youtube Channel
Related Manuals for Goscam GD8107


Summary of Contents for Goscam GD8107
- Page 1 4CH Digital Wireless Security System Model GD8107 EU Environmental Protection Waste electrical products should not be disposed of with household waste. Please recycle where facilities exist. Check with your local authority or retailer for recycling advice. GD8107 Model Version 1.7 Please read this user manual carefully before using this product.
-
Page 2: Table Of Contents
Record ● Timer Recording ● Motion Detection Packing List * Only one camera included in the package. ● PIR Recording GD8104/8105 Playback GD8107 ① Camera x 4 Camera ② 7"TFT LCD Monitor ● Pairing ③ Adapter x 1 ● Active ●... -
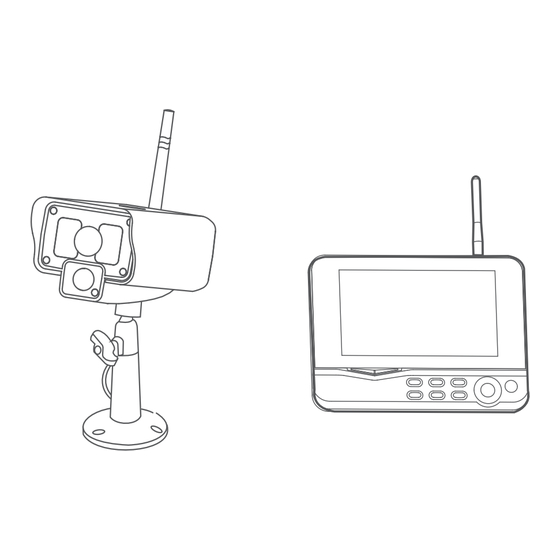
Page 3: Structure
Structure Installation 1. Install the camera at the proper monitoring location. The camera can be installed in two modes: Antenna Infrared LEDs Lens PIR infrared sensor Antenna Socket Microphone Pair Link Button Indicator Power Bracket Indicator ① Upright installation: ② Reverse installation: Power Input Install the camera Install the camera in... -
Page 4: Operations
Operations After successful pairing, the following real-time monitoring picture appears: Basic operations ● Connect the camera to the power supply . The power Indicator Picture display area Picture display area on the back is turned on: 2011/11/05/09:30 2011/11/05/09:30 Picture display area Picture display area Time stamp 2011/11/05/09:30... -
Page 5: Video Recording
◆ ■ Motion Detection Recording: Video recording ● If there is object motion detected by any accessed camera recording can be triggered. The specific steps are as follows: ◆ ■ Manual Recording: 1. Press the MENU button to enter the setting interface; 1. -
Page 6: Playback
Playback Video Output ● ● You can connect the receiver to a larger monitor/TV to monitor 1. In the real time status, press the button to enter playback video more clearly. interface; 2. Press the button to select the folder; 3. -
Page 7: Date / Time
Record Mode Date / Time Sets the system time and date. ● Language Sets the system language. Sets to stop recording or overwrite the earliest video record when the 1. Press the OK button to enter; Record Mode storage medium is full. 2. -
Page 8: Display Items
Mute Display Items ● ● 1. Press the OK button to enter; 1. Press the OK button to enter; 2. Press the button to select; 2. Press the button to select “On” or “Off”; 3. Click the OK button to confirm whether to display this item. 3. -
Page 9: Power Saving Mode
Power Saving Mode PIR Recording ● ● If there is human motion detected by any accessed camera, 1. Press the OK button to enter; recording can be triggered. For specific steps, see Page 08. 2. Press the button to select “Time Interval” or “Wake up on Motion”... -
Page 10: Pairing
Remarks: Pairing ● If pairing fails, the system prompts “Pairing failed”. Please After pairing, the camera is not affected by interference of other perform pairing again. frequencies. 1. Press the button to select “Pairing”, press the OK button to enter: Active ●... -
Page 11: Alarm Setting
Specifications Base/PIP Setting Quality Resolution Size Items 8104JM 8105JM 8107JM High Imaging Sensor 1/ -inch color CMOS High Video Resolution 656 x 488 Medium Viewing Angle 70° 50° Power Supply Consumption OK:Options MENU:Quit 400mA 600mA Current (Max.) Waterproof Capacity IP54 IP66 Press the button to select “Resolution Size”... -
Page 12: Faq
Troubleshooting 1. Why the screen doesn’t display any monitoring picture after Symptoms Solutions the camera is connected? Confirm the adapters of receiver and camera connect : 1. Please check whether “ Active” is set to “ON”. Answer No display 2. Please check whether pairing succeeds. Re-pair the camera and receiver. - Page 13 FCC Radiation Exposure Statement: This equipment complies with FCC radiation exposure limits set forth for an uncontrolled environment . This equipment should be installed and operated with minimum distance 20cm between the radiator& your body. This transmitter must not be co-located or operating in conjunction with any other antenna or transmitter.
Need help?
Do you have a question about the GD8107 and is the answer not in the manual?
Questions and answers