
Summary of Contents for DIMAX GROUP Konner & Sohnen BCT-1400
- Page 1 Owner’s Manual Please, read this manual carefully before use! Electric Lawn Trimmer KS BCT-1400...
-
Page 2: Safety Instruction
INTRODUCTION Thank you for opting for Könner & Söhnen products. This manual contains a brief description of safety, ® setup and use. More information can be found on the official importer’s website in the support section: konner-sohnen.com/manuals You can also go to the support section and download the manual by scanning the QR code or on thewebsite of the official importer of Könner &... -
Page 3: Personal Safety
• Do not abuse the cord. Never use the cord for carrying, pulling or unplugging the power tool. Keep the cord away from heat, oil and sharp edges or moving parts. Damaged or entangled cords increase the risk of electric shock. •... -
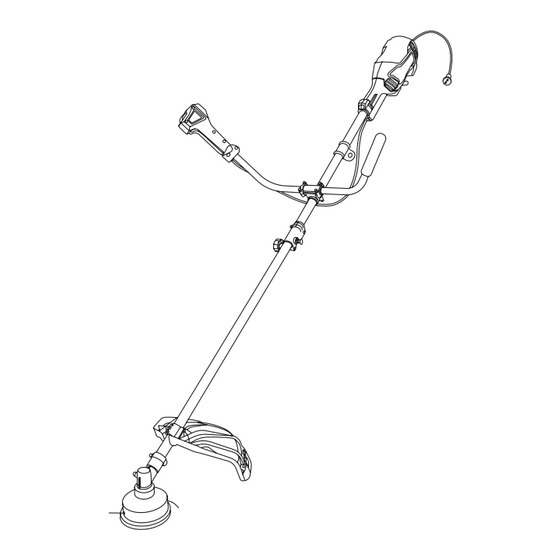
Page 4: Package Content List
1. Supply cable 2. Motor 3. Upper tube shaft 4. Harness support 5. Connector 6. Lower tube shaft 7. Carter of protection 8. Wire cutting line 9. Metal cutting blade 10. Angle drive 11. Handlebar support 12. Handle and handle with switch on/off and switch-lock release button 13. - Page 5 ASSEMBLY Before working on the device, disconnect it from the power WARNING! supply. Use only original parts and be careful when assem- bling the brushcutter. Risk of injury! Before working, you must mount the safety guard on the cutting device, and the two tubes. Assemble the tool as explained below and use the pictures above.
-
Page 6: Operation
MOUNTING THE HANDLEBAR (FIG 3) MOUNTING THE HANDLEBAR (FIG 3) 1. Loosen the 4 Allen screws (A) on the upper tube and remove the handlebar bracket. 2. Insert the handlebar onto the bracket; tighten it with the bracket and the 4 Allen screws (as shown). 3. -
Page 7: Maintenance And Storage
WARNING! Regularly clean the wire knife to ensure proper cutting. If the cutting power is reduced, turn the appliance on and hold it above the grass. Touch the floor with the head. The wires are automatically extended. When the end of the wire is less than 2.5 cm: When the end of the wire is less than 2.5 cm: •... - Page 8 REPLACING THE CUTTING HEAD (FIGURE 9) REPLACING THE CUTTING HEAD (FIGURE 9) 1. Disconnect the power supply. 2. Turn the appliance upwards to raise the head. 3. The coil housing and the coil are inserted only. To open, remove the cover (A) from the cover (C). Remove the coil (B).
- Page 9 WARRANTY SERVICE TERMS The international manufacturer warranty is 1 year. The warranty period starts from the date of purchase. In cases when warranty period is longer than 1 year according to local legislation please contact your local dealer. The Seller which sells the product is responsible for granting the warranty. Please contact the Seller for warranty.
- Page 11 CONTACTS Deutschland: Deutschland: DIMAX International GmbH Flinger Broich 203 -FortunaPark- 40235 Düsseldorf, Deutschland www.koenner-soehnen.com Ihre Bestellungen Ihre Bestellungen orders@dimaxgroup.de Kundendienst, technische Fragen Kundendienst, technische Fragen und Unterstützung und Unterstützung support@dimaxgroup.de Garantie, Reparatur und Service Garantie, Reparatur und Service service@dimaxgroup.de Sonstiges Sonstiges info@dimaxgroup.de Polska:...
Need help?
Do you have a question about the Konner & Sohnen BCT-1400 and is the answer not in the manual?
Questions and answers