Table of Contents
Advertisement
Available languages
Available languages
Quick Links
MANUEL D'UTILISATEUR
SY-T2714
C'est un objet de GRANDE PUISSANCE. N'UTILISEZ PAS LA MEME PRISE
AVEC D'AUTRE APPAREILS MENAGERS DE GRANDE PUISSANCE tels que la climati-
sation, etc, s'il vous plaît. Choisissez une prise exclusivement pour cette machine
et assurez-vous que le fusible est 10A.
POIDS MAXIMAL
DE L'UTILISATEUR
CONTACT@ISEFIT.COM
100 KG
+33 344 762 166
WWW.ISEFIT.COM
Advertisement
Table of Contents

Related Manuals for Novonova SY-T2714


Summary of Contents for Novonova SY-T2714
- Page 1 MANUEL D’UTILISATEUR SY-T2714 C’est un objet de GRANDE PUISSANCE. N’UTILISEZ PAS LA MEME PRISE AVEC D’AUTRE APPAREILS MENAGERS DE GRANDE PUISSANCE tels que la climati- sation, etc, s’il vous plaît. Choisissez une prise exclusivement pour cette machine et assurez-vous que le fusible est 10A.
- Page 2 CONSIGNES SECURITE IMPORTANTES Avertissement: Pour réduire le risque de blessure grave, lisez toutes les précau- tions et instructions importantes de ce manuel ainsi que tous les avertissements sur votre tapis de course avant de l’utiliser. Nous n’assumons aucune responsabil- ité pour les blessures ou les dommages corporels subis par ou au cours de l’utili- sation de cette machine.
- Page 3 pour éviter les sauts soudains de vitesse. 17. Ne jamais laisser le tapis de course sans surveillance pendant qu’il court. Toujours enlever la clé, débrancher la ligne d’alimentation, et mettre le disjoncteur en position d’arrêt lorsque le tapis de course n’est pas utilisé. 18.
- Page 4 • N’utilisez pas de pression excessive sur les clés de commande du console. Ils sont réglés de précision pour fonctionner correctement avec peu de pression des doigts. PARAMÈTRES Norme de test(s): EN 60335-1, EN 62233, IEC Modèle: SY-T2714 60335-1 ; Classe : HC (usage domestique) Taille du produit: 130*58*118cm Matériau: acier Taille du pli:23.5*58*126cm...
- Page 5 INSTRUCTIONS OPERATION IMPORTANTE Ce tapis de course motorisé peut vous aider à atteindre votre objectif de rester en forme. Avec la forme unique, élégante et digne, elle prend un peu d’espace lorsqu’elle est pliée par une gasoline spring. Il y a cinq modes d’entraînement automatique prédéfinis P1-P5 avec console, chaque mode dure 20 minutes, 4 touches de fonctionnement;...
- Page 6 INSTRUCTIONS DES OPÉRATIONS APP Etape 1: Etape 2: Téléchargez Cliquez sur "I APP kinomap et accept the cliquez pour terms of use" entrer dans pour entrer cette page Cliquez sur "start" N’enregistrez pas, sélectionnez selon la version de votre téléphone mobile“...
- Page 7 Etape 4: sélectionnez "fitshow treadmill" pour rechercher le numéro de Bluetooth de la montre électronique, et remplissez "treadmill brand and model" Recherchez le dispositif Bluetooth "Fs-xxxxx" entrez la marque du dispositif Type "ISE SY-T2714" comme ce que indiqué dans l’image, et cliquez sur "OK"...
- Page 8 Etape 5:cliquez et entrezCompatible avec l’interface de bluetooth Affichage: la vitesse, la puissance, la vitesse de rotation et la fréquence cardiaque Etape 6: cliquez sur "back" pour entrer dans la page et cliquez à nouveau "Browse"...
- Page 9 Etape 7: Sélectionnez trois fonctions pour entrer dans la page. Par exemple : Ajustez la vitesse et la pente sur le panneau de commande du tapis de course. Les données correspondantes du tapis de course seront transmises via bluetooth au téléphone mobile pour l’affichage.
- Page 10 INSTRUCTIONS OPERATION 1. Touche de console VITESSE + VITESSE - MODE START/STOP Commence/Arrêt (1)MODE Appuyez sur la machine pour choisir les programmes prédéfinis P1-P5. TIME(mins) 20MINS SPEED STOP (Km/h) TIME(mins) 20MINS SPEED STOP (Km/h) TIME(mins) 20MINS SPEED STOP (Km/h) TIME(mins) 20MINS SPEED STOP...
- Page 11 (2)START/STOP Commence/Arrêt Appuyez sur la machine pour commencer la course. Quand vous courez, l’appuyez pour l’arrêt et enregistrez la course. (3)VITESSE + En cours de course, appuyez sur ce bouton pour augmenter la vitesse à 0,1 km /H à chaque fois. Appuyez et maintenez ce bouton, la vitesse augmente continuellement. (4)VITESSE –...
-
Page 12: Nettoyage Général
L’ENTRETIEN Un nettoyage/lubrification raisonnable doit être effectué pour prolonger la durée de vie de ce tapis de course. Les performances sont maximisées lorsque la courroie et le tapis de course sont aussi propres que possible. AVERTISSEMENT:LE FROTTEMENT MAT/DECK JOUE UN ROLE MAJEUR DANS LA FONCTION ET LA DUREE DE VIE DU TAPIS DE COURSE ET C’EST POURQUOI NOUS VOUS RECOMMANDONS DE LUBRIFIER CONSTAMMENT CE POINT DE FRICTION POUR PLOLONGER LA DUREE DE VIE DU TAPIS DE COURSE. -
Page 13: Réglage De La Courroie
L’utilisation moyenne (3-5 heures par semaine) tous les 3 mois L’utilisation intensive (plus de 5 heures par semaine) toutes les 6 à 8 semaines. Les procédures de lubrification ci-dessous: 1.Utilisez un chiffon doux et sec pour essuyer la zone entre la courroie et le pont. 2.Étalez uniformément le lubrifiant sur la surface intérieure de la courroie et du pont (s’as- surer que la machine est éteinte et que la source d’alimentation est coupée). - Page 14 NE PAS TROP SERRER-un serrage excessif causera des dommages à la courroie et une rupture prématurée du palier. 6. Réglage suivi de la courroie Ce tapis de course est conçu pour garder la courroie raisonnablement centrée pendant son utilisation. Il est normal que certaines courroies dérivent près d’un côté pendant que la courroie tourne sans personne.
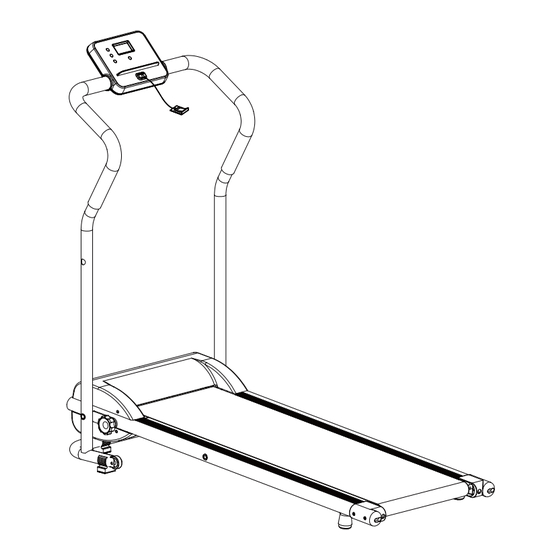
- Page 15 LISTE PIECE ET DIAGRAMME EXPLOSE Description Quantité Description Quantité Ensemble du cadre inférieur Rouleau arrière Ensemble du cadre de la plate- Rouleau avant forme de course Tube de l’accoudoir supérieur Courroie motrice Roue Interrupteur Pad à pied C Clé de sécurité Bouton rotatif M10 Anneau magenatique Couvercle du moteur supérieur...
-
Page 16: Guide D'installation
27 26 GUIDE D’INSTALLATION Attention : Assurez-vous que toutes les vis et tous les écrous sont serrés avant l'exercice. Etape 1:... - Page 17 Etape 2: Etape 3: Bouton rotatif petit Bouton rotatif M10...
- Page 18 Etape 4: Clé de Sécurité Nous avons soigneusement vérifié les mots du manuel. S’il y a un problème dans l’impression, veuillez y réfléchir. Si les photos sont différentes du produit, veuillez prendre votre produit comme le dernier et le bon. Note: s’il y a des changements dans la fonction et la spécification dus à...
- Page 19 USER’S MANUAL SY-T2714 This is HThis is HIGH-POWER item; please DO NOT USE THE SAME OUTLET WITH OTHER HIGH-POWER HOUSEHOLD APPLIANCE like air-conditioning etc. Please choose an outlet exclusively for the machine and make sure the fuse is 10A. MAX USER WEIGHT CONTACT@ISEFIT.COM...
-
Page 20: Important Safety Instructions
IMPORTANT SAFETY INSTRUCTIONS WARNING: To reduce the risk of serious injury, read all important precautions and instructions in this manual and all warnings on your treadmill before using your treadmill. We assume no responsibility for personal injury or property damage sustained by or through the use of this product. - Page 21 affect the accuracy of heart rate readings. The pulse sensor is intended only as an exercise aid in determining heart rate trends in general. 19. Do not attempt to raise, lower, or move the treadmill until it is properly assembled. You must be able to safely lift 45 lbs.
-
Page 22: Important Electrical Information
• Do not use excessive pressure on console control keys. They are precision set to function properly with little finger pressure. PRODUCT PARAMETER Test Standard(s): EN 60335-1, EN 62233, Model: SY-T2714 IEC 60335-1 ; Class: HC(Home use) Product size: 130*58*118cm Material:steel Fold size: 23.5*58*126cm... -
Page 23: Brief Description
BRIEF DESCRIPTION This motorized treadmill can help complete your goal of keeping fit. Together with the unique, elegant and dignified shape, it takes a little space when folded by gasoline spring. There is five built-in preset automatic training modes P1-P5 with console , each mode lasts 20 minutes, 4 operation keys;... - Page 24 APP OPERATING INSTRUCTIONS Step 1: Step 2: Download kino- click "I accept map software the terms of and click to use" to enter enter the page Click "start" Do not register, select according to the mobile phone version“ ”enter, And log in as prompted. Select more in the lower right corner.
- Page 25 Step 4: select "fitshow treadmill" to search the Bluetooth number of the electronic watch, and fill in "treadmill brand and model" Search for "Fs-xxxxx" Bluetooth device Click to name the device Name "ISE SY-T2714" as shown in the figure, and then click "OK"...
- Page 26 Step 5:click and enter Corresponding Bluetooth interface Display: speed, power, rotating speed and heart rate Step 6: click "back" to enter the page and click "Browse" again...
- Page 27 Step 7: select three functions to enter the page. For example: Adjust the speed and slope on the operation panel of the treadmill. The corresponding data of the treadmill will be transmitted to the mobile phone for display through Bluetooth.
-
Page 28: Console Keys
OPERATION INSTRUCTIONS 1. Console keys SPEED + SPEED - MODE START/STOP (1)MODE Power on the machine, press it to choose pre-set programs P1-P5. ZEIT(mins) 20MINS GESCHWIND- STOP IGKEIT(Km/h) ZEIT(mins) 20MINS GESCHWIND- STOP IGKEIT(Km/h) ZEIT(mins) 20MINS GESCHWIND- STOP IGKEIT(Km/h) ZEIT(mins) 20MINS GESCHWIND- STOP IGKEIT(Km/h) -
Page 29: Getting Started
(2)START/STOP Power on the machine, press it to start running. When running, press it to stop and record the running. (3)SPEED + When running, press it to increase speed at 0.1KM/H each time. Hold on it, speed is increased continuously. (4)SPEED –... -
Page 30: Maintenance
MAINTENANCE Reasonable cleaning/lubricating should be made to extend the life time of this unit. Perfor- mance is maximized when the belt and mat are kept as clean as possible. WARNING: THE MAT/DECK FRICTION MAY PLAY A MAJOR ROLE IN THE FUNC- TION AND LIFE OF YOUR TREADMILL AND THAT IS WHY WE RECOMMEND YOU CONSTANTLY LUBRICATE THIS FRICTION POINT TO PROLONG THE USEFUL LIFE OF YOUR TREADMILL. -
Page 31: How To Check The Running Mat For Proper Lubrication
See below procedures for lubricating: 1.Use a soft, dry cloth to wipe the area between the belt and deck. 2.Spread lubricant onto the inside surface of belt and deck evenly (make sure the machine is turned off and power is disconnected). 3.Periodically lubricate the front and rear rollers to keep them at there peak performance. -
Page 32: Belt Tracking Adjustment
6. Belt Tracking Adjustment This treadmill is designed to keep the belt reasonably centred while in use. It is normal for some belts to drift near one side while the belt is running with no one on it. After a few minutes of use, the belt should have a tendency to centre itself. - Page 33 PARTS LIST AND EXPLODED DIADRAM Description Q'ty Description Q'ty bottom frame set rear roller running platform frame set front roller upper handrail tube drive belt Wheel switch C foot pad safety key M10 rotary knob magenatic ring upper motor cover bolt M10*60 side rail bolt M6*40...
- Page 34 27 26 INSTALLATION GUIDE Attention: Make sure all screws and nuts are tightened before Exercise. Step 1:...
- Page 35 Step 2: Step 3: Small Rotary Knob M10 Rotary Knob...
- Page 36 Step 4: Safety Key We have checked the words carefully in the manual. If there is something wrong in printing, please kindly consider it. If the pictures are different from the product, please take the product as the final and correct one.
- Page 37 BEDIENUNGSANLEITUNG SY-T2714 Dies ist ein Gerät mit hoher Leistung; bitte verwenden Sie nicht dieselbe Steckdose mit anderen Haushaltsgeräten mit hoher Leistung wie Klimaanlagen usw. Bitte wählen Sie eine Steckdose ausschließlich für das Gerät und stellen Sie sicher, dass die Sicherung 10 A beträgt.
-
Page 38: Wichtige Sicherheitsanweisungen
WICHTIGE SICHERHEITSANWEISUNGEN WARNUNG: Um die Gefahr von schweren Verletzungen zu verringern, lesen Sie bitte alle wichtigen Vorsichtsmaßnahmen und Anweisungen in dieser Anleitung und alle Warnhinweise auf Ihrem Laufband, bevor Sie es benutzen. Wir überneh- men keine Verantwortung für Personen- oder Sachschäden, die durch den Geb- rauch dieses Produktes entstehen. - Page 39 16. Das Laufband ist für hohe Geschwindigkeiten geeignet. Stellen Sie die Geschwindigkeit in kleinen Schritten ein, um plötzliche Sprünge in der Geschwindigkeit zu vermeiden. 17. Lassen Sie das Laufband niemals unbeaufsichtigt, während es läuft. Ziehen Sie immer den Schlüssel ab, ziehen Sie den Stecker aus der Steckdose und schalten Sie den Sicherungsauto- maten aus, wenn das Laufband nicht benutzt wird.
-
Page 40: Wichtige Elektrische Informationen
• Üben Sie keinen übermäßigen Druck auf die Bedientasten der Konsole aus. Die Tasten sind so eingestellt, dass sie schon bei geringem Fingerdruck einwandfrei funktionieren. PRODUKTPARAMETER Modell: SY-T2714 Prüfnorm (en): EN 60335-1, EN 62233, IEC Produktgröße: 130*58*118cm 60335-1 ; Klasse:HC (Heimgebrauch) Klappgröße:23.5*58*126cm... - Page 41 KURZBESCHREIBUNG Dieses motorisierte Laufband kann Ihnen helfen, Ihr Ziel, sich fit zu halten, zu erreichen. Zusammen mit der einzigartigen, eleganten und gediegenen Form nimmt es wenig Platz ein, wenn es durch eine Benzinfeder zusammengeklappt wird. Es gibt fünf integrierte voreingestellte automatische Trainingsmodi P1-P5 mit Konsole, jeder Modus dauert 20 Minuten, 4 Bedienungstasten;...
- Page 42 APP BEDIENUNGSANLEITUNG Schritt 1: Schritt 2: Laden Sie die Klicken Sie auf kinomap Soft- "Ich akzeptiere ware herunter die Nutzungsbe- und klicken Sie, dingungen", um um die Seite zu einzutreten. öffnen. Klicken "Anfang" Registrieren Sie sich nicht, wählen Sie je nach Mobiltelefonversion“ ”enter,und melden Sie sich nach Aufforderung an.
- Page 43 Uhr zu suchen, und geben Sie "Marke und Modell des Laufbands" ein. Suche nach "Fs-xxxxx" Bluetooth-Gerät Klicken Sie auf , um das Gerät zu benennen Benennen Sie "ISE SY-T2714" wie in der Abbildung gezeigt, und klicken Sie dann auf "OK".
- Page 44 Schritt 5:Klicken Sie auf und geben Sie die entsprechende Bluetooth-Schnittstelle ein. Anzeige: Geschwindigkeit, Leistung, Drehgeschwindigkeit und Herzfrequenz Schritt 6: Klicken Sie auf "Zurück", um die Seite zu öffnen, und klicken Sie erneut auf "Durchsuchen".
- Page 45 Schritt 7: Wählen Sie drei Funktionen aus, um die Seite aufzurufen. Zum Beispiel: Stellen Sie die Geschwindigkeit und die Steigung auf dem Bedienfeld des Laufbands ein. Die entsprechenden Daten des Laufbandes werden über Bluetooth auf das Mobiltelefon übertragen und angezeigt.
- Page 46 BEDIENUNGSHINWEISE 1. Konsolentasten GESCHWINDIGKEIT + GESCHWINDIGKEIT - MODUS START/STOP (1)MODUS Schalten Sie das Gerät ein, und drücken Sie die Taste, um die voreingestellten Programme P1-P5 auszuwählen. Zeit(mins) 20MINS Geschwindigkeit STOP (Km/h) Zeit(mins) 20MINS Geschwindigkeit STOP (Km/h) Zeit(mins) 20MINS Geschwindigkeit STOP (Km/h) Zeit(mins) 20MINS...
-
Page 47: Erste Schritte
(2)START/STOP Schalten Sie das Gerät ein, und drücken Sie die Taste, um den Lauf zu starten. Wenn das Gerät läuft, drücken Sie die Taste, um es anzuhalten und den Lauf aufzuzeichnen. (3)Geschwindigkeit + Drücken Sie die Taste beim Laufen, um die Geschwindigkeit jedes Mal um 0,1 km/Std. zu erhöhen. -
Page 48: Wartung
WARTUNG Um die Lebensdauer dieses Geräts zu verlängern, sollte es angemessen gereinigt/ges- chmiert werden. Die Leistung wird maximiert, wenn das Band und die Matte so sauber wie möglich gehalten werden. WARNUNG: DIE REIBUNG ZWISCHEN LAUFMATTE UND DECK KANN EINE WICH- TIGE ROLLE FÜR DIE FUNKTION UND LEBENSDAUER IHRES LAUFBANDES SPIEL- EN. - Page 49 Siehe nachstehende Verfahren zum Schmieren: 1. Verwenden Sie ein weiches, trockenes Tuch, um den Bereich zwischen Matte und Deck abzuwischen. 2. Verteilen Sie Schmiermittel gleichmäßig auf der Innenfläche von Matte und Deck (stellen Sie bitte sicher, dass das Laufband ausgeschaltet und der Strom abgeschaltet ist). 3.
- Page 50 6. Anpassung vom Riemen Dieses Laufband ist so konzipiert, dass das Laufband während des Gebrauchs angemessen zentriert bleibt. Es ist normal, dass Matte in die Nähe einer Seite driften, während der Matte läuft, ohne dass sich jemand darauf befindet. Nach einigen Minuten Gebrauch sollte der Matte dazu neigen, sich selbst zu zentrieren.
- Page 51 TEILELISTE UND EXPLOSIONSZEICHNUNG Beschreibung Menge Beschreibung Menge Unterer Rahmensatz Hintere Rolle Laufband Matte-Rahmenset Vordere Rolle Oberer Handgriff Antriebsriemen Transportrad Schalten C-Fußpolster Sicherheitsschlüssel Drehknopf M10 Magnetring Obere Motorabdeckung Schraube M10*60 Seitenschiene Schraube M6*40 Linke Endkappe Bogenscheibe Φ6 Verstellbare Fußpolster Mutter M6 Rohrstopfen Schraube ST4.2*13 Netzkabelschnalle...
- Page 52 27 26 INSTALLATIONSANLEITUNG Achtung: Stellen Sie sicher, dass alle Schrauben und Muttern vor dem Training dicht zus- chraubt sind. Schritt 1:...
- Page 53 Schritt 2: Schritt 3: Kleiner Drehknopf M10 Drehknopf...
- Page 54 Schritt 4: Sicherheitsschlüssel Wir haben die Wörter im Handbuch sorgfältig geprüft. Wenn beim Drucken etwas nicht stimmt, berücksichtigen Sie dies bitte. Wenn sich die Bilder vom Produkt unterscheiden, nehmen Sie bitte das Produkt als das endgül- tige und richtige. Bitte beachten Sie: Sollten sich aufgrund technischer Weiterentwicklung Änderungen in Funktion und Ausstattung ergeben, werden wir Sie nicht informieren.
- Page 55 MANUAL DE USUARIO SY-T2714 Este es un artículo de ALTA POTENCIA. NO USE EL MISMO TOMACORRIENTE CON OTROS APARATOS DOMÉSTICOS DE ALTA POTENCIA, como aire acondicionado, etc. Elija un tomacorriente exclusivo para la máquina y asegúrese de que el fusible sea de 10A.
-
Page 56: Instrucciones Importantes De Seguridad
INSTRUCCIONES IMPORTANTES DE SEGURIDAD ADVERTENCIA: Para reducir el riesgo de lesiones graves, lea todas las precau- ciones e instrucciones importantes de este manual y todas las advertencias en su máquina para correr antes de usarla. No asumimos ninguna responsabilidad por lesiones personales o daños a la propiedad sufridos por o a través del uso de este producto. - Page 57 15.La máquina para correr es capaz de alcanzar altas velocidades. Ajuste la velocidad en pequeños incrementos para evitar saltos repentinos de velocidad. 16.Nunca deje la máquina para correr desatendida mientras esté funcionando. Siempre retire la llave, desenchufe el cable de alimentación y cambie el disyuntor de reinicio / apagado a la posición de apagado cuando la máquina para correr no esté...
-
Page 58: Información Eléctrica Importante
No ejerza una presión excesiva sobre las teclas de control de la consola. Están configurados con precisión para funcionar correctamente con la presión del dedo meñique. PARÁMETRO DEL PRODUCTO Modelo: SY-T2714 Estándar de prueba(s): Tamaño del producto: 130*58*118cm EN 60335-1, EN 62233, IEC 60335-1 ;... -
Page 59: Breve Descripción
BREVE DESCRIPCIÓN Esta cinta de correr motorizada puede ayudarlo a completar su objetivo de mantenerse en forma. Junto con la forma única, elegante y digna, ocupa un poco de espacio cuando se pliega con un resorte de gasolina. Hay cinco modos de entrenamiento automático preestablecidos P1-P5 con consola, cada modo dura 20 minutos, 4 teclas de funcionamiento;... - Page 60 INSTRUCCIONES DE USO DE APP Paso 1: Paso 2: Descargue el haga clic en software kino- "Acepto las map y haga clic condiciones de para entrar en la uso" para entrar página Haga clic en "Inicio". No se registre, seleccione según la versión del teléfono móvil“ ”entrar ,e inicie la sesión según se le pida.
- Page 61 Paso 4: seleccione "Cinta de correr FITSHOW" para buscar el número de Bluetooth del reloj electrónico, y rellene "marca y modelo de la cinta de correr" Buscar "Fs-xxxxx" Dispositivo Bluetooth Haga clic para nombrar el dispositivo Nombre "ISE SY-T2714" como se muestra en la figura, y luego haga clic en "Aceptar"...
- Page 62 Paso 5:clic y entrar en la interfaz Bluetooth correspondiente. Pantalla: velocidad, potencia, velocidad de rotación y frecuen- cia cardíaca Paso 6: haga clic en "atrás" para entrar en la página y haga clic en "Examinar" de nuevo...
- Page 63 Paso 7: seleccione tres funciones para entrar en la página. Por ejemplo: Ajuste la velocidad y la pendiente en el panel de control de la cinta de correr. Los datos correspondientes de la cinta de correr se transmitirán al teléfono móvil para su visual- ización a través de Bluetooth.
-
Page 64: Instrucciones De Operacion
INSTRUCCIONES DE OPERACION 1. Teclas de la consola Velocidad + Velocidad - MODOà START/STOP (1)MODO Encienda la máquina, pulse para elegir los programas preestablecidos P1-P5. TIME(mins) 20MINS SPEED STOP (Km/h) TIME(mins) 20MINS SPEED STOP (Km/h) TIME(mins) 20MINS SPEED STOP (Km/h) TIME(mins) 20MINS SPEED... - Page 65 (2)START/STOP Encienda la máquina, pulse para empezar a funcionar. Durante el recorrido, púlsalo para parar y grabar el recorrido. (3)VELOCIDAD+ Al correr, púlselo para aumentar la velocidad a 0,1KM/H cada vez. Si lo mantienes pulsado, la velocidad aumentará continuamente. (4)VELOCIDAD– Al correr, púlselo para disminuir la velocidad a 0,1KM/H cada vez.
-
Page 66: Mantenimiento
MANTENIMIENTO Se debe realizar una limpieza / lubricación razonable para prolongar la vida útil de esta unidad. El rendimiento se maximiza cuando el cinturón y la alfombrilla se mantienen lo más limpios posible. ADVERTENCIA: LA FRICCIÓN DEL ALFOMBRA / CUBIERTA PUEDE JUGAR UN PAPEL PRINCIPAL EN LA FUNCIÓN Y LA VIDA ÚTIL DE SU MÁQUINA PARA CORRER Y ES POR ESO QUE LE RECOMENDAMOS LUBRICAR CONSTANTEMENTE ESTE PUNTO DE FRICCIÓN PARA PROLONGAR LA VIDA ÚTIL DE SU MÁQUINA... -
Page 67: Ajuste De La Correa
Vea los procedimientos a continuación para lubricar: 1.Use un paño suave y seco para limpiar el área entre el cinturón y la plataforma. 2.Esparza el lubricante en la superficie interior de la banda y la plataforma de manera uni- forme (asegúrese de que la máquina esté apagada y desconectada la energía). 3.Lubrique periódicamente los rodillos delanteros y traseros para mantenerlos en su máximo rendimiento. - Page 68 6. Ajuste de Seguimiento de la Correa Esta máquina para correr está diseñada para mantener el cinturón razonablemente centra- do mientras está en uso. Es normal que algunos cinturones se deslicen cerca de un lado mientras el cinturón está funcionando sin nadie sobre él. Después de unos minutos de uso, el cinturón debería tener tendencia a centrarse.
- Page 69 LISTA DE PIEZAS Y DIBUJO DETALLADO DESCRIPCIÓN DESCRIPCIÓN Juego de bastidores inferiores Rodillo trasero Juego de bastidores de plataforma Rodillo delantero de rodaje Tubo del pasamanos superior Correa de transmisión Rueda Interruptor Rodamiento del pie C Llave de seguridad Pomo giratorio M10 Anillo magnético Cubierta superior del motor Perno M10*60...
-
Page 70: Guía De Instalación
27 26 GUÍA DE INSTALACIÓN Nota: asegúrese de que todos los tornillos y tuercas estén apretados antes del ejercicio. Paso 1:... - Page 71 Paso 2: Paso 3: Pomo giratorio pequeño Pomo giratorio M10...
- Page 72 Paso 4: Llave de seguridad Hemos revisado las palabras cuidadosamente en el manual. Si hay algún problema con la impresión, por favor considérelo. Si las imágenes son diferentes del producto, tome el producto como el final y correcto. Tenga en cuenta: Si hay cambios en la función y las especificaciones debido a mejoras técnicas, no lo mantendremos informado.
- Page 73 MANUALE D'USO SY-T2714 Questo è un articolo ad ALTA POTENZA; si prega di NON UTILIZZARE LA STESSA PRESA CON ALTRI APPARECCHIATURE DI CASA AD ALTA POTENZA come l'aria condizionata ecc. Si prega di scegliere una presa di corrente esclusivamente per la macchina e assicurarsi che il fusibile sia da 10A.
-
Page 74: Importanti Istruzioni Di Sicurezza
IMPORTANTI ISTRUZIONI DI SICUREZZA ATTENZIONE: Per ridurre il rischio di lesioni gravi, leggere tutte le precauzioni e le istruzioni importanti contenute in questo manuale e tutte le avvertenze sul tapis roulant prima di utilizzarlo. Non ci assumiamo alcuna responsabilità per lesioni personali o danni alla proprietà... - Page 75 15.Il tapis roulant è capace di alte velocità. Regolare la velocità in piccoli incrementi per evitare improvvisi salti di velocità. 16.Non lasciare mai il tapis roulant incustodito mentre è in funzione. Rimuovere sempre la chiave, scollegare il cavo di alimentazione e commutare l'interruttore di ripristino / spegnimento in posizione OFF quando il tapis roulant non è...
- Page 76 • Non usare una pressione eccessiva sui tasti di controllo della console. Sono impostati con precisione per funzionare correttamente con una piccola pressione delle dita. PARAMETRI DEL PRODOTTO Modello: SY-T2714 Standard di prova: Dimensioni del prodotto:130*58*118cm EN 60335-1, EN 62233, IEC 60335-1 ;...
-
Page 77: Breve Descrizione
BREVE DESCRIZIONE Questo tapis roulant motorizzato può aiutare a completare il tuo obiettivo di mantenerti in forma. Insieme alla forma unica, elegante e dignitosa, prende poco spazio quando viene piegato dalla molla della benzina. Ci sono cinque modalità di allenamento automatico preimpostato P1-P5 con console, ogni modalità... - Page 78 ISTRUZIONI PER L'USO DELL'APP Passo 1: Passo 2: Scaricare l’app Cliccare su "I kinomap e clic- accept the terms carla per entrare of use." per nella pagina. entrare. Cliccare su "start" Non registrarsi, selezionare secondo la versione del cellulare " "...
- Page 79 Passo 4: Selezionare "FITSHOW Treadmill" per cercare il numero Bluetooth dell'DISPLAY elettronico, e compilare "marca e modello del tapis roulant". Cercare "Fs-xxxxx" Dispositivo Bluetooth. Cliccare per dare un nome al dispositivo. Nominare "ISE SY-T2714" come mostrato in figura, quindi fare clic su "OK".
- Page 80 Passo 5:Cliccare e inserire.Interfaccia Bluetooth corrispondente. Display: velocità, potenza, velocità e frequenza cardiaca. Passo 6: Cliccare su "back" per entrare nella pagina e cliccare nuovamente su "Browse".
- Page 81 Passo 7: Selezionare tre funzioni per entrare nella pagina. Per esempio: Regolare la velocità e la pendenza sul pannello di controllo del tapis roulant. I dati corris- pondenti del tapis roulant saranno trasmessi al cellulare per la visualizzazione tramite Blue- tooth.
-
Page 82: Istruzioni Per Il Funzionamento
ISTRUZIONI PER IL FUNZIONAMENTO 1. Tasti della Console Velocità + Velocità - MODALITÀ AVVIO/ARRESTO (1)MODALITÀ Accendere la macchina, premere per scegliere i programmi preimpostati P1-P5. TIME(mins) 20MINS SPEED STOP (Km/h) TIME(mins) 20MINS SPEED STOP (Km/h) TIME(mins) 20MINS SPEED STOP (Km/h) TIME(mins) 20MINS SPEED... - Page 83 (2)AVVIO/ARRESTO Accendere la macchina, premerlo per iniziare a correre. Durante la corsa, premerlo per fer- mare e registrare la corsa. (3)VELOCITÀ + Quando si corre, premerlo per aumentare la velocità a 0.1KM/H ogni volta. Tenendolo premuto, la velocità viene aumentata continuamente. (4)VELOCITÀ...
-
Page 84: Manutenzione
MANUTENZIONE Una pulizia/lubrificazione ragionevole dovrebbe essere fatta per estendere il tempo di vita del tapis roulant. Le prestazioni sono massimizzate quando il nastro e il tappetino sono tenuti il più possibile puliti. ATTENZIONE: L'ATTRITO DEL TAPPETINO/COPERTA PUÒ GIOCARE UN RUOLO IMPORTANTE NELLA FUNZIONE E NELLA VITA DEL TAPIS ROULANT E PER QUESTO TI RACCOMANDIAMO DI LUBRIFICARE COSTANTEMENTE QUESTO PUNTO DI AT- TRITO PER PROLUNGARE LA VITA UTILE DEL TAPIS ROULANT. - Page 85 Vedere di seguito le procedure per la lubrificazione: 1.Utilizzare un panno morbido e asciutto per pulire l'area tra la cintura e il piatto. 2.Distribuire uniformemente il lubrificante sulla superficie interna del nastro e del piatto (assicurarsi che la macchina sia spenta e che l'alimentazione sia scollegata). 3.Lubrificare periodicamente i rulli anteriore e posteriore per mantenerli al massimo delle prestazioni.
- Page 86 6. Regolazione del Tracciamento della Cintura Questo tapis roulant è progettato per mantenere il nastro ragionevolmente al centro duran- te l'uso. È normale che alcune cinture scivolino vicino a un lato mentre la cintura è in funzi- one senza nessuno su di essa. Dopo alcuni minuti di utilizzo, la cintura dovrebbe avere la tendenza a centrarsi.
- Page 87 ELENCO DELLE PARTI E DIAGRAMMA ESPLOSO DESCRIZIONE QTÀ DESCRIZIONE QTÀ Set telaio inferiore Rullo posteriore Set telaio piattaforma di corsa Rullo anteriore Tubo corrimano superiore Cinghia di trasmissione Ruota Interruttore Cuscinetto del piede C Chiave di sicurezza Manopola rotante M10 Anello magnetico Coperchio superiore del motore Bullone M10*60...
-
Page 88: Guida D'installazione
27 26 GUIDA D'INSTALLAZIONE Nota: Prima degli Esercizi per gli utenti, assicurarsi che tutte le viti e i dadi siano serrati. Passo 1:... - Page 89 Passo 2: Passo 3: Piccola manopola rotante Manopola rotante M10...
- Page 90 Passo 4: Chiave di Sicurezza Abbiamo controllato attentamente le parole nel manuale. Se c'è qualcosa di sbagliato nella stampa, si prega gentilmente di considerarlo. Se le immagini sono diverse dal prodotto, prendi il prodotto come finale e corretto. Nota: se ci sono cambiamenti nella funzione e nelle specifiche a causa di miglioramenti tecnici, non ti terremo informato.
Need help?
Do you have a question about the SY-T2714 and is the answer not in the manual?
Questions and answers