Advertisement
Available languages
Available languages
Comando elettronico sovrapposto con due
uscite relè e con contatti liberi da tensione
Electronic push-button with two output
dry relay contacts
14138
SIMON URMET
10154 Torino (Italy)
Via Bologna 152
Tel. +39 011 24 00 000
Fax. +39 011 24 00 249
info@simonurmet.com
www.simonurmet.com
DS14138-001C
LBT9064
Advertisement
Table of Contents

Related Manuals for SIMON URMET nea 14138

Summary of Contents for SIMON URMET nea 14138
- Page 1 Comando elettronico sovrapposto con due uscite relè e con contatti liberi da tensione Electronic push-button with two output dry relay contacts 14138 SIMON URMET 10154 Torino (Italy) Via Bologna 152 Tel. +39 011 24 00 000 Fax. +39 011 24 00 249 info@simonurmet.com...
- Page 2 Descrizione Il dispositivo è un comando elettronico per il controllo di carichi in ambiente civile, provvisto di due sensori a sfioramento indipendenti tra loro con segnalazione luminosa integrata. Il dispositivo possiede due modalità di funzionamento: monostabile e bistabile. è possibile selezionare la modalità di funzionamento agendo sul dip-switch N1, come indicato in Fig.
- Page 3 Funzionamento in modalità Monostabile (simulazione pulsante NO) • Il relè di uscita sarà attivo (contatto chiuso) per tutto il periodo di tempo che si manterrà un dito premuto nella parte superiore o inferiore alla segnalazione luminosa (led azzurro); • Il relè di uscita sarà disattivato (contatto aperto) non appena si allontanerà il dito dalla superficie del dispositivo;...
- Page 4 Pulizia placca Per consentire una confortevole pulizia della placca in vetro è necessario selezionare la modalità stand-by. Tale modalità si attiva mantenendo un dito premuto sul dispositivo per almeno 7 secondi (vedi Fig. 2). L’attivazione della modalità stand-by è confermata dal lampeggiamento della segnalazione luminosa (led azzurro).
- Page 5 Premere 7 sec. Fig. 3 Funzione spegnimento Led (LED-OFF) Per abilitare / disabilitare la funzione per lo spegnimento del led l’utente deve premere e tenere premuto il sensore centrale e contare fino a 4 secondi, quindi rilasciare il pulsante del sensore. ( Fig.4) Per il riconoscimento della funzione il led lampeggia 3 volte e dopo 1 minuto si spegne completamente.
-
Page 6: Note Di Installazione
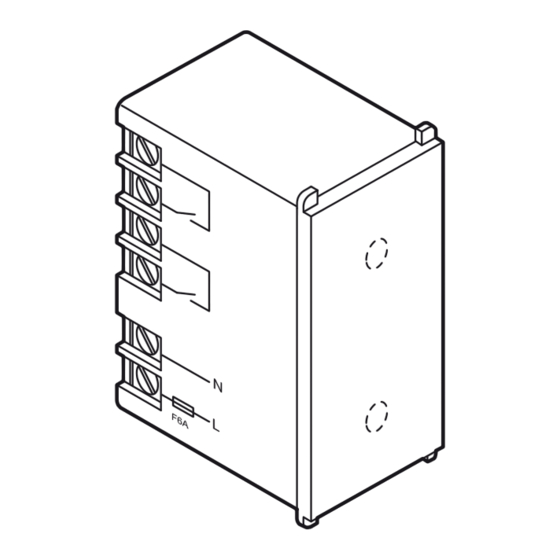
Collegamenti Fusibile tipo T 6,3AH Comando 1 libero da tensione Comando 2 libero da tensione = Neutro = Fase Note di installazione Per la corretta installazione occorre attenersi alle seguenti regole: • Non superare la potenza nominale del dispositivo; • Non sottoporre il dispositivo ad esposizione diretta di fonti di calore; •... -
Page 7: Caratteristiche Tecniche
Caratteristiche tecniche Alimentazione: ..................230V±15% Frequenza: ...................50 Hz±10% Potenza assorbita a riposo: ............... 300mw Assorbimento a riposo: ................22mA Area frontale sensibile:............2 sensori a 295 mm² Norme specifiche di riferimento : ......EN 606691+A1:2002+A2:2008 EN60669-2-1:2004+A1:2009+A12:2010 Prodotti Conformi ai requisiti essenziali della Direttiva B.T 2006/95/CE Conforme alle direttive... - Page 8 Description The device is a touch sensor electronic switch with built in dry relay contacts for load control. The device has two operating modes: monostable or bistable mode. It is possible to choose the operating methods by selecting dip-switch N1, (see Pic.1).
- Page 9 Monostable switch (push button NO) • The output relay turns on (contact closed) as long as a finger is kept on the upper or lower part to the visual signal (blue led). • The output relay turns off (contact opened) as soon as a finger is moved away from the sensor area of the device.
- Page 10 Press 7 sec. Pic. 2 WARNING! Clean with a water wet cloth only. Do not use any chemical, abrasive product, solvent, ammonia or alcohol. Cover plate cleaning with more electronic devices installed If a cover plate includes 2 or more electronic devices the stand-by mode must be activated by pressing simultaneously all devices for at least 7 seconds (see Pic.
-
Page 11: Led-Off Function
Led-off function To enable/disable the led-off function the user has to press&hold the sensor (both sensors for dimmer and shutter) and count to 4 second then release the sensor button. (Pic.4) For acknowledgement, the led flashes 3 times, and after 1 minute will turn off completely .The LED will relight up only after pressing a contact. -
Page 12: Installation Hints
Installation hints For a proper installation, simply comply with the following guidelines: • Do not exceed the rated current of the device; • Do not expose the device to external heat; • Match the device with a proper glass cover plate containing the number of symbols identical to the number of devices. -
Page 13: Correct Disposal Of This Product
Correct disposal of this product (Waste Electrical & Electronic Equipment) This marking on the product, accessories or literature indicates that the product should not be disposed of with other household waste. To prevent possible harm to the environment or human health from uncontrolled waste disposal, please separate these items from other types of waste and recycle them responsibly to promote the sustainable reuse of material resources. - Page 16 MADE IN GERMANY...
Need help?
Do you have a question about the nea 14138 and is the answer not in the manual?
Questions and answers