Advertisement
Flow Gateway v3 installers manual - Original Cable
This guide is applicable to Simonelli and Sanremo espresso machines.
Introduction
Flow integrates with a range of commercial espresso machines, providing cloud-based and real-time visibility of espresso production
parameters.
It achieves this via an Internet of Things (IoT) device installed near the espresso machine which collects the signal from the espresso
machine's built-in flow meters then transmits this data to the cloud for processing and analysis.
Quick Start installation procedure
Flow Gateway installer
1. Connect the flow meter cable(s) to the espresso machine flow meters (mark the end of the cable connected to group 1/2 so you know
which cable is which when you plug them into the Flow Gateway)
2. Mount the Flow Gateway
3. Route the flow meter cable(s) to the Flow Gateway and secure the cable
4. Connect the Flow Gateway power
5. Setup the Internet connection
6. Confirm the Flow Gateway operation
7. Installation complete!
Prerequisite site requirements
Please ensure your site meets all the
Corporate Wi-Fi network which is accessible from the location of the espresso machine
A suitable mounting location for the Flow Gateway near the espresso machine (usually under the counter)
Nb. The supplied flow meter cable is 3 meters long, so depending on the routing of the cable within the espresso machine, this allows for
installing the Flow Gateway approximately 1.5-2 meters away from the espresso machine
AC power outlets near the location of the espresso machine (usually under the counter):
Nb. The Flow Gateway power supply cable is 1.5 meters long
Error loading the extension!
Safety instructions
The Flow Gateway must be installed by a technician with the appropriate levels of certification to perform work inside of a commercial
espresso machine.
The maximum ambient temperature that the Flow Gateway is designed to operate in is 40°C (104°F). Ensure it is installed in a location
where the ambient temperature does not exceed this.
Do not open the Flow Gateway, there are no serviceable parts inside. For all hardware faults return the Flow Gateway to a Flow Coffee
authorised distributor.
Flow Gateway V3 Networking Requirements
Advertisement
Table of Contents

Summary of Contents for Flow Gateway v3
- Page 1 Flow Gateway installer 1. Connect the flow meter cable(s) to the espresso machine flow meters (mark the end of the cable connected to group 1/2 so you know which cable is which when you plug them into the Flow Gateway) 2.
- Page 2 If the Flow Gateway is located where it may be disturbed, or if it is installed on the wall or underside of a counter, secure the Flow Gateway using the supplied dinrail and black mounting bracket that screws to the back of the Flow unit. Fix the dinrail to the desired mounting location using high strength double-sided foam tape (eg.
-
Page 3: Tools And Consumables
1. Connect the flow meter cable(s) to the espresso machine flowmeters The espresso machine has a flow meter per group head. The flow meter cable has a female and male plug per group head to allow it to connect in parallel with the espresso machine’s connection. - Page 4 AC power outlets. 2. If the Flow Gateway is located where it may be disturbed, or if it is installed on the wall or underside of a counter, secure the Flow Gateway using the supplied dinrail and black mounting bracket that screws to the back of the Flow unit. Fix the dinrail to the desired mounting location using high strength double-sided foam tape (eg.
-
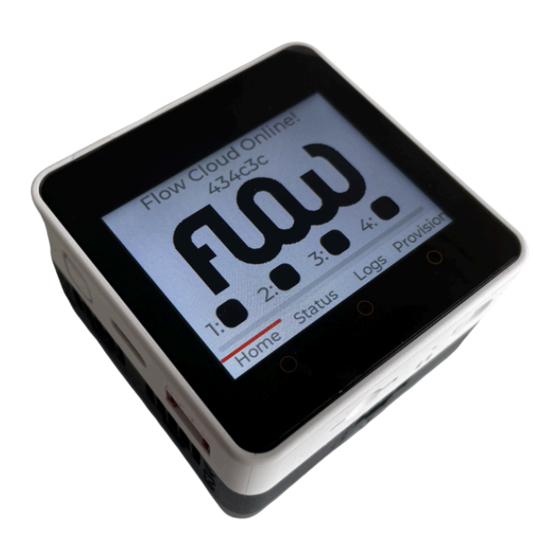
Page 5: Installation Complete
6. At this point, you will be asked for the password for the wifi network. Enter the password and click ‘provision’. 7. you will see that the gateway is connected to the WiFi network when the device rolls back to the home screen and displays ‘Flow Cloud Online’... -
Page 6: Network Connectivity Troubleshooting
Appendix: Network connectivity troubleshooting Qr Code scan fails. The QR code can be light sensitive. If the App is having trouble scanning the QR code, hold the unit in a slightly darker environment e.g under the bench.
Need help?
Do you have a question about the Gateway v3 and is the answer not in the manual?
Questions and answers