Table of Contents
Advertisement
Quick Links
Advertisement
Table of Contents

Subscribe to Our Youtube Channel
Summary of Contents for AZ-Delivery ebook 1.8 Inch Color TFT Display Module
- Page 1 ebook 1.8 Inch Color TFT Display Module...
- Page 2 Areas of application Education and teaching: Use in schools, universities and training institutions to teach the basics of electronics, programming and embedded systems. Research and development: Use in research and development projects to create prototypes and experiments in the fields of electronics and computer science. Prototype development: Use in the development and testing of new electronic circuits and devices.
- Page 3 the requirements of the RoHS Directive (2011/65/EU) and does not contain any hazardous substances in quantities above the permitted limits, residual chemical hazards may still exist. Please note the following safety instructions: Attention: The back of the display and the circuit board can release chemical residues from manufacturing or during operation. Note: Wear protective gloves when handling or installing the display for a long time to avoid skin irritation.
-
Page 4: Table Of Contents
Table of Contents Introduction Specifications Overview: PIN function : How does the 1.8 Inch Color TFT Display work? 1.8 Inch Color TFT Display Module Applications: How to Use the Display Module ? The Circuit wiring Software installation Library installation Arduino Code Setting up the Raspberry Pi and Python Circuit Connection Enable SPI... -
Page 5: Introduction
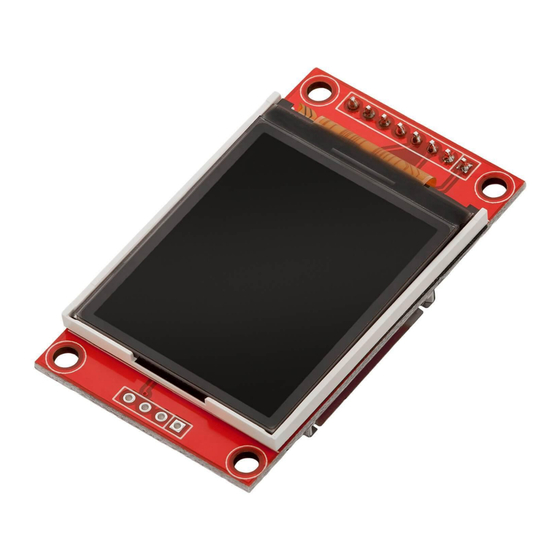
Introduction Thank you for purchasing Our AZ-Delivery 1.8 inch Spi TFT Display 128 x 160 . The 1.8 Inch Color TFT Display Module is a small electronic component pixels that displays images and text in color. This lovely little display breakout is the best way to add a small, colorful, and very bright display to any project. -
Page 6: Specifications
Specifications IC Chip ST7735 Display Size 1.8 inch Dimensions 34,5 x 58 x 7,5 mm Display area 32 x 38 mm Display Resolution 128 x 160 Display Color RGB Full Color RGB Resolution 18 Bits Number of Pins 12 pins Operating Voltage 3.3V or 5V logic Interface Type... -
Page 7: Overview
Overview: PIN function : Description function Ground Module power supply – 3.3/5 V SPI Chip Select pin RESET Reset signal Data/Command selection Serial data input Serial clock input Backlight control... -
Page 8: How Does The 1.8 Inch Color Tft Display Work
How does the 1.8 Inch Color TFT Display work? The 1.8 Inch Color TFT Display Module is a small electronic component that displays images and text in color. It typically consists of a display panel, a driver circuit, and a backlight system. The display panel is made up of a thin film transistor (TFT) array, which controls the color and brightness of each pixel on the screen. -
Page 9: 1.8 Inch Color Tft Display Module Applications
1.8 Inch Color TFT Display Module Applications: The 1.8 Inch Color TFT Display Module has a wide range of applications, thanks to its compact size, high resolution, and colorful display capabilities. Here are some examples of its common applications: Consumer electronics: Portable electronic devices such as digital cameras, handheld game consoles, and portable media players often use these display modules to provide a high-quality visual experience for users. -
Page 10: How To Use The Display Module
How to Use the Display Module ? The uses of this module are very simple. In this section of this article, we will discuss how we can hook up a module and work with it, so first of all we need a setup which described below: Setup for Development environment, we need : -Microcontroller board... - Page 11 -1.8 Inch Color TFT Display Module: Jumper Wire:...
-
Page 12: The Circuit Wiring
The Circuit wiring connections: Display Module Arduino 3.3V Digital Pin 13 Digital Pin 11 Digital Pin 9 RESET Digital Pin 8 Digital Pin 10... -
Page 13: Software Installation
Software installation Download the latest version of Arduino IDE here: https://www.arduino.cc/en/software After starting the Arduino IDE installation file “arduino-ide_2.0.0_Windows_64bit.exe” the license conditions of the software must be read and accepted. - Page 14 In the next step, different options can be selected for installation. Finally, the destination folder must be specified. The installation requires approx. 500MB of free disk space. Click on "Install" to start the installation.
- Page 15 After successful installation, the installation programme can be terminated via the "Finish" button.
- Page 16 The starting window:...
- Page 17 Select the UNO Board: Tools -> Board -> Arduino Uno...
-
Page 18: Library Installation
Library installation here are the steps to install the ST7735 library from the Arduino Library Manager: 1 - Click on the "Sketch" menu and select "Include Library" -> "Manage Libraries". 3- In the Library Manager, search for "Adafruit ST7735" using the search bar at the top of the window. -
Page 19: Arduino Code
Adafruit_ST7735 tft = Adafruit_ST7735(TFT_CS, TFT_DC, TFT_RST); void setup(void) Serial.begin(9600); Serial.print(F("init 1.8 tft screen")); tft.initR(INITR_BLACKTAB); // Init ST7735S chip, black tab Serial.println(F("Initialized")); tft.fillScreen(ST77XX_BLACK); drawtext("Hello! from \n AZ-delivery", ST77XX_RED); delay(1000); fillScreenBlink(ST77XX_WHITE, ST77XX_RED); delay(500); Serial.println("done"); delay(1000); void loop() { tft.invertDisplay(true); delay(500); tft.invertDisplay(false); delay(500);... - Page 20 The setup() function initializes the serial communication and the display, clears the screen with black color, and prints "hello from AZ-DELIVERY" in red color using the drawtext() function, after that screen will blink in white and red. The loop() function repeatedly inverts the display with a delay of 500ms, creating a blinking effect.
-
Page 21: Setting Up The Raspberry Pi And Python
Setting up the Raspberry Pi and Python For the Raspberry Pi, the operating system must first be installed, then everything must be set up so that it can be used in headless mode. Headless mode allows remote connection to the Raspberry Pi without the need for a PC screen monitor, mouse or keyboard. -
Page 22: Circuit Connection
Circuit Connection connections: Display Module Raspberry 3.3V GPIO 8 - CE0 RESET GPIO 24 GPIO 25 GPIO 10 GPIO 11 - SCLK 3.3 V... -
Page 23: Enable Spi
Enable SPI Open terminal, use command to enter the configuration page sudo raspi-config Choose Interfacing Options -> SPI -> Yes to enable SPI interface Library Installation 1 - install ST7789 Library sudo python3 -m pip install st7735 2 - install Dependencies sudo python3 -m pip install RPi.GPIO spidev Pillow numpy... -
Page 24: Python Example
WIDTH = disp.width HEIGHT = disp.height img = Image.new('RGB', (WIDTH, HEIGHT)) draw = ImageDraw.Draw(img) # Load default font. font = ImageFont.load_default() # Write some text draw.text((5, 5), "Hello from AZ-delivery!", font=font, fill=(255, 255, 255)) # display! disp.display(img) - Page 25 If you are looking for the high quality microelectronics and accessories, AZ-Delivery Vertriebs GmbH is the right company to get them from. You will be provided with numerous application examples, full installation guides, eBooks, libraries and assistance from our technical experts.
Need help?
Do you have a question about the ebook 1.8 Inch Color TFT Display Module and is the answer not in the manual?
Questions and answers