
Summary of Contents for AZ-Delivery Hygrometer v1.0 Module
- Page 1 Welcome! Thank you for purchasing our AZ-Delivery Hygrometer v1.0 Module. On the following pages, you will be introduced to how to use and set-up this handy device. Have fun!
- Page 2 Areas of application Education and teaching: Use in schools, universities and training institutions to teach the basics of electronics, programming and embedded systems. Research and development: Use in research and development projects to create prototypes and experiments in the fields of electronics and computer science. Prototype development: Use in the development and testing of new electronic circuits and devices.
- Page 3 consult a doctor. Caution: Keep the product out of the reach of children and pets to avoid accidental contact and swallowing of small parts. Note: Store the product in a safe, closed container when not in use. Attention: Avoid contact of the product with food and drinks.
-
Page 4: Table Of Contents
Table of Contents Introduction Specifications The pinout How to set-up Arduino IDE How to set-up the Raspberry Pi and Python Connecting the module with ATmega328p microcontroller Sketch example Connecting the module with Raspberry Pi Libraries and tools for Python Python script... -
Page 5: Introduction
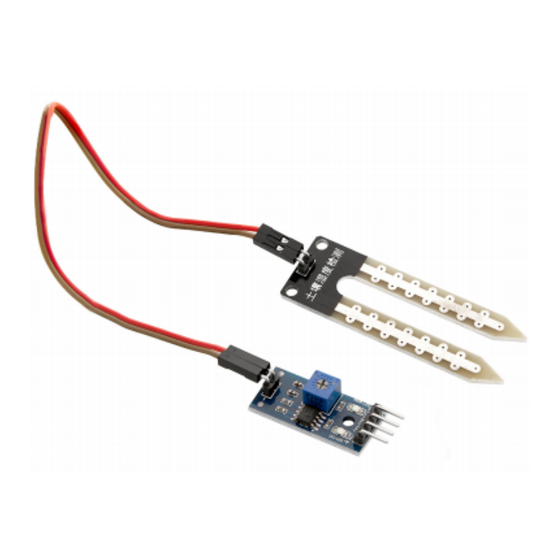
Introduction The hygrometer module measures the volumetric content of water inside the soil. Module outputs both the analog and the digital signal. The module consists of a Hygrometer sensor, control board and jumper cables for connecting the Hygrometer sensor and control board. The hygrometer sensor measures the volumetric content of water in the soil. -
Page 6: Specifications
Specifications Operating voltage: from 3.3V up to 5V Current consumption: Sensor output: analog, digital Sensitivity control: via on-board potentiometer Hygrometer sensor dimensions: 60x20x1.5mm (2.4x0.7x0.1in) Control board dimensions: 32x14x17mm (1.2x0.5x0.6in) The control board has the LM393 comparator chip and the output signal driving current is over 15mA. -
Page 7: The Pinout
The pinout The Hygrometer module consists of two boards, the sensor board and the control board. The sensor board has two pins, and the control board has six pins. The pinouts of these two boards are shown on the image: The sensor board does not have polarity, which means that two pins from the sensor board can be connected either way, on the control board SENSOR INPUT pins. -
Page 8: How To Set-Up Arduino Ide
How to set-up Arduino IDE If the Arduino IDE is not installed, follow the link and download the installation file for the operating system of choice. For Windows users, double click on the downloaded .exe file and follow the instructions in the installation window. For Linux users, download a file with the extension .tar.xz, which has to be extracted. - Page 9 terminal in that directory. Two .sh scripts have to be executed, the first called arduino-linux-setup.sh and the second called install.sh. To run the first script in the terminal, open the terminal in the extracted directory and run the following command: sh arduino-linux-setup.sh user_name user_name - is the name of a superuser in the Linux operating system.
- Page 10 Next thing is to check if your PC can detect a microcontroller board. Open freshly installed Arduino IDE, and go to: Tools > Board > {your board name here} {your board name here} should be the microcontroller, as it can be seen on the following image: The port to which the microcontroller board is connected has to be selected.
-
Page 11: How To Set-Up The Raspberry Pi And Python
For Linux users, for example port name is /dev/ttyUSBx, where x represents integer number between 0 and 9. How to set-up the Raspberry Pi and Python For the Raspberry Pi, first the operating system has to be installed, then everything has to be set-up so that it can be used in the Headless mode. The Headless mode enables remote connection to the Raspberry Pi, without the... -
Page 12: Connecting The Module With Atmega328P Microcontroller
need for a PC screen Monitor, mouse or keyboard. The only things that are used in this mode are the Raspberry Pi itself, power supply and internet connection. All of this is explained minutely in the free eBook: Raspberry Pi Quick Startup Guide ‘ The Raspbian operating system comes with Python preinstalled. - Page 13 Module MC pin Wire color Red wire Green wire Blue wire Black wire NOTE: Connect the Hygrometer module with the control board via jumper cables that come with the module.
-
Page 14: Sketch Example
Sketch example #define DIGITAL_PIN 3 #define ANALOG_PIN 0 #define SENSOR_POWER 2 uint16_t moistVal; boolean isMoist = false; String moisture; void setup() { Serial.begin(9600); pinMode(DIGITAL_PIN, INPUT); pinMode(SENSOR_POWER, OUTPUT); digitalWrite(SENSOR_POWER, LOW); void loop() { digitalWrite(SENSOR_POWER, HIGH); delay(10); moistVal = analogRead(ANALOG_PIN); isMoist = digitalRead(DIGITAL_PIN); digitalWrite(SENSOR_POWER, LOW);... - Page 15 Upload the sketch to the ATmega328p microcontroller and run the Serial Monitor (Tools > Serial Monitor). The result should look like as on the following image: The sketch starts with defining and creating three macros called...
- Page 16 DIGITAL_PIN, ANALOG_PIN and SENSOR_POWER. The DIGITAL_PIN represents the digital pin of ATmega328p that is used for connecting the sensor digital output pin. The ANALOG_PIN represents the analog input pin of ATmega328p that is used for connecting the sensor analog output pin. The SENSOR_POWER represents the digital pin of ATmega328p that is used for powering the module control board in predefined time intervals.
-
Page 17: Connecting The Module With Raspberry Pi
out_max. This function maps one number in the input range, to another number which is in the different range. To read the digital output pin of the module, the isMoist variable is used to store the return value of the digitalRead() function. At the end of the loop() function, the data is displayed in the Serial Monitor. - Page 18 Module pin Raspberry Pi Physical pin GPIO18 Blue wire Black wire Red wire NOTE: Connect the sensor module with the control board via jumper cables that come with the module.
-
Page 19: Libraries And Tools For Python
Libraries and tools for Python To use the module with the Raspberry Pi, the library RPi.GPIO has to be installed. If the library is already installed, running the installation command only updates the library to a newer version. To install the library, open the terminal and run the following commands, one by one: sudo apt-get update &&... -
Page 20: Python Script
Python script import time import RPi.GPIO GPIO GPIO.setmode(GPIO.BCM) GPIO.setwarnings(False) DIGIOUT GPIO.setup(DIGIOUT, GPIO.IN) time.sleep(2) print('[Press CTRL + C to end the script!]') try: # Main program loop while True: GPIO.input(DIGIOUT)==0: print('Soil moisture level: HIGH') time.sleep(2) else: print('Soil moisture level: LOW') time.sleep(2) except KeyboardInterrupt: print('\nScript... - Page 21 Save the script by the name hygrometer.py. To run the script, open the terminal in the directory where the script is saved and run the following command: python3 hygrometer.py The result should look like as on the following image: To stop the script press ‘CTRL + C’ on the keyboard.
- Page 22 If you are looking for the high quality microelectronic products and accessories, AZ-Delivery Vertriebs GmbH is the right company to get them from. You will be provided with numerous application examples, full installation guides, eBooks, libraries and assistance from our technical experts.
Need help?
Do you have a question about the Hygrometer v1.0 Module and is the answer not in the manual?
Questions and answers