
Related Manuals for PUSR USR-EG118


Summary of Contents for PUSR USR-EG118
- Page 1 USR-EG118 User Guide Open Source IoT Gateway User Guide USR-EG118 (Cost effective) V2.0 Be Honest & Do Best Your Trustworthy Smart Industrial IoT Partner pusr.com...
-
Page 2: Table Of Contents
USR-EG118 User Guide Content 1. Introduction ..............................- 3 - 1.1. Overview ..............................- 3 - 1.2. Parameters table ..........................- 3 - 1.3. Pin Mapping ............................- 4 - 1.4. Indicators ............................. - 5 - 1.5. Dimension ............................- 5 - 1.6. Development Environment ........................ - 5 - 2. -
Page 3: Introduction
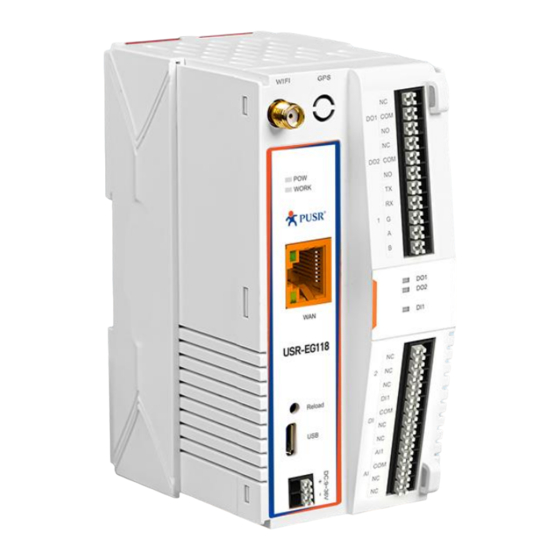
RS485/232, DO*2, DI*1, AI*1, downloading port, Wi-Fi, Ethernet port and BLE. PUSR provides basic source code demo for users to develop their own application. For the rich hardware interface and networking methods, this device can be applied in a variety of scenarios, especially scenarios where users need to collect or control serial devices and IO devices simultaneously, such as: Wastewater Treatment, Agricultural Irrigation, Solar Energy, Intelligent Farming etc. -
Page 4: Pin Mapping
USR-EG118 User Guide 1.3. Pin Mapping The table shows the corresponding relationship between the hardware interface pins of M100 and the pins of the main control ESP32. Users can also download the schematic diagram corresponding to the M100. Download link: https://www.pusr.com/support/download/Schematic-Diagram-Hardware-schematic-diagram-Of-USR-... -
Page 5: Indicators
USR-EG118 User Guide 1.4. Indicators USR-EG118 provides 2 indicators in total, the specific description is as follows. Table 2. LED indicator Name Description Steady on: power supply is normal. Off: No power supply or abnormal power supply. WORK Blinking: The system works normally. -
Page 6: Specific Step Instructions
USR-EG118 User Guide operation steps will be introduced in detail in the following chapters. 2.2. Specific Step Instructions 2.2.1. Download and install Arduino IDE https://www.arduino.cc/en/Main/Software Download and install Arduino IDE: 2.2.2. Add Boards Manager URLs After installing the IDE, add additional boards manager URLs: https://dl.espressif.com/dl/package_esp32_index.json... - Page 7 USR-EG118 User Guide 2.2.4. Install the Needed library file If users test the demo code provided by the PUSR, the following Library files need to be installed first: ESPAsyncWebServer ArduinoRS485 ArduinoModbus PubSubclient OneButton Sketch->Library Manager->Search ”ESPAsyncWebServer”->Install Users can also download the other libraries needed on Arduino IDE.
-
Page 8: Add Aws_Iot Library File
USR-EG118 User Guide 2.2.5. Add AWS_IOT library file PUSR offers library source code of AWS, users can download from: https://www.pusr.com/support/download/Library-File-AWS-IOT-File-Provided-by-PUSR.html The downloaded libraries should be copied to the installation path of Arduino IDE. Note: If the AWS code is needed, users are strongly encouraged to use the AWS libraries we provide. -
Page 9: Programming Via Arduino
USR-EG118 User Guide 3.2. Programming via Arduino 3.2.1. Downloading parameters settings Tools-->Board-->”ESP32-WROOM-DA Module” Tools-->Board-->Port-->Select the right COM. Users can check the COM port in device manager like the following picture. If there is not this COM port in device manager, users can install the serial port driver. -
Page 10: Download Program
Click the “Upload” button to compile the code first, When the compilation is about to be completed, press and hold the reload button, power on the USR-EG118. Do not release the reload button during the program download process, otherwise the program will fail to be burned. -
Page 11: Export Compiled Binary File
USR-EG118 User Guide 3.3.1. Export compiled binary file Users can edit code on Arduino IDE, and export compiled binary file. Open flash_download_tool, Chipset—ESP32 3.3.2. Load BIN file xxx.ino.bin Start register address:0x10000 xxx.ino.bootloader.bin Start register address:0x1000 xxx.ino.partitions.bin Start register address:0x8000 The xxx.ino.bin file is the binary file exported above. - Page 12 Document.html Select COM port, BAUD is 921600. SPIFlashConfig: 40MHz,DIO,DoNotChgBin 1> Power off the USR-EG118, hold on the reload button, power on the USR-EG118 device, click “START” button, it starts to programming. pusr.com - 12 -...
- Page 13 USR-EG118 User Guide 2> Finished the programming. pusr.com - 13 -...
- Page 14 DO through the switch on this interface. 4.3. STA setting Click the second button, and enter the SSID and password of the router which USR-EG118 will connect to. With this demo code, the length of the SSID and password should be less than 10 characters.
- Page 15 USR-EG118 User Guide restart. 4.4. TCP mode setting Click button, then set the server IP and port. In TCP mode, the device work at TCP client mode only for now. Server IP: 172.16.11.221 Server port: 8081 On TCP server side, Local Host: 172.16.11.221...
- Page 16 USR-EG118 User Guide The setting will take effect after restarting. To improve efficiency, users can set all parameters at once and then restart. In this document, we set the parameters like the following: Server IP: 123.233.249.74 Username: mqtt_10 Password: USR-test...
- Page 17 USR-EG118 User Guide 4.6. Connecting to AWS platform To use this code connecting to the AWS platform, you need to ensure that the EG118 is connected to a router that can connect to the Internet through Wi-Fi. EG118 can connect to the AWS platform through the MQTT protocol, and the corresponding parameters have been encapsulated in the demo code.
- Page 18 Click “Connect” button to connect the AWS server, subscribe to the “Arduino_m100” topic. Connect the PC and USR-EG118 device via USB to RS485, open Modbus Slave tool, set the Slave ID to 42, and set the address to 31000.
- Page 19 USR-EG118 User Guide Serial settings, distinguish the RS485 COM from the Download COM. Change the value of register to 77, and the changed data can be received by the MQTTfx. It means the device connect to AWS and can communicate with the RS485 device.
-
Page 20: Contact Us
USR-EG118 User Guide 5. Contact Us Jinan USR IOT Technology Limited Address : Floor 12 and 13, CEIBS Alumni Industrial Building, No. 3 Road of Maolingshan, Lixia District, Jinan, Shandong, China Official website: https://www.pusr.com Official shop: https://shop.usriot.com Technical support: http://h.usriot.com/ Email : sales@usriot.com... - Page 21 USR-EG118 User Guide OF THE USE OR INABILITY TO USE THIS DOCUMENT, EVEN IF USR IoT AND/OR ITS AFFILIATES HAVE BEEN ADVISED OF THE POSSIBILITY OF SUCH DAMAGES. USR IoT and/or its affiliates make no representations or warranties with respect to the accuracy or completeness of the contents of this document and reserves the right to make changes to specifications and product descriptions at any time without notice.
- Page 22 USR-EG118 User Guide Official Website: www.pusr.com Official Shop: shop.usriot.com Technical Support: h.usriot.com Inquiry Email: inquiry@usriot.com Skype & WhatsApp: +86 13405313834 关注有人微信公众号 登录商城快速下单 Product Catalog Facebook Youtube Click to view more: & & pusr.com...
Need help?
Do you have a question about the USR-EG118 and is the answer not in the manual?
Questions and answers