Table of Contents
Advertisement
Quick Links
FLA00102B-1
Outdoor Furniture
IMPORTANT
If you have any problems with this product (missing or damaged parts, assembly issues, etc.),
PLEASE DO NOT RETURN TO THE RETAILER/STORE
from where you purchased the product.
1-866-988-3300
Please call our Toll-Free Customer Service Hotline at:
Between 8:00 AM and 5:00 PM Pacific Standard Time, Monday through Friday
To expedite any future warranty claims, please retain the instruction sheet, warranty card
and receipt for future use.
Care and Maintenance
Store furniture in an upright position. Be careful to never allow water to build up in frames as this will
cause corrosion and freeze damage in cold climates. Wash all frames with a solution of mild soap and
water. Rinse with clean water and dry with a soft absorbent cloth towel. Frames can be treated with a
liquid wax for maximum protection against UV rays and/or salty, damp air. If your set includes cushions,
slings, and/or an umbrella they may be cleaned by hand with a solution of soap and water with a clean
water rinse. (Never machine wash cushions, slings or umbrella covers as this will result in shrinkage or
damage). After cleaning cushions tip on end and allow to drip dry. (Never use a commercial or home dryer
to tumble dry fabric goods). Do not use bleach or solvents to clean any product! This will void the warranty.
4
Advertisement
Table of Contents

Related Manuals for Hanover FLA00102B-1


Summary of Contents for Hanover FLA00102B-1
- Page 1 FLA00102B-1 Outdoor Furniture IMPORTANT If you have any problems with this product (missing or damaged parts, assembly issues, etc.), PLEASE DO NOT RETURN TO THE RETAILER/STORE from where you purchased the product. 1-866-988-3300 Please call our Toll-Free Customer Service Hotline at:...
- Page 2 FLA00102B-1 Outdoor Furniture 1-Year Limited Warranty Program For a period of one (1) year after date of purchase, the Manufacturer will either repair or replace defective components in accordance with this Limited Warranty. This warranty is between the Manufacturer and the original purchaser and is valid only when accompanied by the original purchaser’s sales receipt showing original date of purchase and location of purchase.
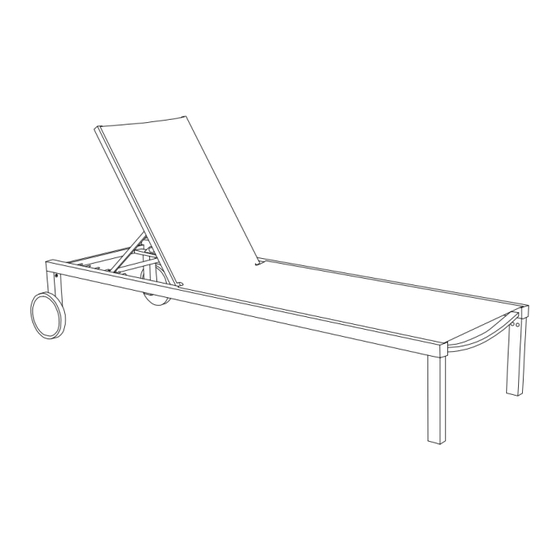
- Page 3 Assembly Instructions FLA00102B-1 Aluminum Sling Chaise Lounge Questions, problems, or missing parts? Before returning to the store, call Customer Service. 1-866-988-3300 8 a.m. -5 p.m., PST Monday - Friday Retain this manual for future use.
- Page 4 FLA00102B-1 Parts & Tools PART PICTURE & DESCRIPTION PART PICTURE & DESCRIPTION Seat & Back Bucket M6x15 Screw M6 Flat Washer Front Rear Leg Allen Wrench WARNING: To avoid damaging this product, assemble it on a soft, non-abrasive surface such as carpet or cardboard.
- Page 5 FLA00102B-1 Chaise Lounge Assembly Step 1: Attach the front leg (B) to the seat & back Bucket (A) by lining up the screw holes on the front leg (B) and Seat & Back Bucket (A). Insert M6x15 screw (E) through M6 flat washer (F).
- Page 6 Assembly Instructions FHTS80073A Outdoor Gas Fireplace Questions, problems, or missing parts? Before returning to the store, call Customer Service. 1-866-988-3300 8 a.m. - 5 p.m., PST Monday - Friday ContactUs@Hanover-Products.com Retain this manual for future use.
-
Page 7: Table Of Contents
Contents Safety Instructions Parts List Assembly Operation Cleaning & Maintenance Troubleshooting Warranty Specifications This appliance complies with “ANSI Z21.97-2017/CSA 2.41-2017, Outdoor Decorative Gas Appliances.” IMPORTANT: RETAIN FOR FUTURE REFERENCE, AND READ CAREFULLY. FHTS80073A... -
Page 8: Safety Instructions
Safety Instructions WARNING WHAT TO DO IF YOU SMELL GAS For your safety: For outdoor use only (outside, only (outside, non-enclosed area). Do not use for cooking. • Do NOT try lighting any appliance. • Do NOT touch any electrical switch. •... - Page 9 Safety Instructions WARNING FIRE TABLE IS FOR OUTDOOR USE ONLY Installation and repair should be done by a qualified service person. The appliance should be inspected before use and at least annually by a qualified service person. More frequent cleaning may be required as necessary.
- Page 10 Safety Instructions • Only use propane gas for this unit. • Converting this unit to natural gas is dangerous. This conversion kit shall be installed by a qualified service agency in accordance with the manufacturer’s instructions and all applicable codes and requirements of the Authority having jurisdiction. The maximum inlet natural gas pressure for this outdoor fire table is 10 1/2”...
- Page 11 Safety Instructions fire table is not in use. • DO NOT sit on the fire table when the unit is in operation. • DO NOT throw anything onto the fire when the unit is in operation. • Lava rocks are very hot; please keep children or pets at a safe distance. •...
- Page 12 Safety Instructions ANSI Z223.1/NFPA54, or CAN/CGA-B149.1, Natural Gas and Propane Installation Code. • LP gas tank must be arranged for vapour withdrawal. • The LP gas tank must have a listed overfilling prevention device (OPD) and a QCCI Type I (CGA810) LP gas tank connection.
- Page 13 Safety Instructions a. The CGA No 791 connection incorporates a magnetic flow limiting device that acts to limit the flow of gas if a leak is detected between the regulator and the burner valve. b. If the burner valve is open prior to the LP gas cylinder service valve being opened, the connection will interpret this free flow of gas to be a leak.
- Page 14 Safety Instructions LAVA ROCKS WARNING: 1. Lava rocks may have sharp edges. Wear safety glasses and gloves when handling. 2. If changing or substituting the lava rocks with other media, use lava rocks/pumice stones/glass shards/glass beads available from your local authorized dealer/distributor. 3.
-
Page 15: Parts List
Parts List Burner Lid - 1 Flame Igniter - 1 (pre-assembled) Table Top - 1 Switch Knob - 1 (pre-assembled) Regulator/Hose - 1 (pre-assembled) Right Front Leg - 1 M6x15 Bolt & Washer - 26 Left Front Leg - 1 Left Back Leg - 1 Bolt - 1 Right Back Leg - 1... -
Page 16: Assembly
Assembly STEP 1 Requires: B, C, D, E, F, AA Carefully place the table top (B) upside down on a soft, flat surface. Line up the bolt holes on the table top (B) with the corresponding bolt holes on the table legs (C, D, E and F). Insert M6x15 bolt and washer (AA) and tighten by hand. - Page 17 Assembly STEP 2 Requires: C, D, E, F, G, AA Line up the bolt holes on the table legs (C, D, E and F) with the corresponding bolt holes on the wall panel (G). Insert M6x15 bolt and washer (AA) and tighten by hand. Repeat this step to assemble the other two wall panels (G) to the corresponding table legs (C, D, E and F).
- Page 18 Assembly STEP 3 Requires: C, E, I, AA Line up the bolt holes on the cross bar support (I) with the corresponding bolt holes in the table legs (C and E). Insert M6x15 bolt and washer (AA) and tighten by hand. FHTS80073A...
- Page 19 Assembly STEP 4 Requires: C, D, E, F, J, AA Line up the bolt holes of the tank support (J) with the corresponding bolt holes on the table legs (C, D, E and F). Insert M6x15 bolt and washer (AA) and tighten by hand. FHTS80073A...
- Page 20 Assembly STEP 5 Requires: D, H, BB, CC, DD Line up the bolt holes on the door panel (H) with the corresponding bolt holes on the left front table leg (D). Insert bolt (BB) and washer (CC) to the left front leg (D) tighten using the hex key (DD).
- Page 21 Assembly STEP 6 Requires: B, K, O Turn the assembled fire table the correct way up and place the lava rocks (K) into the burner bowl. To ensure proper function, the screen on the pilot housing (O) should not be covered by lava rocks.
- Page 22 Assembly STEP 7 Requires: A, B Place the burner lid (A) over the burner bowl. Make sure to remove the burner lid (A) before lighting. Do not place the lid back onto the burner bowl until it has cooled down. FHTS80073A...
- Page 23 Assembly STEP 8 Requires: L, P, Q Insert the included battery (L) and switch knob (Q) into the flame ignitor (P) and twist the button cover on. Do not over-tighten. WARNING: Battery may contain mercury. Do not throw battery into the fire. Battery must be disposed of and recycled properly as hazardous waste.
- Page 24 Assembly STEP 9 Inserting LP Gas Tank WARNING: Make sure LP gas tank valve is closed. 1. Loosen LP gas tank retainer bolt by turning counter-clockwise. 2. Place precision-filled LP gas tank upright into the hole of the fireplace base so the tank valve is facing the gas line connection.
- Page 25 Assembly STEP 10 Connecting LP Gas Tank Requires: R Before connecting be sure there is no debris caught in the head of the LP gas tank, head of the regulator valve or in the head of the burner or burner parts. Connect the propane hose (R) to the gas tank by turning knob clockwise until it stops.
- Page 26 Assembly STEP 11 Disconnecting LP Gas Tank Requires: R Before disconnecting the propane hose (R) make sure the LP gas tank valve is "CLOSED." Disconnect the propane hose (R) from the LP gas tank by turning the knob counter-clockwise until loose. Place the protective cap cover on the LP tank and store the tank outdoors in a well-ventilated area out of direct sunlight.
- Page 27 Assembly WARNING 1. Make sure the regulator hose and valve connections are securely fastened to the burner and the tank. 2. Before using this outdoor fireplace, make sure you have read, understood, and are following all information provided in the “Important Safeguards” section. 3.
- Page 28 Assembly STEP 13 Tank/Gas Line Connection Leak Test 1. Make 2-3 oz of leak detection solution by mixing one part liquid dishwashing soap with three parts water. 2. Make sure control knob is in the “OFF” position. 3. Connect LP gas tank per “Installing LP Gas Tank” section. 4.
- Page 29 Assembly STEP 14 Requires: H Once the LP gas tank is installed, close the door (H). FHTS80073A...
-
Page 30: Operation
Operation WARNING NEVER light the burner with the cover on the outdoor fireplace. CAUTION PROPER FLAME HEIGHT Do NOT obstruct the flow of combustion and ventilation air. CAUTION Check and clean burner/venturi tubes for insects and insect nests. A clogged tube can lead to a fire. CAUTION Keep outdoor gas appliance area clear and free from combustible materials, gasoline and other flammable vapors and liquids. - Page 31 Operation LIGHTING (CONTINUED) 11. If igniter does not light burner: a. Wearing heat-resistant gloves, position a long, lit match or long, lit butane lighter near the pilot housing. b. Push and turn control knob to “ON”. c. Remove match/lighter once burner is lit. 12.
-
Page 32: Cleaning & Maintenance
Cleaning & Maintenance Cleaning Surfaces 1. Wipe surfaces clean with mild dishwashing detergent or baking soda mixed with water. 2. For stubborn stains, use a citrus-based cleaner and a nylon scrubbing brush. 3. Rinse clean with water. 4. Allow to air dry. Before Storing 1. -
Page 33: Troubleshooting
Troubleshooting LP gas tank valve is closed Make sure regulator is securely attached to the LP gas tank per “Installing LP Gas Tank,” then turn LP gas tank valve to “OPEN” LP gas tank is low or empty Exchange, refill or replace LP gas tank LP gas leak 1. - Page 34 Troubleshooting Out of gas Exchange, refill or replace LP gas tank Overfilling prevention device may 1. Turn control knob to “OFF” have been activated 2. Wait 30 seconds and light outdoor fireplace per “Lighting” section 3. If flames are still too low, reset the overfilling prevention device: Sudden drop a.
-
Page 35: Warranty
Warranty Outdoor Furniture IMPORTANT If you have any problems with this product (missing or damaged parts, assembly issues, etc.), PLEASE DO NOT RETURN TO THE RETAILER/STORE from where you purchased the product. Please call our Toll-Free Customer Service Hotline at: 1-866-988-3300 Between 8:00 AM and 5:00 PM Pacific Standard Time, Monday through Friday To expedite any future warranty claims, please retain the instruction sheet, warranty card and receipt for future use. -
Page 36: Specifications
Warranty Outdoor Furniture 1-YEAR LIMITED WARRANTY PROGRAM For a period of one (1) year after date of purchase, the Manufacturer will either repair or replace defective components in accordance with this Limited Warranty. This warranty is between the Manufacturer and the original purchaser and is valid only when accompanied by the original purchaser’s sales receipt showing original date of purchase and location of purchase.
Need help?
Do you have a question about the FLA00102B-1 and is the answer not in the manual?
Questions and answers