Advertisement
Advertisement
Table of Contents

Summary of Contents for ActiveAid 1218
- Page 1 OWNER’S MANUAL...
- Page 2 SYMBOL LEGEND DATE OF MANUFACTURE CAUTION/ATTENTION SERIAL NUMBER SEE INSTRUCTIONS FOR USE Please be environmentally responsible and MANUFACTURER recycle this product through your recycling facility at its end of life. Afin de préserver l’environnement, veuillez confier ce produit à votre centre de recyclage à...
-
Page 3: Table Of Contents
Table of Contents Introduction . . . . . . . . . . . . . . . . . . . . . . . . . . . . . . . . . . 1 Safety Precautions . -
Page 4: Introduction
This will ensure the product is assembled properly and used in the most beneficial manner. The ActiveAid 1218 should only be used under the guidance of a physician or therapist. Consult your physician or therapist for proper transfer techniques. -
Page 5: Safety Precautions
18"x18" 350 lbs. (158kg). • The expected service life of a 1218 product is 3 years under normal use conditions. Note: this may vary based on frequency of use. • ActiveAid products are specifically designed to be used with ActiveAid accessories and options. Unless otherwise noted, accessories and options from other manufacturers have not been tested by ActiveAid and are not recommended for use with ActiveAid products. • Product modifications made without express written consent (including but not limited to, modification through the use of unauthorized parts or attachments) are not recommended and will void the product warranty. • This equipment is designed to accommodate a range of users; therefore, the unit has various adjustment slots and holes. Avoid placing fingers or other body parts in any of these areas. -
Page 6: Assembly
Assembly Tools required for setup: 7/16" wrench, 5/32" hex key, #10 metric wrench. Note: Assembly may include some or all these steps based on shipping configuration and options of the product selected. 1. Remove all parts from the shipping container(s). Remove all packing material from the parts. Recycle shipping and packing materials in accordance with the recycling codes of your location. - Page 7 4. If the large head support was ordered, remove acorn nut and clamp from headrest assembly. 5. Unscrew ratchet handle until there is room to insert the head support stem. Insert head support stem. 6. Place clamp back into postion.
- Page 8 7. Place acorn nut back onto bolt and tighten securely. 8. If the small foam head support was ordered, place it onto the back as shown. 9. If the Abductor/Deflector was ordered, insert into the opening of seat as shown.
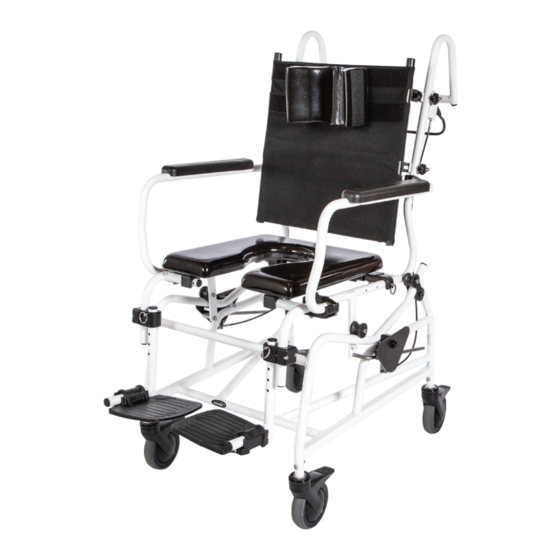
- Page 9 Usage Seat Remove by lifting one corner at a time or lift off one side only and pivot the seat up from the opposite side. Install the seat by aligning opposite corners and snapping into place on the frame. Make sure that the seat is square, and all 4 corners are snapped into place before sitting on chair. Adjustable Sling Back Loosen strap thru buckle to decrease tension, tighten strap thru buckle to increase tension Leg Rests Gooseneck Adjust the height of the leg rest by depressing snap button and sliding footplate mount up or down to obtain correct height. Remove footrest assembly by lifting on the gooseneck to remove it from the receiver of the front support. Elevating Leg Rest Adjust the height of the leg rest by depressing snap button and sliding footplate mount up or down to obtain correct height. Adjust the angle of the leg rest upward by lifting, lower by depressing the tab. Arm Rests Height-Adjustable Arm Rests To raise the arm, push up on the armlock cap and pivot back the entire armrest. To lower the arm, pull down on the front of the armrest until the arm latch locks onto the securing stud under the arm pivot.
-
Page 10: Usage
Usage (cont.) Belts Hook and Loop Fasteners Pull the belt strips apart to separate them. Adjust the strips to the proper position. Press the belt strips together to connect them. Snap Fit Buckle To unbuckle, depress the two spring arms on the male end and pull/slide to separate it from the female receiver. To buckle, insert the male end into the female receiver until the spring arms secure. Listen for clicking sound to indicate it is secure. Pull strap thru male portion of buckle to tighten. -
Page 11: Maintenance
• Upholstery pads may be cleaned with a non-abrasive, non-alcohol-based soap or sanitized using a bleach dilution of up to 1:10. Note, many anti-bacterial and disinfectant products contain alcohol and should not be used on the upholstery, due to the drying effect of the alcohol. Choose a non-alcohol-based sanitizer. Germicidal wipes that are rated to kill C-difficile spores may be used on the upholstery and the epoxy coated stainless steel. • Urethane Coated Fabrics may be cleaned with a sponge or damp cloth to wipe the surface clean with warm water. As needed, they may be hand washed using warm water and a mild detergent. Do not use bleach. Line dry. Do not iron. Do not dry clean. Parts Replacement When asking your supplier to order replacement parts, please specify the serial number of the 1218 unit. Your Supplier will contact ActiveAid Customer Service to obtain the necessary items for your specific unit. If you have any questions, please contact your local supplier or call ActiveAid, LLC at 1-800-533-5330 or 1-507-644-2951. -
Page 12: Limited Warranty
ActiveAid products should only be used under the guidance of a physician. ActiveAid maintains a policy of continual product improvement and reserves the right to change features, specifications, and prices without prior notification. Check with ActiveAid for latest information. FORM 1218MAN 121819 REV A...
Need help?
Do you have a question about the 1218 and is the answer not in the manual?
Questions and answers