Advertisement
Available languages
Available languages
Quick Links
INSTRUCTION MANUAL
Micro Cassette Recorder
SANYO'S HELP-LINE
Call the toll-free number below if you have any difficulties
operating this product.
1-877-999-1840 (Weekdays: 8:00 AM - 5:00 PM, Pacific
Time)
LINEA DE CONSULTA SANYO
Llame gratis al número indicado a continuación si tiene
dificultades al utilizar este producto.
1-877-999-1840 (días laborables de 8:00 AM a 5:00 PM,
hora del Pacífíco)
1AD6P1P1672-B
TRC-540M, Issue Number 1
Printed in China
TRC-540M/US
1
TRC-540M
ENGLISH
ESPAÑOL
9/10/03, 10:37 AM
Advertisement

Related Manuals for Sanyo TRC540M - Auto Stop Microcassette Recorder


Summary of Contents for Sanyo TRC540M - Auto Stop Microcassette Recorder
- Page 1 INSTRUCTION MANUAL TRC-540M Micro Cassette Recorder SANYO’S HELP-LINE Call the toll-free number below if you have any difficulties operating this product. 1-877-999-1840 (Weekdays: 8:00 AM - 5:00 PM, Pacific Time) LINEA DE CONSULTA SANYO Llame gratis al número indicado a continuación si tiene dificultades al utilizar este producto.
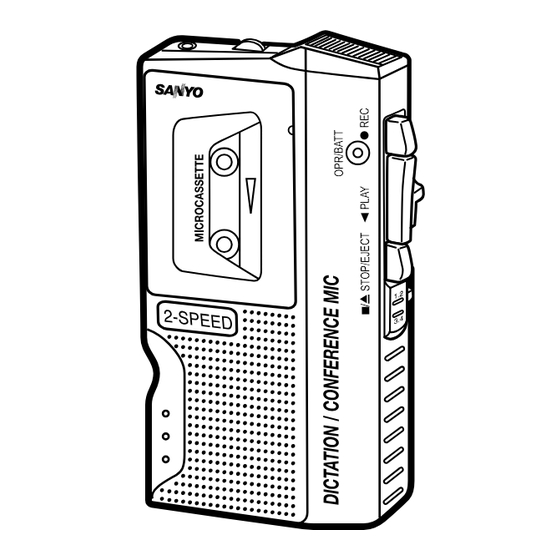
- Page 2 2. Volume control (–VOL+) 3. Operation/Battery indicator (OPR/BATT) 4. Built-in microphone (MIC) 5. Pause switch (PAUSE a) 6. Record button (m REC) 7. Play button (b PLAY) 8. Fast forward/Cue and Rewind/Review switch (FFW/CUE | REW/REV) TRC-540M/US 9/10/03, 10:37 AM...
-
Page 3: Power Supply
POWER SUPPLY AC adaptor Connect the optional AC adaptor (Sanyo Model No. 3CV- 120US) to the EXT DC 3V jack (Fig. 2). (The batteries are automatically disconnected.) • The center pin of the EXT DC 3V jack is positive (+). - Page 4 Install two “AA” batteries (not supplied) as shown in Fig. 3. Observe proper polarity. Fig. 3 • If you are not going to use the unit with batteries for one month or more, remove the batteries. Battery replacement When the OPR/BATT indicator does not light during opera- tion or is lit dimly, replace the batteries.
- Page 5 .
- Page 6 RECORDING (Fig. 4) Fig. 4 1. Press the STOP/EJECT button. The cassette holder opens. 2. Load a microcassette as shown in Fig. 5. Fig. 5 TRC-540M/US 9/10/03, 10:37 AM...
- Page 7 3. Set the SPEED switch to 2.4 or 1.2. 2 . 4 c m : C o m p a t i b l e w i t h m o s t s i n g l e - s p e e d microcassette recorders.
- Page 8 Automatic stop system When the end of the tape is reached during recording or playing back, the tape stops automatically and the buttons are released. This system does not work in fast forward or rewind operation. Be sure to press STOP/EJECT button when the end of the tape has been reached.
- Page 9 REV switch to play back your recording. Press the REC button to resume recording. Safeguards against accidental erasure (Fig. 7) To protect side A, break out tab (1). To protect side B, break out tab (2). • To erase or record a protected cassette, cover the tab openings with adhesive tape (3).
- Page 10 PLAYBACK (Fig. 8) Fig. 8 1. Load the microcassette as shown in Fig. 5. 2. Set the SPEED switch to 2.4 or 1.2 to correspond with the recorded tape speed. 3. Press the PLAY button and adjust the –VOL+ control.
-
Page 11: Maintenance
MAINTENANCE To ensure continued high performance, use cotton swab (1) moistened with head cleaner to clean the heads (2, 3), pinch roller (4) and capstan (5) after about every 10 hours of use (Fig. 9). Fig. 9 TRC-540M/US 9/10/03, 10:37 AM... - Page 12 Note: Do not return this unit to the retail store for service. To obtain Service Plus Warranty service, product opera- tion information or for problem resolution, call...
- Page 13 SFC’s designated facility, either (a) repair such product or any of its parts which fail to conform to this warranty or (b) ship a replacement product. The warranty period commences on the date the product was first purchased at retail.
- Page 14 LEGAL RIGHTS. YOU MAY HAVE OTHER RIGHTS, WHICH VARY FROM STATE TO STATE. S/D R2 For your protection in the event of theft or loss of this product, please fill in the information below for your own personal records. Model No.
-
Page 15: Warranty Application
Canada are warranted against manufacturing defects in ma- terials and workmanship for ONE YEAR for parts and NINETY DAYS for labour, from the date of purchase by the original retail purchaser. This warranty only applies in favour of the original retail purchaser of the warranted product. - Page 16 WARRANTY BECOMES VOID This warranty becomes void if the product’s serial numbers are altered or removed or if any repair to the product is made other than by SANYO Canada Inc. or by an authorized Sanyo Service Depot.
-
Page 17: How To Obtain Warranty Service
Warranty. Where any terms of this Warranty are prohibited by such a statute, they shall be deemed null and void but the remainder of this warranty shall remain in effect. - Page 18 3. Indicador de Operación/Pilas (OPR/BATT) 4. Micrófono incorporado (MIC) 5. Interruptor de Pausa (PAUSE a) 6. Botón de Grabación (m REC) 7. Botón de reproducción (b PLAY) 8. Interruptor de Avance rápido/Punto de referencia (FFW/CUE | REW/REV) TRC-540M/US 9/10/03, 10:37 AM...
- Page 19 14. Compartimento para cassettes ENERGÍA Adaptador CA Conecte el adaptador de CA opcional (Modelo Sanyo No. 3CV-120US) a la clavija EXT DC 3V (Fig. 2). (Las pilas se desconectan automáticamente). • El conector central del enchufe EXT DC 3V es positivo (+).
- Page 20 LAS PILAS USADAS O DESCARGADAS DEBAN R E C I C L A R S E O D E S E C H A R S E D E F O R M A CORRECTA, DE ACUERDO CONTODAS LAS LEYES VIGENTES.
- Page 21 CONEXIONES Auricular Conecte el auricular (no incluido) a la clavija EAR para escuchar en forma privada. (El parlante se desconecta automáticamente). TRC-540M/US 9/10/03, 10:37 AM...
- Page 22 GRABACIÓN (Fig. 4) Fig. 4 1. Presione el botón STOP/EJECT. El compartimento para cassettes se abre. 2. Cargue el microcassette como se indica en la Fig. 5. Fig. 5 TRC-540M/US 9/10/03, 10:37 AM...
- Page 23 3. Ponga el interruptor SPEED en la posición 2.4 ó 1.2. 2.4 cm: Compatible con casi todas las grabadoras de microcassettes de velocidad única. 1.2 cm: Para grabaciones más largas; aproximadamente 2 horas de tiempo de grabación. (total para un cassette de 60 minutos por lado;...
- Page 24 Sistema de parada automática Al final de la cinta, ya sea en modo de grabación o reproducción, la cinta se detiene automáticamente y los botones se liberan. Este sistema no funciona cuando está operando en avance rápido o rebobinado. Asegúrese de presionar el botón STOP/EJECT cuando se llegue al final...
- Page 25 Mientras grabe, deslice el interruptor FFW/CUE | REW/REV hacia arriba y sosténgalo (el botón REC se suelta) hasta que la cinta se haya rebobinado a la posición deseada. Libere el botón FFW/CUE | REW/REV para reproducir su grabación. Presione el botón REC para reanudar la grabación.
- Page 26 REPRODUCCIÓN (Fig. 8) Fig. 8 1. Cargue el microcassette como se muestra en la Fig. 5. 2. Posicione el interruptor SPEED en 2.4 ó 1.2 para empalmar con la velocidad de la cinta grabada. 3. Presione el botón PLAY y ajuste el control -VOL+.
-
Page 27: Mantenimiento
Para asegurarse de un buen funcionamiento, utilice un bastón de algodón (1) humedeciéndolo con limpiador de cabezales para limpiar los cabezales del aparato (2, 3), rodillo presor (4) y cabrestante de arrastre (5) después de cada 10 horas de uso (Fig. 9). Fig. 9... - Page 28 LOS TERRITORIOS Y PROTECTORADOS DE EE. UU. E S TA G A R A N T Í A S Ó L O E S V Á L I D A PA R A E L COMPRADOR ORIGINAL AL DETALLE; NO ES VÁLIDA PARA PRODUCTOS USADOS CON CUALQUIER FIN INDUSTRIAL, PROFESIONAL O COMERCIAL.
- Page 29 (B) la reparación de cualquier producto cuyo número de serie haya sido alterado, tachado o quitado. Esta garantía no es válida para la cubierta o partes ornamentales, botones o mantenimiento de rutina. Esta garantía no es válida para reparaciones o cambios que sea necesario realizar por cualquier causa que escape al control de SFC, incluyendo, pero no limitándose a, cualquier...
- Page 30 LA DURACIÓN DE CUALQUIER GARANTÍA IMPLÍCITA POR L E Y ( I N C L U Y E N D O G A R A N T Í A S COMERCIALIZACIÓN Y CONVENIENCIA) ESTÁ LIMITADA A LA DURACIÓN DE ESTA GARANTÍA. SFC NO SERÁ, EN NINGÚN CASO, RESPONSABLE POR DAÑOS...
- Page 31 Para su protección en caso de robo o pérdida de este producto, llene los siguientes espacios con la información correspondiente; esto le servirá como un registro personal. Núm. de modelo Núm. de serie (Se encuentra en la parte posterior o interior de la unidad)
- Page 32 TRC-540M/US 9/10/03, 10:37 AM...
- Page 33 TRC-540M/US 9/10/03, 10:37 AM...
- Page 34 TRC-540M/US 9/10/03, 10:37 AM...
- Page 35 TRC-540M/US 9/10/03, 10:37 AM...
- Page 36 TRC-540M/US 9/10/03, 10:37 AM...
- Page 37 TRC-540M/US 9/10/03, 10:37 AM...
- Page 38 TRC-540M/US 9/10/03, 10:37 AM...
- Page 39 TRC-540M/US 9/10/03, 10:37 AM...
- Page 40 TRC-540M/US 9/10/03, 10:37 AM...
- Page 41 TRC-540M/US 9/10/03, 10:37 AM...
- Page 42 TRC-540M/US 9/10/03, 10:37 AM...
- Page 43 TRC-540M/US 9/10/03, 10:37 AM...
- Page 44 TRC-540M/US 9/10/03, 10:37 AM...
- Page 45 TRC-540M/US 9/10/03, 10:37 AM...
- Page 46 TRC-540M/US 9/10/03, 10:37 AM...
Need help?
Do you have a question about the TRC540M - Auto Stop Microcassette Recorder and is the answer not in the manual?
Questions and answers