Advertisement
Quick Links
Advertisement

Related Manuals for Article OTTO Cabinet Cabinet


Summary of Contents for Article OTTO Cabinet Cabinet
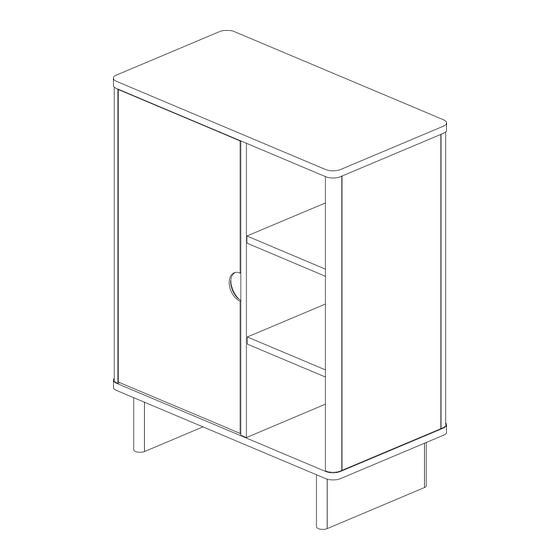
- Page 1 VERSION 1.0 Assembly Instructions OTTO Cabinet...
- Page 2 If you’re having difficulty, our friendly Customer Care team is always here to help. Call us at 1.888.746.3455 during business hours, email service@article.com or chat live at article.com. PARTS INVENTORY HARDWARE LIST...
- Page 3 OTTO Cabinet Page 2 of 4 ×1 Tighten the bolts 80%...
- Page 4 OTTO Cabinet Page 3 of 4 100% ×16 Tighten the bolts 100% 100% Tighten the bolts 100%...
- Page 5 OTTO Cabinet Page 4 of 4 ×12 Adjust leveler as needed.
- Page 6 OTTO Cabinet Door Adjustment Page 1 of 3 DOOR ADJUSTMENT INSTRUCTIONS During shipping, the doors of your cabinet may have shifted slightly. This can easily be corrected by tightening a few screws. Always start by adjusting the top hinge on the affected door.
- Page 7 OTTO Cabinet Door Adjustment Page 2 of 3 DOOR ADJUSTMENT INSTRUCTIONS During shipping, the doors of your cabinet may have shifted slightly. This can easily be corrected by tightening a few screws. Always start by adjusting the top hinge on the affected door.
- Page 8 OTTO Cabinet Door Adjustment Page 3 of 3 DOOR ADJUSTMENT INSTRUCTIONS During shipping, the doors of your cabinet may have shifted slightly. This can easily be corrected by tightening a few screws. Always start by adjusting the top hinge on the affected door.
- Page 9 ANTI-TIP Installation Page 1 of 3 1010 Raymur Ave. Vancouver, BC V6A 3T2 ANTI-TIP RESTRAINT INSTALLATION WARNING! Children have died from furniture tipover. To reduce the risk of furniture tipover: 15 min • ALWAYS install tipover restraint provided. • NEVER put a TV on this product. TIME # OF PEOPLE DIFFICULTY...
- Page 10 ANTI-TIP Installation Page 2 of 3 × 4 × 2 Attach pair of brackets to top Mark on wall where second pair corners of the back of the unit. of brackets should be placed. × 4 × 4 × 4 Drill holes in wall using 8mm / 5/16"...
- Page 11 ANTI-TIP Installation Page 3 of 3 Align brackets on unit with brackets on wall. × 2 × 2 Pull strap down until it snap-locks.
Need help?
Do you have a question about the OTTO Cabinet Cabinet and is the answer not in the manual?
Questions and answers