Table of Contents
Advertisement
Available languages
Available languages
Quick Links
Advertisement
Table of Contents

Related Manuals for RICHARD LE DROFF VALAIS 650T

Summary of Contents for RICHARD LE DROFF VALAIS 650T
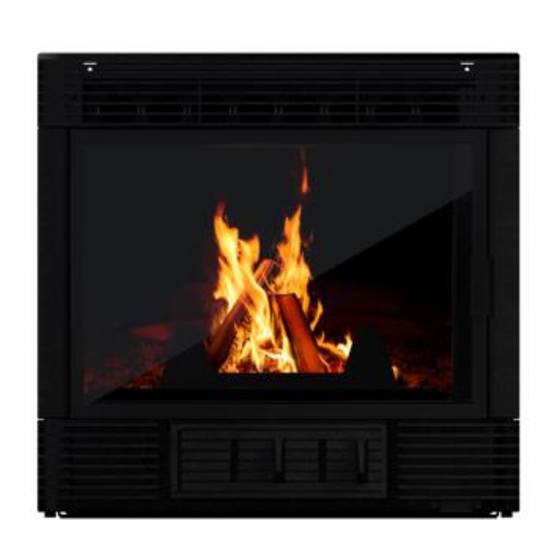
- Page 1 INSERTS FONTE FRANÇAIS VALAIS 650T NOTICE D’INSTALLATION ET D’UTILISATION 02-22 1. CARACTÉRISTIQUES TECHNIQUES 2. ENCOMBREMENT 3. INSTALLATION 4. UTILISATION 5. ENTRETIEN 6. SERVICE APRÈS-VENTE Illustrations non contractuelles...
-
Page 2: Caractéristiques Techniques
Faites contrôler le tirage du conduit (appareil en fonctionnement) par un professionnel, si celui-ci est supérieur à 20 Pa, installer un régulateur de tirage ou un adaptateur sur le conduit de raccordement de l'appareil. 1. CARACTÉRISTIQUES TECHNIQUES FOYER INSERT VALAIS 650T Catégorie du poêle Intermittent Puissance calorifique nominale (1) -
Page 3: Installation
DTU 24.1 traitant des conduits de fumées ; DTU 24.2 traitant des travaux d'âtrerie ; NF EN 13229 foyers ouverts et inserts à combustible solide. (Disponibles à l’AFNOR). DIMENSIONS INSERT (mm) VALAIS 650T Façade de l’insert Hauteur du fond Cadre Gabarit (int) 3. - Page 4 Passage du câble d'alimentation Cadre gabarit Patte de fixation Câble d'alimentation Trappe d'accès aux composants électriques Interrupteur 3 positions Porte de cendrier Réglage air de combustion Grille entrée air frais 10. Porte de chargement 11. Grille sortie air chaud 12. Tubes échangeurs 13.
- Page 5 JOINT D’ÉTANCHÉITÉ Appliquer le joint autocollant sur le cadre-gabarit. Renforcer l’adhérence du joint par un filet de silicone. FINITIONS Obturer l’espace compris entre l’ouverture de la cheminée et le cadre- gabarit. En fonction du style et de la nature des pierres de la cheminée, la finition, étanche, peut être réalisée : En pierres, tuiles, briques réfractaires maçonnés directement entre le cadre- gabarit et la cheminée,...
- Page 6 COMBUSTIBLES POUTRE EN BOIS Bois Aucune partie de la poutre en bois (C) ne doit être soumise à la Cet appareil à hautes performances nécessite un combustible de chaleur de l’insert. Poser le kit de protection de poutre (D) qualité. Brûler exclusivement du bois de chauffage, en bûches, disponible chez votre revendeur (Fig.
-
Page 7: Service Après-Vente
5. ENTRETIEN – RECOMMANDATIONS - Mettre 1 ou 2 allumes feu sur le bois d'allumage et allumer les allumes feu. - Refermer la porte DÉCENDRAGE Pour allez plus loin, vous pouvez consultez la vidéo Supra sur Attendre que l’appareil soit refroidi. youtube à... - Page 8 CAST INSERTS ENGLISH VALAIS 650T INSTALLATION INSTRUCTIONS AND USER MANUAL 02-22 1. TECHNICAL DATA 2. DIMENSIONS 3. INSTALLATION: 4. USE 5. MAINTENANCE 6. AFTER-SALES SERVICE Non-binding illustrations...
-
Page 9: Important Assembly Information
Have a professional check the chimney draft (with the stove operating) and, if it is higher than 20 Pa, install a draft regulator or an adapter in the stove’s connection duct. 1. TECHNICAL DATA HEARTH INSERT VALAIS 650T Stove type Intermittent Nominal output (1) -
Page 10: Overall Dimensions
2. OVERALL DIMENSIONS DTU 24.1 covering flue ducting; DTU 24.2 covering drilling work; NF EN 13229 open hearths and solid fuel inserts. (Available at AFNOR). INSERT DIMENSIONS (mm) VALAIS 650T Front of insert Back height Surround frame (int.) - WARNINGS - This appliance is designed to burn wood, it must not be used as an incinerator or to burn liquid fuels, coal or coal derivatives. - Page 11 3. INSTALLATION: Power cable gland Surround frame Fixing plate Power cable Access hatch to electrical components 3 position switch Ash box door Combustion air regulator Fresh air intake grille 10. Hearth door 11. Hot air outlet grille 12. Heat-exchanger pipes 13.
- Page 12 SEALING GASKET Apply the self-adhesive sealant to the surround frame. Use a silicone cord joint to strengthen adhesion. FINISHES Seal the gap between the fireplace opening and the surround frame. Depending on the style and nature of the stones in the fireplace, a smoke-tight finish can be made with: Stones, tiles, firebricks directly between the surround frame and the fireplace,...
- Page 13 FUEL WOODEN BEAM Wood This high-performance appliance requires quality fuel. Only burn No part of the wooden beam (C) should be subjected to heat from air-dried logs (2 to 3 years, stored in a sheltered and well- the insert. Use the beam protection kit (D) available from your ventilated place) with a maximum moisture content of 15 to 20%.
-
Page 14: Maintenance Recommendations
Refuel 5. MAINTENANCE - RECOMMENDATIONS Refuel the appliance once there is a good bed of embers and the flames have gone out. Open the door gently to prevent smoke ASH REMOVAL from escaping (if opening while lit) or embers from falling. Once Wait until the appliance is cold. - Page 15 INSERTS FUNDICIÓN CASTELLANO VALAIS 650T MANUAL DE INSTALACIÓN Y FUNCIONAMIENTO 02-22 1. CARACTERÍSTICAS TÉCNICAS 2. DIMENSIONES 3. INSTALACIÓN 4. UTILIZACIÓN 5. MANTENIMIENTO 6. SERVICIO POSTVENTA Ilustraciones no contractuales...
-
Page 16: Características Técnicas
Haga que un profesional examine el tiro de la chimenea (con el aparato en funcionamiento) y, en caso de ser superior a 20 Pa, instale un regulador de tiro o un adaptador en el conducto de conexión del aparato. 1. CARACTERÍSTICAS TÉCNICAS HOGAR INSERT VALAIS 650T Categoría de la estufa Intermitente Potencia térmica nominal (1) -
Page 17: Dimensiones Totales
DTU 24.1 que trata de los conductos de humos; DTU 24.2 que trata de los trabajos de perforación; NF EN 13229 chimeneas abiertas e inserts de combustible sólido. (Disponibles en AFNOR). DIMENSIONES INSERT (mm) VALAIS 650T Frente del insert Altura del fondo... -
Page 18: Instalación
3. INSTALACIÓN Paso del cable de alimentación Marco estructura de encastre Patilla de fijación Cable de alimentación Trampilla de acceso a los componentes eléctricos Interruptor 3 posiciones Puerta cenicero Ajuste del aire de combustión Rejilla de entrada aire fresco 10. Puerta de carga 11. - Page 19 JUNTA DE ESTANQUEIDAD Aplique el sellador autoadhesivo al marco-estructura. Refuerce la adherencia de la junta con un cordón de silicona. ACABADOS Selle el espacio entre la abertura de la chimenea y el marco- estructura de encastre. En función del estilo y la naturaleza de las piedras de la chimenea, el acabado estanco se puede realizar con: Piedras, azulejos, ladrillos refractarios de albañilería directamente...
- Page 20 COMBUSTIBLES VIGA DE MADERA Madera Este aparato de alto rendimiento requiere un combustible de Ninguna parte de la viga de madera (C) puede estar sometida al calidad. Quemar sólo leña, en troncos, secada al aire (2 a 3 años calor del insert. Instale el kit de protección de vigas (D) disponible almacenada en un lugar abrigado y ventilado) con una humedad en su distribuidor (Fig.
-
Page 21: Servicio Postventa
ATENCIÓN: Nunca utilice gasolina, alcohol o fueloil... 5. MANTENIMIENTO - RECOMENDACIONES RETIRADA DE LA CENIZA Espere hasta que el aparato se enfríe. Recarga - Limpie la rejilla extraíble del hogar Recargue el aparato cuando haya un buen lecho de brasas y las -Vacíe regularmente el cenicero.
Need help?
Do you have a question about the VALAIS 650T and is the answer not in the manual?
Questions and answers