Advertisement
Advertisement
Table of Contents

Related Manuals for OBSIDIAN CONTROL SYSTEMS NETRON NS8 IP

Summary of Contents for OBSIDIAN CONTROL SYSTEMS NETRON NS8 IP
- Page 1 User Guide...
- Page 2 ©2024 OBSIDIAN CONTROL SYSTEMS all rights reserved. Information, specifications, diagrams, images, and instructions herein are subject to change without notice. Obsidian Control Systems logo and identifying product names and numbers herein are trademarks of ADJ PRODUCTS LLC. Copyright protection claimed includes all forms and matters of copyrightable materials and information now allowed by statutory or judicial law or hereinafter granted.
-
Page 3: Table Of Contents
C O N T E N T S GENERAL INFORMATION OVERVIEW LIMITED WARRANTY CONNECTIONS INSTALLATION INSTRUCTIONS MENU HOME SCREEN PRESETS PORTS SWITCH IP SETTINGS SYSTEM FIRMWARE UPDATES SPECIFICATIONS DIMENSIONS... -
Page 4: General Information
G E N E R A L I N F O R M AT I O N Please read and understand the instructions in this manual carefully and thoroughly before attempting to operate this device. These instructions contain important safety and use information. CUSTOMER SUPPORT Contact your local Obsidian Controls Systems dealer or distributor for any product related service and support needs. -
Page 5: Overview
O V E R V I E W INTRODUCTION The NETRON NS8 IP is an IP66 rated rugged outdoor network switch featuring 8 Gigabit ports and PoE+ support. With a total power budget of 100W the NS8 IP is ideally suited to distribute data and power to NETRON nodes or any other PoE compatible network appliance. -
Page 6: Limited Warranty
(including negligence), misrepresentation, strict liability, breach of warranty of Elation or Obsidian Control Systems or any supplier, and even if Elation or Obsidian Control Systems or any supplier has been advised of the possibility of such damages. -
Page 7: Connections
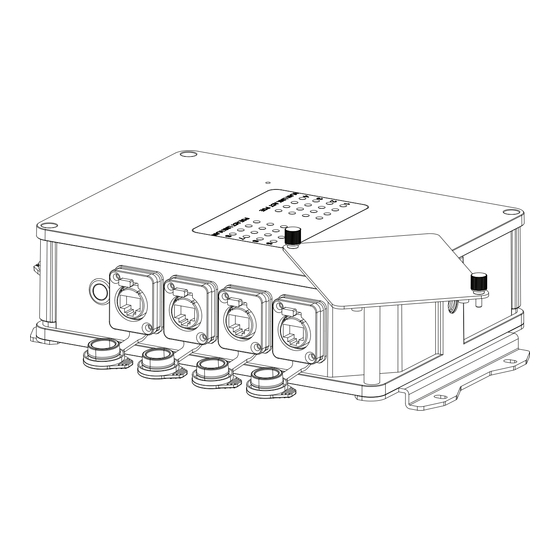
C O N N E C T I O N S AC CONNECTIONS The Obsidian Control Systems Netron NS8 IP is rated 100-240V 50/60Hz. Do not con- nect it to power outside this range. Damage resulting from incorrect connection is not covered under warranty. - Page 8 C O N N E C T I O N S LED Panel Cover Indicator LED Panel Fuse T2A / 250V Vent Valve Ethernet Ports 1-4 Power On/Off/PoE Mounting Power Switch Bracket Reset Switch Mounting Hole Ethernet Ports 5-8 Mounting Bracket...
-
Page 9: Installation Instructions
I N S TA L L AT I O N I N S T R U C T I O N S DISCONNECT POWER BEFORE PERFORMING ANY MAINTENANCE! ELECTRICAL CONNECTIONS A qualified electrician should be used for all electrical connections and/or installations. USE CAUTION WHEN POWER LINKING OTHER MODEL DEVICES AS THE POWER CONSUMPTION OF OTHER MODEL DEVICES MAY EXCEED THE MAXIMUM POWER OUTPUT OF THIS DEVICE. - Page 10 I N S TA L L AT I O N I N S T R U C T I O N S TRUSS MOUNTED WITH CLAMP This unit can be truss mounted using either an M10 or M12 bolt. For the M12 bolt, as shown on the left, simply insert the bolt through a properly rated mounting clamp, then thread the bolt into the matching mounting hole on the side of the device and tighten securely.
- Page 11 I N S TA L L AT I O N I N S T R U C T I O N S WALL MOUNTED Flip the device over to expose the mounting holes on the bottom face. Align the circular holes on the wide flange of each included wall mount bracket to the mounting holes on each side of the device, then insert the included screws to secure the wall mount brackets in place.
-
Page 12: Menu
M E N U : H O M E S C R E E N Connect any of the Ethernet connection ports to your computer, then open your web browser and navigate to the default IP address: 2.0.0.254. This will bring you to the default home screen, which provides information about the overall status of the device, as well as the status of each port. - Page 13 M E N U : P R E S E T S The user can select from either factory provided or self supplied presets, under the NETRON PRE- SETS and USER PRESETS sub-menus, respectively.
- Page 14 M E N U : P R E S E T S NETRON PRESETS TABLE Number Label Option Network Ports Port Device IP Port 1 Port 2 Port 3 Port 4 Port 5 Port 6 Port 7 Port 8 Name VLAN Automatic 2.x VLAN...
- Page 15 M E N U : P R E S E T S NETRON PRESETS TABLE Number Label Option Network Ports Port Art-Net Art- Art- Art- Art- Art- Art- Art- Device IP Name Net 2 Net 3 Net 4 Net 5 Net 6 Net 7 Net 8...
- Page 16 M E N U : P R E S E T S NETRON PRESETS TABLE Number Label Option Network Ports Port Device IP MA 1 MA 2 MA 3 MA 4 MA 5 MA 6 MA 7 MA 8 Name VLAN Automatic 2.x VLAN...
- Page 17 M E N U : P R E S E T S NETRON PRESETS TABLE Number Label Option Network Ports Port Device IP Avo 1 Avo 2 Avo 3 Avo 4 Avo 5 Avo 6 Avo 7 Avo 8 Name VLAN Automatic 2.x Automatic 10.x...
- Page 18 M E N U : P O R T S The PORTS menu allows the user to configure the settings for each individual port on this device. • Port Tab Number - Located at the top of the page, and used to select the port number that the settings will apply to.
- Page 19 M E N U : S W I T C H VLAN CONFIGURATION • Tab A-F, Trunk - Select the desired VLAN group. This device can manage up to 6 groups, plus the “Trunk”, which includes all VLANs and allows point to point traffic of VLANs from one switch to another.
- Page 20 M E N U : S W I T C H IGMP CONFIGURATION - These settings apply to the entire device and across all VLAN groups. • Automatic Configuration - It is generally recommended to leave this function enabled, as it is optimized for entertainment networking protocols.
- Page 21 M E N U : S W I T C H QoS CONFIGURATION - The Quality of Service (QoS) configuration can be used to improve system performance by selectively prioritizing certain network traffic. For instance, in this device, video or audio streams may be given priority over web browser traffic.
- Page 22 M E N U : I P S E T T I N G S This menu can be used to set the IP address mode, IP address, and subnet mask. The default IP address for this device is 2.0.0.254, Subnet 255.0.0.0.
- Page 23 M E N U : S Y S T E M DEVICE SETTINGS - This sub-menu can be used to create a user-generated name and ID for the device. Make sure to press the SAVE button before navigating away from this menu. STATUS - This sub-menu displays the status of various device parameters, which are organized into the following three categories: •...
- Page 24 M E N U : S Y S T E M MAINTENANCE - This sub-menu can be used to return the device to default settings, reboot the sys- tem, load setting files, or update the device firmware. SPECIAL FUNCTION • Reset to Default - Reset all device parameters to default factory settings.
- Page 25 F I R M WA R E U P D AT E S Updates for improved performance or to add additional features may be available on www.obsidian- control.com. To install a firmware upgrade, connect to the device through a web browser and open the System – Maintenance menu.
- Page 26 S P E C I F I C AT I O N S Mounting Electrical Standalone 100-240 V nominal, 50/60 Hz, 109W Truss-mount (M12 mounting hole) PoE, PoE+ Wall-mount horizontal or vertical (included) 100W Total PoE Budget Connections - Front Approvals / Ratings (8) Locking IP65 RJ45 Ethernet network cETLus / CE / IP66 / FCC...
- Page 27 D I M E N S I O N S Dimension drawings not to scale 8.0in (204mm) 9.5in (242mm)
Need help?
Do you have a question about the NETRON NS8 IP and is the answer not in the manual?
Questions and answers