
Subscribe to Our Youtube Channel
Related Manuals for Akai AK-FL10


Summary of Contents for Akai AK-FL10
- Page 1 10 kg Front Load Washing Machine With Wi-Fi Function INSTRUCTION MANUAL MODEL: AK-FL10...
-
Page 2: Table Of Contents
Contents General Safety Instructions Unpacking Product Overview Installation Instructions Wi-Fi Connection FAQs and Troubleshooting Guide Other Useful Information After Sales Support (AU) 1300 886 649 (NZ) 0800 836 761 | tempo.org/support... -
Page 3: General Safety Instructions
General Safety Instructions IMPORTANT SAFETY INSTRUCTIONS READ CAREFULLY AND KEEP FOR FUTURE REFERENCE Read this manual thoroughly before first use, even if you are familiar with this type of product. The safety precautions enclosed herein reduce the risk of fire, electric shock and injury when correctly adhered to. - Page 4 General Safety Instructions (Cont.) • CAUTION! Do not connect the appliance to the power supply using a power adaptor or extension cord. Use of an extension cord does not guarantee the required safety. • After use: Always unplug the appliance and turn off the water after use. •...
- Page 5 General Safety Instructions (Cont.) • Electrical connection: During installation, the power cord must not be excessively or dangerously bent or flattened. The plug must be accessible after installation. • Misuse: Improper installation or faulty use may result in the risk of fire, electric shock and/or injury.
- Page 6 General Safety Instructions (Cont.) – clothes that have any residues of flammable materials, as this may result in fire or explosion. For example, articles that have been cleaned in, washed in, soaked in, or dabbed with industrial chemicals, or combustible or explosive substances (such as wax, oil, paint, petrol, alcohol, degreasers, dry-cleaning solvents, kerosene, etc.).
-
Page 7: Unpacking
Unpacking Unpacking the washing machine CAUTION: EXTREMELY HEAVY! A team lift or mechanical aid is required when moving this appliance. Keep the washing machine as upright as possible during transportation. • This product has been packaged to Fig. 1 protect it against transportation damage. Remove all packaging materials from around the appliance and inside the drum, including the foam base (Fig. -
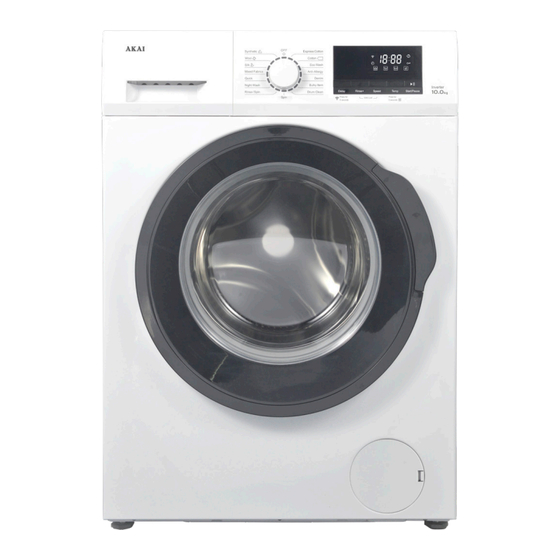
Page 8: Product Overview
Product Overview Scope of delivery Front view Program dial (knob) Detergent drawer Door Door glass window Service cover Drain pump filter (behind the service cover) Top cover Control panel with LED display Wash/spin drum 10 Housing 11 Door seal 12 Adjustable feet (4) After Sales Support (AU) 1300 886 649 (NZ) 0800 836 761 | tempo.org/support... - Page 9 Product Overview (Cont.) Rear view 13 Power cord and plug 14 Transit bolts (4) 15 Back cover 16 Drain hose connection (drain hose included, but not shown here) 17 Cold water inlet valve Accessories 18 Cold water supply (inlet) hose 19 Transit hole caps (4) 20 Drain hose support (elbow) Documentation...
-
Page 10: Installation
Installation Removing the transit bolts WARNING! Before installing the washing machine, you must remove the transit bolts from the back of the housing and cover the holes with the transit hole caps provided. The bolts hold the drum in place during transport but they must be removed before use so the drum can move during the wash and spin cycles. - Page 11 Installation (Cont.) Levelling the machine WARNING! It is very important to level the washing machine carefully, especially if your floor is uneven. Failure to do so may result in the machine shaking and moving during the spin cycle, or out-of-balance problems. Place the machine on solid, dry and level ground.
- Page 12 Installation (Cont.) Installing the drain hose WARNING! Do not kink or protract the drain hose. Position the drain hose properly in order to prevent water spillage onto the floor and potential damage. Never immerse the end of the drain hose in water. The drain hose is installed at the back of the machine.
- Page 13 Installation (Cont.) Drain hose connection into a standpipe (Fig. 7) • Firstly, form a hook in the end of the drain hose using the Fig. 6 supplied drain hose elbow (Fig. 6). • Place the drain hose into your standpipe, which should have an internal diameter of approximately 30 mm, thus “Elbow”...
- Page 14 Installation (Cont.) Connecting the water supply hose WARNING! To prevent leakage or water damage, make sure to follow the instructions in this section when connecting the washing machine to your water supply. Do not kink, crush, modify or sever the water inlet hose. •...
- Page 15 Installation (Cont.) Electrical connection WARNING! This appliance must be earthed. In the event of a malfunction or breakdown, earthing will reduce the risk of an electric shock by providing a path of least resistance for the electric current. This appliance is equipped with a cord having an equipment-earthing conductor and an earthing plug.
-
Page 16: Instructions
Instructions 基本尺寸 SY-XT5QG100-006 版本 Control panel (Fig. 10) IT12 大于 到 — 0.12 0.15 0.18 0.21 0.25 0.35 12 0 12 0 1 8 0 1 8 0 2 50 0.46 2 50 31 5 0.52 31 5 40 0 0.57 4 0 0 50 0... - Page 17 Instructions (Cont.) Display icons (Fig. 11) Table 1: Display icons Icon Meaning Description Digital Shows the time, speed, rinse times, error codes. display – Does not flash or illuminate when the Wi-Fi function is not selected (“not connected”). – Flashes rapidly (several times per second) when the unit Wi-Fi is ready for configuration with your mobile device (“ready”).
- Page 18 Instructions (Cont.) Table 2: Wash program parameters * Program Time Temperature Number Spin Speed (hr:min) (°C) of Rinses (rpm) Express 1:16 --/20/40/60/90 2/3/4/5 0/400/600/800/1000/1200/1400 Cotton Cotton 3:17 --/20/40/60/90 2/3/4/5 0/400/600/800/1000/1200/1400 0:49 2/3/4/5 Eco Wash 0/400/600/800/1000/1200 Anti-Allergy 2:11 2/3/4/5 0/400/600/800/1000 Denim 1:40 --/20/40 0/400/600/800...
- Page 19 Instructions (Cont.) Table 3: Wash program suitability Max. Program Suitable for ... Load (kg) Express Cottons, linens or cotton mix fabrics, e.g. table linen, Cotton towelling, underwear, T-shirts etc. Cottons, linens or cotton mix fabrics, e.g. table linen, towelling, underwear, T-shirts etc. Cotton This is the most energy and water efficient program with the highest washing intensity for normally soiled cotton laundry.
- Page 20 Instructions (Cont.) Before first use CAUTION! Make sure the washing machine is properly and securely installed before using it. Before using the washing machine for washing clothes, run a complete washing cycle without clothes, using the drum clean program. Before using the washing machine for the first time, please review the following important points and make sure you have completed all preparatory steps.
- Page 21 Instructions (Cont.) Detergent recommendations WARNING! Do not use flammable and explosive or toxic solvents, petrol, alcohol or other chemicals in the machine. Keep detergents and clothing care preparations out of reach of children. • Only use low-sudsing detergent and clothing care preparations that are suitable for use in a front load washing machine, or in a top and front load machine.
- Page 22 Instructions (Cont.) Instructions (Cont.) Before each wash • Before loading the washing machine - Ensure that the washer is stable, level and properly connected to the power supply. - Check that no young child or pet has climbed into the drum. - Ensure that the water inlet hose and the drain hose are properly connected.
- Page 23 Instructions (Cont.) Instructions (Cont.) Step-by-step washing instructions Connect: Plug the machine in, switch on the power to the outlet and open the water tap. Load: Open the door of the washer and load the machine following the guidelines on the previous page. Mixing both large and small items gives better wash results and also helps distribute the load evenly during spinning.
-
Page 24: Wi-Fi Connection
Wi-Fi network. On your mobile device, tap on the AKAI Home app. It will open and take you to the log in page. Before you log in, please follow the prompts to register your account (using your email account) and set a password. - Page 25 The device only recognises ONE registered user. But you can share access to the device with other members of your household if they have the latest version of the AKAI Home app updated on their phone. To share the device, proceed as follows: On the device’s main control page, click the edit symbol in the corner, then select to...
- Page 26 Wi-Fi Connection (Cont.) Table 4: Wi-Fi troubleshooting Problem Possible cause and solution Check and ensure you have internet reception and your mobile phone and the washing machine are connected to the same Wi-Fi network. Check and ensure your Wi-Fi password is correct. During the set-up, the washing machine Check and ensure that no firewalls or other restrictions...
-
Page 27: Faqs And Troubleshooting Guide
FAQs and Troubleshooting Guide When the following problems occur, the microcomputer inside the washer will detect the abnormal condition, display an error message and the washer will stop operating. If after your remedial action the problem persists, please contact our after sales support centre for advice or to book a service. - Page 28 FAQs and Troubleshooting Guide (Cont.) Not all unusual incidents you may encounter with your washing machine are faults, or cause for concern. Check in the list below what issues may arise and why. Also check in the table on the previous page for solutions to problems that may be resolved without the need for a service call.
-
Page 29: Other Useful Information
Other Useful Information Garment care symbols When choosing a wash program, check for any labels in your clothes and follow the instructions. Below are some commonly used symbols and explanations what they mean. Fig. 14 Normal wash Hand w Handwash Bleach Warm wash (max 40... - Page 30 Other Useful Information (Cont.) Cleaning and care To prolong the service life of the washing machine, keep it in good condition and perform regular maintenance. WARNING! For any type of cleaning and maintenance, make sure the washing machine is disconnected from the mains power supply and the water tap is closed. Cleaning the cabinet (when required) •...
- Page 31 Other Useful Information (Cont.) Cleaning the detergent drawer (when required) Remove detergent residues regularly. The detergent dispenser may be removed for cleaning. • Pull open the dispenser drawer until you feel a resistance. Press down the release catch and at the same time pull the drawer right out of the machine (Fig. 15). •...
- Page 32 Other Useful Information (Cont.) Cleaning the water inlet filter To avoid blockage of the mesh filters at the water tap or hose after long time use, we recommend you clean these filters every 6 months, or more often if there are frequent interruptions to the water supply.
- Page 33 Other Useful Information (Cont.) WARNING! For any type of cleaning and maintenance, make sure the washing machine is disconnected from the mains power supply and the water tap is closed. Do not open the pump filter cover during the course of a wash program. If you are checking the drain pump after a hot water wash, take particular care as any residual water in the machine may be hot.
- Page 34 Our after sales support centre stocks spare water inlet hoses, drain hoses and adjustable feet for the appliance. To purchase a spare part, contact the centre using the details at the bottom of the page. Technical specifications Model number AK-FL10 Rated capacity (washing/spinning) 10 kg Rated power 2000 W Rated voltage 220–240 V~...
- Page 35 Other Useful Information (Cont.) Responsible disposal Packaging materials are recyclable. Please dispose of them responsibly for recycling. At the end of its working life, do not throw this appliance out with your household waste. Electrical and electronic products contain substances that can have a detrimental effect on the environment and human health if disposed of inappropriately.
- Page 36 Warranty returns Should you for any reason need to return this product for a warranty claim, make sure to include all accessories with the product. Product does not work? If you encounter problems with this product, or if it fails to perform to your expectations, make sure to contact our After Sales Support Centre on 1300 886 649 for advice.
Need help?
Do you have a question about the AK-FL10 and is the answer not in the manual?
Questions and answers