Table of Contents
Advertisement
Quick Links
Sitter Elite
The Posey Sitter Elite Alarm is
an important part of your falls
management protocols.
Ensure all parts of this
system are operational
before leaving a
patient unattended.
8345
Optional magnet and cord
available upon request by
contacting Posey customer
service at 1.800.447.6739
Before using the Posey Sitter Elite, read this entire manual and save for future reference.
Instruction Manual
®
Advertisement
Table of Contents

Summary of Contents for TIDI Posey Sitter Elite 8345
- Page 1 Sitter Elite ® Instruction Manual The Posey Sitter Elite Alarm is an important part of your falls management protocols. Ensure all parts of this system are operational before leaving a patient unattended. 8345 Optional magnet and cord available upon request by contacting Posey customer service at 1.800.447.6739 Before using the Posey Sitter Elite, read this entire manual and save for future reference.
-
Page 2: Table Of Contents
Contents Before You Begin ......................... 3 Features of the Sitter Elite and the Sitter Elite AC System ............4-6 Preparing the Sitter Elite for Use ....................7-8 Setting Alarm Mode ........................9-10 Setting Alarm Tone........................11 Adjusting Alarm Volume......................12 Time Delay ..........................13 To Record a Message ........................ -
Page 3: Before You Begin
BEFORE YOU BEGIN Before You Begin The Posey Sitter Elite is an easy to use, restraint free addition to your falls management program. The Sitter Elite provides an early warning when a patient attempts an unassisted exit from a sensor. This system does not prevent falls or injury from falls and is not a substitute for patient care, rounding and a comprehensive falls management protocol in your facility. -
Page 4: Features Of The Sitter Elite And The Sitter Elite Ac System
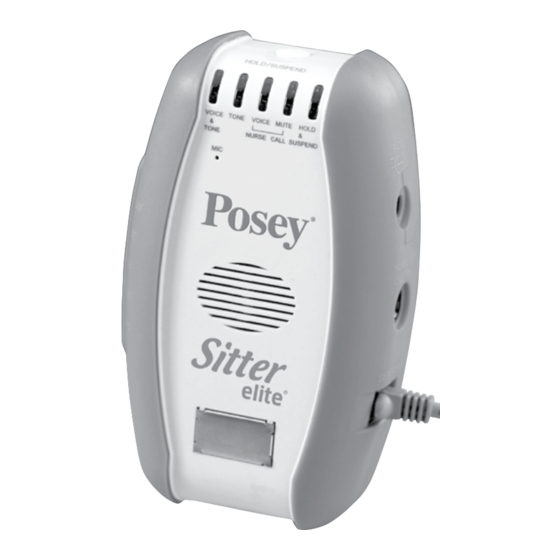
FEATURES Features of the Sitter Elite FRONT VIEW REAR VIEW (OPEN BATTERY DOOR) HOLD/SUSPEND ON/OFF MODE LED SWITCH MICROPHONE ® BATTERY COMPARTMENT ™ MAGNET PLATE RIGHT SIDE VIEW LEFT SIDE VIEW AC POWER DELAY ADAPTER INPUT MODE NURSE CALL TONE NURSE VOLUME CALL... - Page 5 FEATURES Features of the Sitter Elite (Cont.) Five alarm tones. There are five different alarm tone options which can be used in • different patient rooms, or to discern between different caregivers or levels of fall risk for easy patient identification. Four alarm modes.
- Page 6 CONTENTS AND BRACKET OPTIONS Each Sitter Elite is shipped to you with: Alarm (1) • “AA” Alkaline batteries (4) • NOTE: If you require the ability to run on AC power, order 8345AC. Customer may order the following bracket systems: 8208G GCX Alarm Mounting 8208H Modular Services Alarm 8208CS Command...
-
Page 7: Preparing The Sitter Elite For Use
PREPARING Preparing the Sitter Elite for Use Battery Installation: The battery-operated Sitter Elite is portable and long lasting. Fresh alkaline batteries have an estimated life of 30 days of daily use. Actual life depends on alarm mode, tone and volume you select. - Page 8 PREPARING Preparing the Sitter Elite for Use (Continued) Storing Your Sitter Elite: If you are storing the Sitter Elite for an extended period of time, you should turn the alarm off and remove the batteries. Batteries start to corrode after an extended period of time (just like a flash- light).
-
Page 9: Setting Alarm Mode
SETTING MODE Setting Alarm Mode The Sitter Elite has four (4) alarm modes. These allow you to select an alarm notification best suited to patient and facility needs. The LED blinks green above the mode that the alarm is set to when the alarm is on (Fig. - Page 10 SETTING MODE Setting Alarm Mode (Continued) 4. LED light blinks green to indicate selected mode is in use Mode LED (Fig. 6). LED blinks yellow if the alarm mode is set to “Mute” (Fig. 6). 5. If alarm is set to “Voice Only” or “Voice and Tone” mode and custom recorded message does not play, re-record message.
-
Page 11: Setting Alarm Tone
SETTING TONE Setting Alarm Tone The Sitter Elite has five (5) available tones. This allows you to differentiate between patients and other equipment alarms. To Select Tone: 1. Lift the programming control protective cover (Fig. 7). 2. Ensure alarm is on and either sensor pad, chair belt sensor, or magnet is attached to alarm. -
Page 12: Adjusting Alarm Volume
ADJUSTING VOLUME Adjusting Alarm Volume There are three (3) alarm volume settings: low, medium and high. These allow you to select the right volume for facility and/or patient needs. All volume settings are within OSHA standards. For maximum staff alert in noisy areas, use HIGHEST (loudest) volume setting. -
Page 13: Time Delay
TIME DELAY Time Delay There is no time delay option when the magnet is used. This option is available ONLY in Sensor Mode, while a sensor is in use. The delay is the time that will elapse AFTER weight is removed from sensor pad or chair belt sensor is unfastened, and BEFORE alarm activates. -
Page 14: To Record A Message
RECORDING A MESSAGE To Record a Message The Posey Sitter Elite has a feature that allows a caregiver or family member to communicate a verbal “warning” message about unassisted sensor pad exits to a patient without having to be physically in the room with the patient. 1. -
Page 15: The Hold Button (Sensor Use Only)
THE HOLD BUTTON The HOLD Button (Sensor Use ONLY) NOTE: HOLD feature will not work unless sensor is plugged into the alarm. To Place the Alarm on HOLD: HOLD/SUSPEND Button 1. Press HOLD/SUSPEND button on the top of alarm (Fig. 17) for 1 second. -
Page 16: The Suspend Button (Sensor Use Only)
THE SUSPEND BUTTON The SUSPEND Button (Sensor Use ONLY) NOTE: SUSPEND feature will not work unless sensor is plugged into the alarm. The SUSPEND feature is indicated when extended patient care is required. This feature allows you additional time to perform that care without activating the alarm. To Place the Alarm on SUSPEND: HOLD/SUSPEND Button 1. -
Page 17: Connecting To Ac Power (Optional)
CONNECTING TO AC POWER Connecting to AC Power (Optional) The Posey Sitter Elite is equipped with a DC jack to allow you to use AC power to operate the alarm when the 8345AC is ordered (includes AC power adapter). To ensure proper alarm function and to prevent damage to the alarm, only use the AC power adapter supplied by Posey. -
Page 18: Nurse Call Interface
NURSE CALL INTERFACE Nurse Call Interface You can connect the Sitter Elite to your facility nurse call system when you connect the optional Nurse Call Cable Cat. 8282. This allows you to add the options and notification associated with your specific nurse call system such as nursing station notification and patient room lights and sounds. - Page 19 NURSE CALL INTERFACE Nurse Call Interface (Continued) FOR SAFE USE WITH NURSE CALL CABLE: DO NOT stretch or strain cable to avoid possible damage and possible malfunction. • DO NOT attach cable to moving parts of the bed or chair that will cause strain or •...
-
Page 20: Choosing The Right Method For Patient Monitoring
MONITORING Choosing the Right Method for Patient Monitoring The Sitter Elite allows you to monitor a patient in sensor mode or optional cord & magnet mode. NOTE: Both methods CANNOT be used at the same time. Select the mode best suited to patient needs and risk assessment. - Page 21 MONITORING Monitoring with a Sensor (Continued) FOR SAFE USE IN ALL SENSOR MODES: To reduce the risk of serious injury or death, ALWAYS follow these steps after putting the sensor in place and before leaving patient unattended (see instructions below). DO NOT use any alarm or sensor that does not alarm each time it is tested.
-
Page 22: Steps To Apply: Over-Mattress Sensor Pad
MONITORING, STEPS TO APPLY Monitoring with a Sensor (Continued) 4. Check that there is no risk that chair sensor pad will be trapped in a “hammocking” chair seat. To reduce this risk, place a foundation cushion on seat under sensor. 5. -
Page 23: Steps To Apply: Chair Sensor Pad
STEPS TO APPLY Steps to Apply: Over-Mattress Sensor Pad (Continued) Testing Alarm and Over-Mattress Sensor Pad NURSE ALWAYS check sensor pads when connecting them to a Posey alarm. CALL You can check a pad by attaching it to the sensor cable outlet in the alarm, activating the alarm and placing pressure on the pad (Fig. -
Page 24: Steps To Apply: Chair Belt Sensor Pad
STEPS TO APPLY Testing Alarm and Chair Sensor Pad ALWAYS check sensor pads when connecting them to a Posey alarm. You can check a pad by attaching it to the sensor cable outlet in the alarm, activating the alarm and placing pressure on the pad (Fig. -
Page 25: Monitoring In Optional Cord & Magnet Mode
CORD AND MAGNET MODE Monitoring in Optional Cord & Magnet Mode Magnet and Sensor Modes CANNOT be used at the same time. A con- nected sensor will ALWAYS override the magnet. If you are using a sensor cord for monitoring with the alarm, ALWAYS remove the magnet and store it in a safe place while the sensor is being used. -
Page 26: Connecting Optional Magnet Cord To Patient
CONNECTING MAGNET CORD Connecting Optional Magnet Cord to Patient 1. Use slider to adjust cord to desired length. Cord adjusts from 31" to 60" (79 cm to 152 cm). 2. Attach clip near shoulder: Of clothing patient is not likely to remove; and •... -
Page 27: The Sitter Elite And Use Of Physical Restraints
USE OF PHYSICAL RESTRAINTS The Sitter Elite and Use of Physical Restraints The use of physical restraints should be a last resort, and only after a full physical and mental assessment by the facility healthcare team. If the patient’s care plan calls for the use of a restraint, staff should read and follow all instructions and warnings for the device you choose. -
Page 28: Warnings And Cautions
WARNINGS AND CAUTIONS Warnings and Cautions NEVER connect a Posey alarm to other manufacturers’ sensors. • NEVER connect a Posey sensor to other manufacturers’ alarm. • Make sure it is safe to drill and there are no pipes or electrical wires that could be damaged •... - Page 29 WARNINGS AND CAUTIONS Warnings and Cautions (Continued) before leaving the patient unattended. If the alarm and/or sensor do not function properly, remove the alarm and sensor from service and replace them with a properly functioning alarm and/or sensor. DO NOT use the alarm, sensor or magnet if it does not activate each time weight is removed from the sensor, the chair belt sensor is unfastened, or magnet is removed from face plate.
-
Page 30: Sensor Not Functioning
WARNINGS AND CAUTIONS Warnings and Cautions (Continued) if nurse call cable is plugged into the alarm and wall jack. Activate the alarm (remove pressure from sensor, unfasten chair belt sensor) and make sure the nurse call light for the proper bed and room activate in the appropriate nurse’s station location. -
Page 31: Mounting The Sitter Elite
MOUNTING Mounting the Sitter Elite There are multiple mounting options to choose from for the Sitter Elite: 8208 Wall Bracket (for wall mounting) • 8269 Alarm Attachment Bracket with BioThane Strap (for bed, wheelchair, stretcher, and • ® commode mounting) 8208CS Command Strip Alarm Mounting System (for wall mounting) ™... - Page 32 MOUNTING TO MOUNT THE 8276 WIRE BRACKET: 1. Slide alarm onto bracket from top down until it is firmly in place (Fig. 39). 2. Choose location on head or footboard where patient cannot reach or tamper with the alarm or connections.
- Page 33 MOUNTING Make sure it is safe to drill and there are no pipes or electrical wires that could be damaged. SLIDE Drill holes where marked and insert anchors. • ALARM UP ® Position bracket over holes. Insert and tighten screws. •...
- Page 34 MOUNTING Chair/Wheel Chair Mounting WITH THE 8276 WIRE BRACKET 1. Choose a location on rear of chair, out of the patient’s reach. 2. Slide alarm onto bracket from top down until it is firmly in place (Fig. 39 page 31). 3.
-
Page 35: Alarm Cleaning, Storage And Battery Maintenance
CLEANING, STORAGE, MAINTENANCE Alarm Cleaning, Storage and Battery Maintenance Cleaning: Sensor, Cables and Alarm Housing (exterior ONLY) Dampen (but DO NOT soak) a clean cloth with disinfectant. Wipe alarm clean, using care not to get disinfectant inside speaker grill and connector ports. To reduce the risk of damage, NEVER: use any cleaning substance that contains Phenol •... -
Page 36: Troubleshooting Guide
TROUBLESHOOTING GUIDE Troubleshooting Guide PROBLEM: Continuous alarm with patient in bed or chair. SOLUTION: Magnet and Cord Mode Check that magnet is connected to plate on face of alarm. • SOLUTION: Chair Sensor Pad Check that sensor pad cord and RJ11 plug are clean and undamaged. Check plug connection •... - Page 37 TROUBLESHOOTING GUIDE Troubleshooting Guide (Continued) PROBLEM: Intermittent Alarm while the patient is in a bed or chair. SOLUTION: Check that sensor cord and RJ11 plug are clean and undamaged. Check plug connection to alarm. • Check sensor pad for creases or damage to vinyl cover. •...
- Page 38 TROUBLESHOOTING GUIDE Troubleshooting Guide (Continued) SOLUTION: Over Mattress Sensor Pads (Continued) When the patient lies down they may not be making contact with the sensor to activate monitoring. • Try a different position for the sensor pad. Most patient weight is normally under buttocks. SOLUTION: Chair Belt Sensor Check that all connections are tight and properly plugged into the alarm.
-
Page 39: Alarm Specifications
Four Year Warranty Four Year Warranty Limited Lifetime Warranty TIDI Products, LLC warrants, for a period of four (4) years after date of manufacture (the Removed current Warranty language, replaced with the following, change red text for ® “Warranty Period”), that the Posey Sitter Elite (“Alarm”) is free of defects in materials and... - Page 40 Instruction Manual TIDI Products, LLC • 570 Enterprise Drive, Neenah, WI 54956 USA Phone: 1.800.447.6739 • Fax: 1.800.767.3933 • www.tidiproducts.com © TIDI Products, LLC. All rights reserved. Posey is a registered trademark of TIDI Products, LLC. M6223 Rev H 2020-12-03...
Need help?
Do you have a question about the Posey Sitter Elite 8345 and is the answer not in the manual?
Questions and answers