
Subscribe to Our Youtube Channel
Summary of Contents for Elecrow CrowPi 2
- Page 1 Elecrow CrowPi 2 - All in one STEM Learning Platform & Raspberry Pi Laptop USER MANUAL V1.4 2021 *Pictures are for display only 2021 ELECROW All Rights Reserved. www.elecrow.com...
-
Page 3: Table Of Contents
Catalog Product info Main features • The main parameters • Structure • Development board • Specifications • Module list • Conventional accessories How to use • Install Raspberry Pi • Keyboard and mouse • Storage compartment • Power bank • Screen brightness adjustment Precautions Software Parts... -
Page 4: Product Info
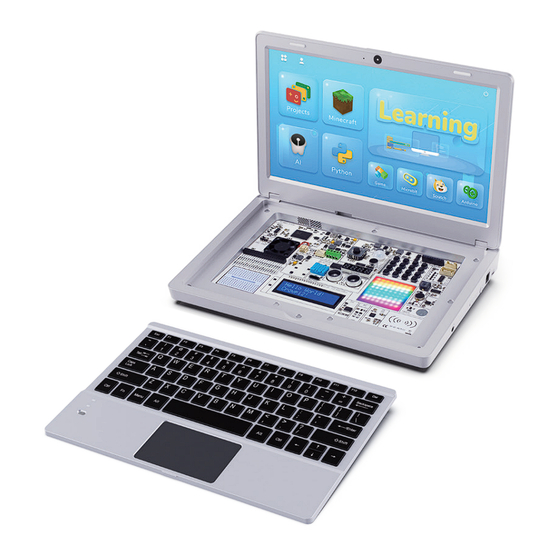
Product info CrowPi 2 combines Raspberry Pi and a range of common sensors, it’s just as useful for learning about STEM education and setting up as a portable laptop. No matter you are Raspberry Pi fan , a STEM educator, or someone... -
Page 5: Structure
1. 11.6 -inch 1920 * 1080 resolution screen 7. Screen brightness +/- 13. Speakers 2. Microphone 8. 3.5mm headphone jack 14. Storage groove 3. Two-megapixel camera 9. Removable wireless keyboard 15. Cooling hole 4. 5V USB power supply port 10. Raspberry Pi power supply head (reserved) 16. -
Page 6: Development Board
Development board 1. Joystick 2. Segment 3. Relay 4. Screen driver 5. Cooling fan 6. Raspberry Pi and PCBA connection switch 7. GPIO interface 8. GPIO indicate LED 9. DHT11 temperature and humidity sensor 10. Breadboard 11. Tilt sensor 12. LCD1602 13. -
Page 7: The Main Parameters
The main parameters CrowPi 2 Specification Dimensions 291(L)*190(W)*46(H)mm Weight 1.3kg Screen 11.6-inch 1920*1080 IPS screen Camera 2.0MP camera with microphone Power supply DC12V/ USB 5V power supply Power port Micro USB/ DC Keyboard 2.4G wireless Mouse 2.4G wireless Audio output... -
Page 8: Module List
16. I/O/ADC/UART extension port Module list: 17. IIC port 1. Joystick 18. 9G servo 2. Segment LED 19. Stepper motor 3. Relay 20. LCD1602 display 4. Cooling fan 21. 4x4 button matrix 5. Switch converts connection between sensors 22. Buzzer and Raspberry Pi 23. -
Page 9: How To Use
1. Insert the SD card (built in system) into the Raspberry Pi SD card slot. 2. Push to the right to open the back cover of the CrowPi 2 4. Connect the Micro HDMI adapter board to the Micro Raspberry Pi compartment. - Page 10 5. Connect the Raspberry Pi power cable and the 2pin interface to the female socket on the PCBA board, and insert the Type-c into the Raspberry Pi type-c power port. 6. Remove the USB head and insert it into the USB port of the Raspberry Pi through the cable hole. It’s for camera and microphone.
-
Page 11: Keyboard And Mouse
8. Connect the power supply, Use 7. Close the cover. the 12V power supply in the accessories, insert the DC round head into the DC12V power supply port. Keyboard and mouse ● 1. Remove the wireless receiver in the mouse 2. -
Page 12: Storage Compartment
3. Install a battery into the mouse,and then switch the button of keyboard and mouse to "ON" side. 4. Get started, and you can use to open/close the touchpad. 5. When the power led of keyboard is blink, it means that the power is almost exhausted, please use the micro usb cable to power the keyboard. -
Page 13: Power Bank
Power bank ● 1. Install 5v power bank 1.1. Open the storage compartment, put the powerbank 1.2. Access to 5V micro USB port. into the compartment, insert the wire through the wire hole, and then push it into device. 2. Press the power button Screen brightness adjustment ●... -
Page 14: Faq
1. Unable to boot Make sure you are using the correct charger and that the SD card is inserted into the Raspberry Pi. 2. The module or sensor on the PCBA board cannot be used Please make sure that GPIO toggle switch have been switched to A successfully. 3. -
Page 15: Software
Software This is a software specially designed for CrowPi 2 users, which integrates scratch, python programming and adapta- tion tutorials, Micro:bit and Arduino IDE, as well as the most popular programming game Minecraft. In addition, it also can be used as entertainment device, which not only allows you to play small python games, but also enjoy videos and audios with a built-in player. -
Page 16: Parts
Scratch lessons Let users quickly master the knowledge of scratch programming and software and hardware interaction 20 small applications designed for quick familiarity with CrowPi 2 Projects hardware features Use game Minecraft to open the door to python programming world... -
Page 17: Main Page And User Settings
Main page and User Settings Main page The page is the main software page, click on the corresponding module area to enter the corresponding section. Click to return to the desktop. Click to Create and login accounts. Click to pop up the shutdown window. Click shutdown the device or to reboot. - Page 18 Create and login accounts Enter account login page, click go back to the previous step. The first time you use the software you need to register a new account. Click Create Account to create a new user account. Then go to the page shown in the image below, click back to the previous step.
- Page 19 Set up secret questions and answers, click CREATE complete account creation. Go back to the login page and enter the username and password you just set up. Then click to sign in. Once you've successfully logged in, click on the user icon, pop up a personal user window, where you can view the progress of your course and your private folder.
- Page 20 Forget password If you forget your password, click on the Forget Password? login page to go to the password reset page, click back to the previous step. Enter the secret question and answer, click NEXT the next step, click back to previous step. Enter the new password and confirm it twice, click complete password reset, go back to the CREATE...
-
Page 21: Operation Process
Operation Process Learning Integrated Scratch and python teaching resources, providing users with step-by-step tutorials to learn Scratch programming and python programming. Projects We provide 20 kinds of project use cases for users to quickly experience software and hardware interactions, understand the functions supported by the hardware that comes with the device. -
Page 22: Minecraft
Minecraft Minecraft- the classic Minecraft raspbian version that combines gaming with programming. Click on the icon and enter the desktop, pop up the Minecraft game window, the python programming client and the minecraft course teaching window. As shown in the figure below: Zone A: Minecraft 16 course selection interface, click on the corresponding icon... - Page 23 Course page: Drag the scroll bar on the right to browse and learn lessons. Click back on the course selection page and click to close the window. Enter AI Studies, divided into Face Recognition Speech and Recognition. Face recognition : Seven face recognition courses allow you to master the simple principles of face recognition and simulate the application of preliminary scenes.
- Page 24 Click to enter speech recognition learning. Go back to the desktop and pop up the following two windows. Zone A on the left is the Python programming client, and Zone B on the right is the speech recognition course selection window for a total of 5 lessons.
- Page 25 Click to enter face recognition learning. Return to the desktop and pop up the following two windows. on the left is the Python programming client, and Zone A the right is the Face Recognition Course Selection Zone B Window for a total of 7 lessons. Click go back to the main page and click close window.
-
Page 26: Python
Python Python programming - integrate the Python IDE for the convenience of Python developers Click on the icon to return to the desktop and open the python programming client. Game Micro:bit Pygame-18 games written by python, users Micro:bit programming - Makecode for who is familiar with python can DIY games. - Page 28 Elecrow For more information, please visit our forum: https://forum.elecrow.com...
Need help?
Do you have a question about the CrowPi 2 and is the answer not in the manual?
Questions and answers