
Related Manuals for TEKK Bridgecom Systems D-500

Summary of Contents for TEKK Bridgecom Systems D-500
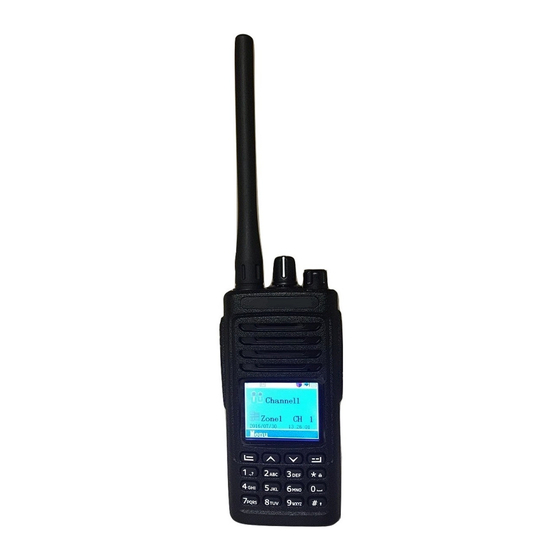
- Page 1 BridgeCom Systems D-500 DMR Radio by Tekk BridgeCom Systems, Inc D-500 DMR Radio by Tekk...
-
Page 2: Table Of Contents
BridgeCom Systems D-500 DMR Radio by Tekk Contents Safety and Overview.............................3 TEKK D-500 Specifications..........................4 Unpacking Charging The Battery..........................5 Getting Acquainted..........................6 Basic Operations............................8 Power On/Off............................8 VOL Control.............................8 Launch And Receive Call..........................9 Zone Selecting............................9 Selecting Channel, User ID, Group ID.....................9 Receive And Reply Group Call........................8 Receive And Reply Private Call.......................8... - Page 3 BridgeCom Systems D-500 DMR Radio by Tekk Missed Call Screen........................18 Storing Missed Call List’s Alias or ID....................18 Deleting the Call of Calling List......................18 Call Reminder..............................19 Receiving and Confirming the Call Reminder..................19 Starting a Call Reminder by Communication List..................19 Message Function............................19 Edit And Send SMS..........................19...
-
Page 4: Safety And Overview
BridgeCom Systems D-500 DMR Radio by Tekk Switch On/Off (VOX) Function......................32 Power-on Password..........................32 Clock..............................33 Time...............................33 Date...............................33 Model..............................33 Access to General Information........................34 Radio ID..............................34 Radio Version............................34 Radio Configuration.........................34 Receiving Frequency..........................34 Transmitting Frequency.........................35 Channel Name............................35 Time Out Timer............................35 CTCSS.................................36 Encode..............................36 Decode..............................36 Color Code..............................36 Repeater Slot..............................37... -
Page 5: Tekk D-500 Specifications
BridgeCom Systems D-500 DMR Radio by Tekk TEKK D-500 Specification s General Specifications Frequency Range 400-470MHz/136-174MHz Working Frequency 400-520 /136-174MHz Channel Capactiy 1000 7.4 V Working Voltage ℃ ℃ Working Temperature -30 ~+60 ℃ ℃ Storing Temperuature -40 ~+85 Analog: 10h ; Digital: 14h... -
Page 6: Unpacking
Tekk AMBE +2 TM Digital Voice Vocoder Unpacking Welcome to the Tekk D-500 radio, before using we suggest you: · Please check the packing box of this product and see if there are signs of damage. · Please open the packing box carefully. We recommend that you identify the items listed in the following packing list. - Page 7 Tekk maintenance or cleaning. 7. Use of an attachment not recommended or sold by BridgeCom or Tekk it may result in a risk of fire, electric shock, or personal injury. 8. Make sure the cord is located so it will not be stepped on, tripped over, or subjected to damage or stress.
-
Page 8: Getting Acquainted
BridgeCom Systems D-500 DMR Radio by Tekk Getting Acquainted... -
Page 9: Basic Operations
BridgeCom Systems D-500 DMR Radio by Tekk Notice: Either Long-press or Short-press of Side-key 1/ Side-key 2/ Side-key 3 can be set by program software for the following functions: 1.None-function 12.Scan on/off 2.All warning tone on/off 13.Tight/Normal SQL 3.High/Low power 14.Encryption on/off... -
Page 10: Launch And Receive Call
BridgeCom Systems D-500 DMR Radio by Tekk Volume Control Turn the volume knob Clockwise to raise the volume or counter-clockwise to lower; The radio shows a volume line on the screen. Launch And Receive Call 1) Zone Selection Zones is a channel group. Each radio can set at most 250 zones and each zone with 16 channels (Maximum). -
Page 11: Receive All Call
BridgeCom Systems D-500 DMR Radio by Tekk 5)Receive All Call All call means communicate with all members on the same channel and to public When receiving: 1. LED indicator lights green. 2. Show RSSI mark on the top screen. First line show the all call, user name or ID in the middle, all call mark at the end (Only analog mode). -
Page 12: All Call
BridgeCom Systems D-500 DMR Radio by Tekk 6. you will receive a message sound and screen shows call finished. You can make a single call with contacts or use keyboard to search the target Radio to make a call. All Call Radio must be programmed with this function, so that you can send information to every user who are under the channel. -
Page 13: Reply Emergency Call
BridgeCom Systems D-500 DMR Radio by Tekk 1. While receiving emergency calling, number of emergency calls and alarms received, exchange the sender name or 2. With a message sound and LED indicator becomes red 3. If the radio have activated, then will confirm the emergency alarm automatically. When the radio receive the emergency alarm, screen shows the emergency alarm warning mark, until send with a confirm message then can logout. -
Page 14: Voice Emergency Alarm
BridgeCom Systems D-500 DMR Radio by Tekk 5. Press [PTT] key to call, LED indicator light changes to red, screen shows the group mark. 6. Let go [PTT] key to receive. 7. If on the“free channel message sound”function, let go [PTT] key, you can hear a message sound, means it channel is free for you to answer. -
Page 15: Menu Operation
BridgeCom Systems D-500 DMR Radio by Tekk • Press [PTT] key. Notice: Emergency mode will be logout when power off the radio. Radio will not under emergency mode when the radio is power on next time. Menu Operations 1)Characters Input Users can use the 3 x4 alphanumeric keypad to access the radio’s function. -
Page 16: Number Input
BridgeCom Systems D-500 DMR Radio by Tekk Numbers Input Mode When in the Numbers input mode, press the number keys to display the corresponding number, press the *key to display * on the screen, press # to switch input mode. -
Page 17: Monitor
BridgeCom Systems D-500 DMR Radio by Tekk 4)Monitoring Using monitoring function to open the target two way radio’s microphone (only the user alias or ID). You can use the function to monitor any sound around target two way radio. Your must allow your two way radio to use this function by programming it. -
Page 18: Private Call With Contacts
BridgeCom Systems D-500 DMR Radio by Tekk 4. Holding the radio and let it in a vertical position and keep mouth 1 to 2 inches (2.5 to 5.0 cm) with radio. 5 . Press [PTT] to start calling, the LED turns red. The screen displays the calling group’s alias or ID, as well as icon of group call. -
Page 19: Missed Call Screen
BridgeCom Systems D-500 DMR Radio by Tekk 2. Press the [ ◁ or ▷ ] key to the call history, and then press [OK] key to choose. 3. Press [ ◁ or ▷ ] to the required list, and then press [OK] key too choose. -
Page 20: Call Reminder
BridgeCom Systems D-500 DMR Radio by Tekk 7)Call Reminder Call instruction makes you can suggest a specific radio users in the possible time to call you back. This feature applies only to the user alias or ID, and can be used through the menu by address book or manual dialing. -
Page 21: Sent Prefabricate Sms With A Key
BridgeCom Systems D-500 DMR Radio by Tekk Or press [◁or▷] or spending] key to manual dialing, and then press [OK] button, enter your user ID and press [OK] key. 8. The screen shows message: < user/group name or ID > call, sending message are being confirmed 9. -
Page 22: Manage The Failed Sms
BridgeCom Systems D-500 DMR Radio by Tekk Resending Message 1. Press [OK] to resend same message to same user/group name or ID. 2. If the messages sent successfully, issued a prompt sound, and display messages sent or if you cannot send text messages, screen display text message sent failure. -
Page 23: Manage The Send Sms
BridgeCom Systems D-500 DMR Radio by Tekk 1. Press [OK] button to enter the menu mode. 2. Press the [ ◁ or ▷ ] key to information, and then press [OK] key to choose 3. Press [ ◁ or ▷ ] to sent project, and then press [OK] key to choose 4. -
Page 24: Receive Sms
BridgeCom Systems D-500 DMR Radio by Tekk 1Press the [OK] button to enter the menu mode. 2. Press the [ ◁ or ▷ ] key to information, and then press [OK] key choice. 3. Press [ ◁ or ▷ ] to sent project, and then press [OK] key choice. -
Page 25: Check The Inbox Sms
BridgeCom Systems D-500 DMR Radio by Tekk Manage Received Messages Use your inbox to manage messages. inbox can store up to 50 text messages at Most. Two way radio supports the following text options: Reply Forward Delete Delete All store the message in the inbox in the order received. Note: at any time according to the [back] key can return to the previous screen. -
Page 26: Delete All Inbox Sms
BridgeCom Systems D-500 DMR Radio by Tekk 8 After Writing the text, press [OK] . 9. The screen displays message: < user/ call group name or ID >, to confirm. text messages were being sent 10. If the messages sent successfully, issued a prompt sound, and screen display text message has been sent. -
Page 27: Basic Encryption
BridgeCom Systems D-500 DMR Radio by Tekk not must request to do so. Basic Encryption Two way radio can only be assigned more than one type of encryption. If users Call for encryption or decryption of data transmission, must make to be pre-programmed radios and launch radio has the same "encryption keys"... -
Page 28: Radio Activate
BridgeCom Systems D-500 DMR Radio by Tekk During radio kill operation, do not press the [back] key, because you will not get a confirmation message. Radio Activate Use menu function: 1. Press [OK] key to enter the menu mode. 2. Press [ ◁ or ▷ ] key to Contacts, and then press [OK] key to select, entries are in alphabetical order. -
Page 29: Scanning Reply
BridgeCom Systems D-500 DMR Radio by Tekk start scanning, radio will detect all channels / contact groups on pre-programmed scan list. • Auto Scan: When you select an already activated auto scan channels / contact groups, radio scans from the activated auto scan channel. -
Page 30: Radio Sounds
BridgeCom Systems D-500 DMR Radio by Tekk Keyboard lock Language selection LED indicator Power-on password Clock Mode Talk Around When the transponder does not work, or when the radio located outside the range of the transponder but located within the range of other radios call, you can continue to communicate. This is called "talk around."... -
Page 31: Screen Back-Light
BridgeCom Systems D-500 DMR Radio by Tekk Turn On or Turn Off Keyboard Tone If desired, you can activate and deactivate call admission tone. 1. Press [OK] key to enter the menu mode. 2. Press [ ◁ or ▷ ] key to settings, and then press [OK] key to select. -
Page 32: Lock/Unlock Key
BridgeCom Systems D-500 DMR Radio by Tekk Setting Squelch Level You can adjust radio squelch level, thus filtering low signal intensity useless call or channel higher than normal value. Setting: Normal is the default, strict filtering (useless) call or background noise. However, a call from a remote location may also be filtered out. -
Page 33: Switch On/Off (Vox) Function
BridgeCom Systems D-500 DMR Radio by Tekk •Chinese 1. Press [OK] key to enter the menu mode. 2. Press [ ◁ or ▷ ] key to Settings, and then press [OK] key to select. 3. Press [ ◁ or ▷ ] key to radio settings, and then press [OK] key to select. -
Page 34: Clock
BridgeCom Systems D-500 DMR Radio by Tekk 2. Press [ ◁ or ▷ ] key to Settings, and then press [OK] key to select. 3. Press [ ◁ or ▷ ] key to radio settings, and then press [OK] key to select. -
Page 35: Access To General Information
BridgeCom Systems D-500 DMR Radio by Tekk 8. Press [OK] key to save, the screen displays the date has been saved. Mode Mode settings are divided into: •CH Mode •VFO Mode 1. Press [OK] key to enter the menu mode. -
Page 36: Transmitting Frequency
BridgeCom Systems D-500 DMR Radio by Tekk • Transmitting frequency • Channel name • Transmitting time • CTCSS/DCS • Color code • Repeater slot Receiving Frequency 1. Press [OK] key to enter the menu mode. 2. Press [ ◁ or ▷ ] key to Settings, and then press [OK] key to select. -
Page 37: Time Out Timer
BridgeCom Systems D-500 DMR Radio by Tekk 4. Use the keypad to enter the correct radio configuration password (programmed by software), and then press [OK] key to select. 5. Press [ ◁ or ▷ ] key to the channel name and press [OK] key to select. -
Page 38: Color Code
BridgeCom Systems D-500 DMR Radio by Tekk 4. Use the keypad to enter the correct radio configuration password (programmed by software), and then press [OK] key to select. 5. Press [ ◁ or ▷ ] key to CTCSS/DCS, and then press [OK] key to select. -
Page 39: Troubleshooting
BridgeCom Systems D-500 DMR Radio by Tekk Troubleshooting Symptom Try This Battery power may have run out, please No power update battery or recharge it. Battery may not be properly installed, please take it off and re-install. ... - Page 40 BridgeCom Systems D-500 DMR Radio by Tekk...
-
Page 41: Warranty Card
Trouble Description: __________________________________________________________________________ ____________________________________________________________________________________________ Terms and Conditions 1)This warranty is provided only for product purchased from authorized dealer of Tekk-Radios, Inc. (hereinafter called Dealer). 2) Warrants this product to be free from manufacturer’s defects for a specified period. 3)Within the specified warranty period, will repair or replace non consumable parts (excluding casing, accessories, batteries, cable and consumable) that are damaged under normal use (by judgement of ) at no additional charge.
Need help?
Do you have a question about the Bridgecom Systems D-500 and is the answer not in the manual?
Questions and answers