Advertisement
Advertisement
Table of Contents

Summary of Contents for Hypontech HM-1000D
-
Page 2: Safety And Warnings
1. SAFETY AND WARNINGS 1.1 Safety Instructions HM-1000D, produced by Suzhou Hypontech Co,. Ltd., is designed, tested and manufactured strictly aligned with relative safety regulation. As an electric device, installation and maintenance shall follow instructions stated in this document. Incorrect operation may cause physical or financial damage to the operator or third parties. -
Page 3: General Introduction
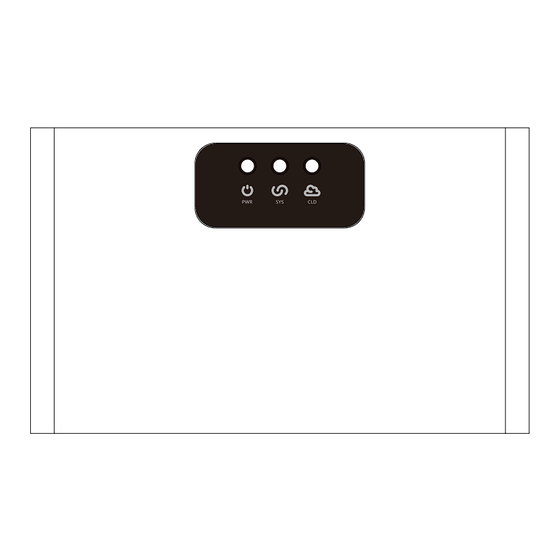
2. General Introduction 2.1 Product Introduction HM-1000D is a PV system monitoring device. Together with ethernet, HM-1000D can collect data from inverters, smart meters and other dataloggers, therefore, to actively control power output, data configuration and firmware update remotely via HiPortal. - Page 4 Interface Power Adapter Input for DRED Port for connecting ethernet cable RS485 COM1: for connecting Inverter RS485 COM2: for connecting Smart Meter Port for USB connection Reset Button 2.3 LED Indicator The LEDs indicate of the product: "PWR" > Power Status •...
- Page 5 Status Explanation Indicator Glowing red light Device operation normal Flashing red light Unstable power supply No power supply Glowing green System operation normal light Flashing green System booting or resetting light System not operating Glowing yellow Cloud server connected light Flashing yellow Internet connected, no connection to light...
-
Page 6: Installation
Accessories Manual 3.2 Installing the product 3.2.1 Positioning Protection level of HM-1000D is IP20, it MUST be mounted indoor. Weight and dimension of HM-1000D must be considered to choose installation method and position. Well air ventilation, no direct sun light. - Page 7 the center of marks should be 186mm. Drill the holes using a 6mm bit to 30mm depth. Insert the expansion bolts into the drill holes. Install the guide rail onto the HM-1000D with M3*6 countersunk head screws...
- Page 8 Fix the DIN rail on the mounting surface with ST4.2 screws. Ensure the product is stably attached. ...
-
Page 9: Connecting The Product
4. CONNECTING THE PRODUCT 4.1 Connection Area Power Adapter Input for DRED Port for connecting ethernet cable RS485 COM1: for connecting Inverter RS485 COM2: for connecting Smart Meter Port for USB connection Reset Button 4.2 Connect to Inverter 4.2.1 To single Inverter The connection port COM1 are used for RS485 cable connections. - Page 10 4.2.2 Connect to more than one inverter Multiple inverters can be connected in string. Inverters are inter-connected via COM1, and the last inverter in string connects to COM1 on HM-1000D. Please be advised to connect A to A and B to B. Maximum connection is up to 16 inverters.
- Page 11 DRM4/8 REF2 COM/DRM0 Procedure of Installing DRED on HM-1000D 1. Prepare the RJ45 plug for DRED connection. 2. Insert the plug into the DRED socket on HM-1000D until the plug snaps into place. DRED Device 4.5 Connect to Ethernet 1. Insert the RJ45 plug of the network cable into the Ethernet port until the plug snaps into place.
- Page 12 CO M 1 CO M 2 ETHERNET POWER DRED RESET DHCP service MUST be supported by the router. DHCP MUST be activated.
- Page 13 5. Configuration Please find further instructions from document HiPortal User Manual EN. This document can be found in www.hypontech.com/xiazai/.
-
Page 14: Technical Parameter
6. Technical Parameter MODEL HM-1000D ELECTRICAL PARAMETERS Input Voltage / V DC 7.5 - 12 Input Current / mA Max. Power Consumption / W Power Supply Type AC Adaptor Number of connected interfaces Ethernet 10/100 Mbit/s RS485 COMMUNICATION RS485 Communication Range / m...
Need help?
Do you have a question about the HM-1000D and is the answer not in the manual?
Questions and answers