
Subscribe to Our Youtube Channel
Summary of Contents for TT Micro TINY AUDIO C5
- Page 1 English TINY AUDIO C5 IN-CAR DAB/DAB+ RADIO WITH SERVICE FOLLOWING & BLUETOOTH HANDSFREE ADAPTOR Please read carefully before using this product Side 1...
-
Page 2: Safety Instructions
Safety Instructions: Do not use this radio near water. Clean with dry cloth. Do not block any ventilation openings. Do not use near heat objects. Use only accessories provided by manufacturer. Do not expose this radio to rain or moisture. Do not allow this unit to become exposed to water, steam, sand or other environmental hazards. - Page 3 Control Unit and Connectors Side 3...
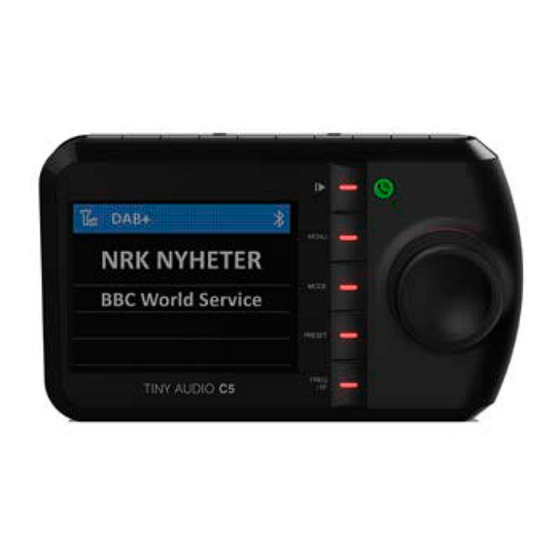
- Page 4 Controls: Preset Buttons 1-10 Microphone Phone/Play/Pause Button Menu Button Rotary Encoder and Confirmation Button Preset Button FM Frequency/ Service Following Button Mode/Dim Button Line Out Jack 10. Aux In Jack 11. Power Switch 12. Power Supply Micro USB Socket 13. DAB/DAB+ Antenna Jack 14.
- Page 5 5. Dash/window mounting bracket 6. DAB/DAB+ active antenna for main unit Note: All accessories are designed to work specifically with Tiny Audio C5. Please do not use third party cables as these may not work and cause warranty invalidation. Side 5...
- Page 6 2. Connect one end of the USB power supply cable to Micro USB power socket at the back of TINY AUDIO C5 and the other end to dual USB car charger. Plug the dual USB car charger to the car cigar-lighter socket.
- Page 7 2. Connect your car audio stereo speaker “Aux-in” or “Line-in” to the “LINE OUT” jack at the bottom of TINY AUDIO C5 with the provided 3.5mm audio cable. Remark: In “Line Out” mode, there will be no FM transmission to the car stereo.
- Page 8 TX108.0MHz Then tune your car FM radio system to match the selected “vacant” frequency (TX FREQ) for transmission of the audio signal from TINY AUDIO C5 to your car stereo audio system. --Select FM Transmitting Frequency (Manual Mode): Short press “FREQ/SF”...
- Page 9 Search and select DAB/DAB+ channels: Press the “MODE/DIM” button until “DAB+ Radio” mode is found Use “ROTARY ENCODER” to select the desired DAB/DAB+ channel Or in “DAB+ Mode”, short press “MENU” button to enter Preview Mode, use “ROTARY ENCODER” to scroll up or down to select the desired DAB+ channel and press “ROTARY ENCODER”...
- Page 10 Service Information: DAB+ mode The Service Information display -The Service Information data will be displayed with scrolling text which is being broadcasted from the station. While listening to DAB+, the display will show the followings if applicable Channel Name Frequency Multiplex Name(DLS)...
- Page 11 When “S/F” icon turns red from white for a specific DAB station, it means that DAB station supports S/F feature and the device has detected it, however, it is not switched over yet. Once it is switched to other region, the S/F icon will be turned white again.
- Page 12 Press and hold any of the selected numeric buttons (1-10) to store your first favorite preset DAB+ stations. Repeat the same procedure for other favorite DAB+ stations and numeric buttons. You may program and store more than 10 favorite DAB+ preset stations by using the following procedure: To select a favorite DAB+ station using “ROTRAY ENCODER”,...
- Page 13 Manage the Bluetooth devices: Pairing a Phone: Paring a phone with TINY AUDIO C5 for the first time, follow the below procedures: Press the “MODE/DIM” button until you scroll the screen to “Bluetooth” mode In “Bluetooth”...
- Page 14 Manage Phone Call: When there is an incoming call, the TINY AUDIO C5 rings with a ringtone, short press “PLAY/PAUSE” button to answer a call and at the same time the speaker phone volume and talk time will be displayed at the bottom of the screen, you may use “ROTARY ENCODER”...
- Page 15 Selecting Bluetooth Phone Voice to your Car Stereo through FM transmitter or Built-in Speaker: Press and hold “MENU” button to enter menu, Use “ROTARY ENCODER” to scroll down the menu to select “Hands Free Speaker” and press “ROTARY ENCODER” to confirm, In “HANDS FREE SPEAKER”...
- Page 16 TINY AUDIO C5 is powered on. TINY AUDIO C5 automatically connects itself to the last phone you used with it. If you want to connect TINY AUDIO C5 to another phone you already paired but not the last one, you have to first disconnect the last phone by selecting “Forget this...
- Page 17 If you want to connect TINY AUDIO C5 to another phone while the first phone is still in connection, you may force the first phone to disconnect by press and hold “FREQ/SF” button to enter pairing mode again and a flashing Bluetooth icon will appear at the top of the display.
- Page 18 3. black background/orange font 4. colour To set the color, follow the procedure below: Press and hold “MENU” button for 3 seconds to enter “Colour Setting” menu mode Use “ROTARY ENCODER” to scroll and select your favorite color by pressing “ROTATRY ENCODER” to confirm and exit the menu.
- Page 19 Can also be mounted to the rear side windows. Connecting Aux-IN: The TINY AUDIO C5 features a 3.5mm Aux-IN jack at the bottom of the device. External analog audio sources from iPad/iPhone/iPod/Tablet/Android phone or MP3 players etc. can be fed wirelessly through FM transmission into your car stereo audio system.
- Page 20 MP3 player etc. into “AUX IN” jack at the bottom of TINY AUDIO C5 with the provided 3.5mm audio cable. Charging iPad/iPhone/iPod/mobile phones/tablets/camera: Using your mobile phone USB cable and plug the USB connector into the dual USB car charger with 12V socket, Connect the other end of the cable to your device and start charging.
- Page 21 Select Language: Press and hold “MENU” button to enter menu Use “ROTARY ENCODER” to scroll up or down to select “Language” and confirm by pressing “ROTARY ENCODER” again Use ‘ROTARY ENCODER” to select your desired language and confirmed by pressing “ROTARY ENCODER” again. Restore factory setting: Press and hold “MENU”...
-
Page 22: Product Specification
Power Source: Car Cigar-lighter Socket (10V- 30V) Dimension: 110 x 65 x 32 mm Net weight: 335g ( approx.) *Information of this user manual is subject to change without prior notice. Tiny Audio is distributed by TT Micro AS – support@ttmicro.no – www.ttmicro.no Side 22... - Page 23 Norsk TINY AUDIO C5 DAB/DAB+-RADIO TIL BIL MED SERVICE FOLLOWING, HANDSFREE/STREAMING BLUETOOTH-ADAPTER Vennligst les nøye før produktet tas i bruk Side 23...
- Page 24 Sikkerhetsinstrukser: Ikke bruk adapteret nær vann. Rengjør med tørr klut. Ikke blokker ventilasjonsåpningene. Ikke bruk radioen nær varme gjenstander. Bruk tilbehør levert av produsenten. Utsett ikke radioen for regn eller fuktighet. Ikke utsett denne enheten for vann, damp, sand el.l. Forlat ikke radioen hvor sterk varme kan forårsake skade.
- Page 25 Kontrollenhet og forbindelser Side 25...
- Page 26 Kontroller: Forhåndsinnstillingsknapper 1-10 Mikrofon Telefon/Play/Pause-knapp Menyknapp Dreie- og bekreftelsesknapp Forhåndsinnstillingsknapp FM-frekvens/Service Following-knapp Modusknapp / Dimme lys Linjeutgang 10. AUX-inngang 11. Strømbryter 12. Strømforsyning, mikro-USB 13. DAB+-antenneinngang 14. Handsfree høyttaler Side 26...
- Page 27 2. 3,5mm lydkabel 3. Dobbel USB-lader til 12/24V 4. Hovedenhet, DAB-mottaker 5. Festebrakett til dashbord/vindu 6. DAB og DAB+ aktiv antenne til hovedenheten Anmerkning: Alt tilbehør er spesifikt utformet til bruk sammen med Tiny Audio C5. Vennligst ikke Side 27...
- Page 28 Disse fungerer kanskje ikke, og kan ugyldiggjøre garantien. Bruk av DAB+ Digital Radioadapter for bil: Fest TINY AUDIO C5 DAB/DAB+-radioen til dashbordet med den vedlagte klebende braketten. Fest USB-strømforsyningskabelens ene ende i mikro-USB-utgangen på TINY AUDIO C5, og den andre enden i den doble USB-laderen.
- Page 29 Koble bilstereoens Aux-inngang til TINY AUDIO C5 sin utgang nederst på enheten ved å bruke den vedlagte 3,5mm audio-kabelen. Merk: I linjeutgangsmodus er det ikke mulig med mottak av FM- sendinger i bilstereoen. Motta signaler fra DAB/DAB+-bilradioen via FM-sendinger: - Velg FM-sendefrekvens (Auto-modus): Trykk kort på...
- Page 30 Trykk kort på "FREQ/SF"-knappen for å komme til FM-sendefrekvensvalgmodus. Bruk deretter dreieknappen for å velge din foretrukne ledige frekvens (basert på dine tidligere erfaringer med kjente ledige frekvenser) som du vil at bilradioen din skal kunne motta. Etter at den er funnet, trykk dreieknappen for å velge å gå...
- Page 31 Merk: Det er ved normal bruk unødvendig å utføre "DAB-Autoscan" hver gang du bruker DAB/DAB+-bilradioen såfremt det ikke foreligger nylig tillagte DAB+-stasjoner. Da kan det være nødvendig å kjøre et nytt søk med "DAB Autoscan". Dette søket minner om tilsvarende kanalsøk på fjernsynet ditt. Tjenesteinformasjon: DAB+-modus Tjenesteinformasjonsskjermen: Tjenesteinformasjonen vil vises med rullende tekst kringkastes av stasjonen.
- Page 32 Following-funksjonen. Etter dette vil "AV" vises på LCD-skjermen. "S/F"-ikonet vil også forsvinne fra LCD-skjermen. Når " S/F" ikonet gå fra rødt til hvitt på en bestemt DAB stasjon , betyr det at DAB stasjon støtter S/F -funksjonen og enheten har oppdaget det, men det er ikke slått over ennå...
- Page 33 Lagre forhåndsinnstilte stasjoner: For å stille inn og lagre forhåndsinnstilte stasjoner med nummertastene (1-10) på toppen av enheten: Bruk dreieknappen i DAB-modus for å velge en favoritt DAB+-stasjon. Trykk og hold en hvilken som helst nummertast (1-10) for å en forhåndsinnstilt lagre DAB+-stasjon.
- Page 34 Bruk av Bluetooth-enheten: Parring med telefon: Gjør følgende for å parre en telefon med TINY AUDIO C5: Trykk modusknappen til skjermen viser Bluetooth-modus. I Bluetooth-modus, trykk og hold "FREQ/SF"-knappen for å sette TINY AUDIO C5 i parremodus. Beskjeden "Parring pågår"...
- Page 35 Ikonet vil slutte å blinke når Bluetooth er tilkoblet. Telefonanrop: Ved innkommende anrop vil TINY AUDIO C5 gi fra seg en ringelyd. Trykk kort på "PLAY/PAUSE"-knappen for å svare på et anrop. Høyttalervolum og taletid blir vist nederst på...
- Page 36 Velge telefon over Bluetooth til bilstereoanlegget, gjennom FM-sender eller innebygd høyttaler. Trykk og hold menyknappen for å komme inn på menyen. Bruk dreieknappen for å bla nedover i menyen hvor du finner "Handsfree høyttaler", og trykk dreieknappen for å velge. I "handsfree høyttaler"-menyen bruker du dreieknappen for å...
- Page 37 Bruk dreieknappen for å velge neste eller forrige sang. Merk: Etter at telefonen din er parret med TINY AUDIO C5 vil tilkoblingen mellom begge enheter automatisk bli gjenopprettet hver gang du går inn i bilen, såfremt TINY AUDIO C5 er slått på. TINY AUDIO C5 kobler seg automatisk til den telefonen den brukte sist.
- Page 38 Du kan parre opp til åtte Bluetooth-enheter med TINY AUDIO C5. Ønsker du å koble TINY AUDIO C5 til en annen telefon mens den første fremdeles er tilkoblet, kan du tvinge den første telefonen til å koble seg fra ved å trykke og holde "FREQ/SF"-knappen, og så...
- Page 39 Valg av skjermbakgrunn og fontfarge: Du kan velge mellom fire forskjellige fargekombinasjoner for skjermbakgrunn og font: 1. Svart bakgrunn/hvit font 2. Svart bakgrunn/blå font 3. Svart bakgrunn/oransje font 4. Farge på bakgrunn/hvit font (Monokrom) Gjør følgende for å velge farger: Trykk og hold menyknappen i 3 sekunder for å...
- Page 40 Tilkoble og feste DAB+-antenne inne i bilen: (Ved feil installasjon vil man oppleve støy og dårlig mottak). Fest antennefilmen på glasset, som anvist i diagrammet. Legg et lett press på for å fjerne eventuelle luftbobler. Fjern den selvklebende baksiden fra forsterkerblokken, og fest den på...
- Page 41 Kan også monteres på sideruter bak. Koble til Aux-inngang: TINY AUDIO C5 er utstyrt med en 3,5 mm Aux-inngang nederst på enheten. Eksterne musikkspillere kan kobles til denne inngangen med den vedlagte 3.5mm lydkabelen. Side 41...
- Page 42 Spille fra en ekstern musikkspiller: Trykk "MODUS/DIM"-knappen til du ser "AUX INNGANG"-modus. Koble en ekstern musikkspiller til Aux-inngangen helt nederst på TINY AUDIO C5 med den vedlagte 3,5 mm lydkabelen. Lade USB-enheter: Bruk din enhets USB-kabel og koble til inngangen på...
- Page 43 Velg språk: Trykk og hold menyknappen for å komme inn på menyen. Bruk dreiehjulet for å bla opp eller ned for å finne "Språk", og velg ved å trykke dreiehjulet. Bruk dreiehjulet for å finne ditt foretrukne språk, og velg ved å...
- Page 44 Strømutgang: 5V, 1A (lading for iPad/iPhone/iPod/Android-telefon osv. ) Strømkilde: Sigarettennerkontakt (10V- 30V) Dimensjoner: 110 x 65 x 32 mm Nettovekt: 335 g (ca.) *Informasjon vedrørende denne brukerhåndboken kan endres uten forvarsel. Tiny Audio distribueres av TT Micro AS – Salg@ttmicro.no – www.ttmicro.no Side 44...
- Page 45 Side 45...
Need help?
Do you have a question about the TINY AUDIO C5 and is the answer not in the manual?
Questions and answers