
Summary of Contents for Speedrid AMA005875
- Page 1 E-Bike PRODUCT INSTRUCTION MANUAL Caution : Please read the manual before your first ride!
-
Page 3: Table Of Contents
CONTENTS IMPORTANT SAFETY INSTRUCTION GENERAL INFORMATION BIKE USAGE INSTALLATION AND ADJUSTMENT METER OPERATION BATTERY AND CHARGING MAINTENANCE WARRANTY ATTACHMENTS WARNING... -
Page 4: Important Safety Instruction
IMPORTANT SAFETY INSTRUCTION WHEN USING THIS PRODUCT BASIC PRECAUTIONS SHOULD ALWAYS BE FOLLOWED, INCLUDING THE FOLLOWING: Things To Know Before Use ● Read all the instructions before using the product. ● To reduce the risk of injury, close supervision is necessary when the product is used near children. - Page 5 IMPORTANT SAFETY INSTRUCTION ● Try to avoid riding in severe weather such as heavy rain and snow. ● It is not allowed to exceed the maximum load of the vehicle body when riding (the maximum load is 120KG). ● It is suitable for people of 16+ years old and physically fit adults, and it is strictly forbidden to drive electric bicycles on the road by people under 16 years old.
-
Page 6: General Information
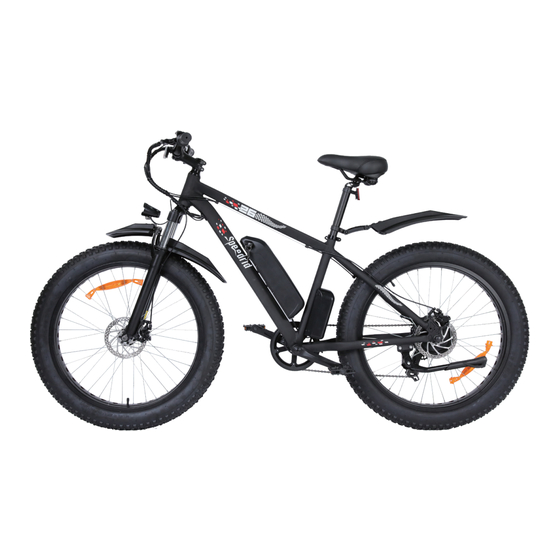
GENERAL INFORMATION 1. About Speedrid Electric Bike Speedrid has been designing powerful electric bikes for years. Noticing the missed simple details in the current marketplace selection, Speedrid adds the most cost- effective components and continuously update and optimize electronic control devices to make the electric vehicles stronger, faster and smarter. - Page 7 GENERAL INFORMATION 3. Bike Components Rear Fender Rear Brake Caliper Tyre Front Fork Flywheel Front Fender Rear Derailleur Head Light/Front Light Chain Stem Controller Box Frame Chain Wheel Battery Crank Seat Post Clamp/ Seat Clamp Front Disc Brake Caliper Saddle Disc Rear Reflector Wheel Reflector...
- Page 8 GENERAL INFORMATION Left Brake Lever Rear Shifter Left Grip Right Brake Lever Meter Right Grip Pedal Throttle/ Twister Kickstand Handle Bar Motor...
- Page 9 GENERAL INFORMATION 4. Tool List 0.24 inch (6mm) Tool bag 0.20 inch (5mm) 0.16 inch (4mm) 0.12inch (3mm) Phillips-Slotted 8-10 Open 13-15 Open 14-17 Open Allen Key Allen Key Allen Key Allen Key Head Screwdriver End Wrench End Wrench End Wrench 5.
-
Page 10: Bike Usage
BIKE USAGE Before Riding ● Before riding the bike on the open road, try all the settings on the electric bike, and get used to various results in a safe and controllable environment. ● Please check the power circuit, lighting circuit, and test the brake system before cycling. -
Page 11: Installation And Adjustment
INSTALLATION AND ADJUSTMENT Open the package of the bike, take out the electric bike and all the parts inside and use the tool to cut off the packing rope. Please follow our YouTube channel- Speedrid Customer Service, we have provided installation tutorial. - Page 12 INSTALLATION AND ADJUSTMENT Turn the stem 180° to the forward direction, then both the stem and the fork bridge of the front fork are facing forward. Forward Loosen the four screws and put the handlebar into the stem in balance and tighten the screws.
- Page 13 INSTALLATION AND ADJUSTMENT 2. Install The Seat First attach the reflector and rear fender to the seat tube and tighten the screws of both. Install the saddle tube into post receiver. Set right its position and adjust height to fit your ridding habit. (Note: please be careful not to exceed the limit line) Tighten the fastening nut clockwise first, and then fasten the seat tube clamp.
- Page 14 INSTALLATION AND ADJUSTMENT Using the wrench to loosen the fixing rod of the front fork and remove it (this accessory is to prevent the front fork from being deformed during delivery but not a needed part for the installed bike). Remove the nuts, safety hooks and the safety washers from the hub of wheel.
- Page 15 INSTALLATION AND ADJUSTMENT NOTE: Make sure the safety hooks on both sides are hooked and the nuts are tightened. NOTE: Make sure the wheel is in the middle of the fork. Length A= lenght B . Caliper A = B...
- Page 16 INSTALLATION AND ADJUSTMENT 4. Check The Front Wheel Rotates Smoothly After installing the front wheel, rotate it to see whether it rotates smoothly. If the disc brake rubs, please adjust the brake. Brake Adjustment Ensure that the brake cables are properly inserted into the brake levers before aligning a mechanical disc brake.
- Page 17 INSTALLATION AND ADJUSTMENT 5. Install Kickstand Unscrew the screw in the kickstand, and install the kickstand. Then tighten with tool. 6. Install The Headlight and Front Fender Loosen the screw on the fork with the hex key. Put the light and front fender in this position.
- Page 18 INSTALLATION AND ADJUSTMENT 8. Install The Battery Push the battery into the battery support until it is closely connected to the socket on the pipe of the frame battery support. Then insert the key and turn the key to lock it. 9.
-
Page 19: Meter Operation
METER OPERATION 1. Activate The Battery Before turning on the meter and using the lights and speakers, please press the circular switch button on the side of the battery to activate the battery. "-" means open and "○" means shut down. 2. - Page 20 METER OPERATION 3. Display Interface 4. Display Content Introduction Battery Indicator Pedal Assist Levels ● Level "0" is pure electric mode, starting at 0 speed.You can turn the throttle to speed up. ● Level "1" - "5" are power assist modes, and the default is Level "1" when starting up.
- Page 21 METER OPERATION Speed Indication Ebike Status Display Area : Communication Abnormality : Cruise control : Undervoltage : Brake Prompt : Motor Failure : Throttle Failure : Controller Failure ● Cruise at Fixed Speed When riding in pure electric mode, twist the throttle for 8s to enter the cruise control mode.
- Page 22 METER OPERATION Multifunctional Display Area Press the "M" key for a short time after starting up, and switch in sequence: Total Distance--ODO, Single Trip Distance--TRIP, Voltage--VOL, Boot Time--T1. Setting After starting up, press the "+" and "-" keys at the same time to enter the display setting state.
-
Page 23: Battery And Charging
BATTERY AND CHARGING Charging: Safe Operation Guide ● Please follow the instructions for use, otherwise the consequences are at his own risk. Please use the original special charger. It is strictly prohibited to use other chargers. ● Pay attention to the battery type and applicable voltage that the charger can charge, and it is strictly forbidden to mix them. - Page 24 BATTERY AND CHARGING ● The battery and battery charger contain hazardous materials. Always keep the battery and battery charger away from children, animals, or persons incapable of understanding the potential hazards. ● A damaged battery or battery charger (e.g. cable, plug or housing) may result in leakage of hazardous materials or be a potential source of sparking and fire.
- Page 25 BATTERY AND CHARGING Reminder Charge a new battery 4 hours before you use it in your product for the first time. If the battery is dropped or damaged due to a bicycle accident, there may be a danger of electrolyte leakage. Please stop using it immediately. It is better not to wait until the power is completely exhausted before charging, which can more effectively extend the battery life.
-
Page 26: Maintenance
MAINTENANCE ● The front and rear wheels of the vehicle should be located in the center of the front fork or frame. ● After riding, please store the bike in a place without sunlight and rain. ● Water showering is forbidden, and the surface of the bike body can be wiped with a semi-dry cloth. -
Page 27: Warranty
WARRANTY One-Year Limited Hardware Warranty Your electric bike includes a One Year Limited Hardware Warranty. Speedrid provides warranty service for the electric bikes. If there is a hardware defect and a valid claim is received during the warranty period, we will resend new parts within the scope permitted by law. -
Page 28: Attachments
ATTACHMENT Technical Parameters Performance index Project Parameter Vehicle Size 1910*630*1100mm Wheel Size 26*4.0 Inches Frame Material Aluminium Alloy Basic Parameters Maximum Load 265 lbs (120KG) Vehicle Weight 61 lbs (27.8KG) Maximum Speed 20 mph (32km/h) Rear Derailleur 7-Speed Performance Parameters Working Temperature 23°F-104°F (-5℃~40℃) Rated Voltage... - Page 29 ATTACHMENT Remarks: The amount of battery remaining, load of the bike(weight of rider and cargo), tire ● pressure, road environment, chain and wheel axle lubrication, etc. will affect the maximum speed; Riding habits, temperature, load, tire pressure, road environment and other ●...
- Page 30 Operation General ● Only use the e-bike and the drive assist system for safe, recreational riding. Use of the e-bike for a purpose it was not intended for is dangerous and could result in property damage, serious injury or death. Always follow the instructions for intended use and limitations.
- Page 31 If a component’s life cycle is exceeded, the component can suddenly and catastrophically fail, causing serious injury or death to the rider. Scratches, cracks, fraying and discoloration are signs of stress caused fatigue and indicate that a part is at the end of its useful life and needs to be replaced. Product life is often related to the kind of riding you do and to the treatment to which you submit the bicycle.
- Page 32 ● Although many catalogs, advertisements and articles about bicycling depict riders engaged in extreme riding, this activity is extremely dangerous, increases your risk of injury or death, and increases the severity of any injury. Remember that the action depicted is being performed by professionals with many years of training and experience.
- Page 33 If you can twist the stem in relation to the front wheel, turn the handlebars in relation to the stem, or turn the bar end extensions in relation to the handlebar, the bolts are insufficiently tightened.Be aware that adding aerodynamic extensions to handlebars will change the steering and braking response of the bicycle.
- Page 36 E Bike Input: DC 54.6V, 3A max Max Speed: 20 mph (32km/h) Power: 500W Model: AMA005875 KOMDA INDUSTRIAL(DONGGUAN)CO, LTD Made in China speedrid.cs@gmail.com Speedrid Customer Service Customer Service...
Need help?
Do you have a question about the AMA005875 and is the answer not in the manual?
Questions and answers
Is there a part list for the speedrid 26 inch bike?
The part list for the Speedrid 26-inch bike includes:
- Speedrid Electric Bike (1)
- User Manual (1)
- Key (2)
- Charging Adapter (1)
- Battery (1)
- Pedal (2)
- Saddle (1)
- Saddle Tube (1)
- Tools Bag (1)
- Kickstand (1)
- Reflector (1)
- Front & Rear Fender (1)
This answer is automatically generated
how to get keys
I need a replacement for the Controller but I can't seem to find it anywhere
unlock speed limit?
Getting a replacement key
Can I get the wiring diagram for the throttle on this bike
What size planetary gears are in the motor and Do you sell or can I get the little key that goes in with the planetary gears in the motor?