Table of Contents
Advertisement
Quick Links
Advertisement
Table of Contents

Subscribe to Our Youtube Channel
Summary of Contents for Scooterpac INVADER XTREME
- Page 1 The ultimate off-road all terrain vehicle User ManUal...
- Page 2 The ultimate off-road all terrain vehicle...
- Page 3 Become Limitless Learn more about your Invader today...
-
Page 4: Table Of Contents
Replacing Bulbs ..............25 Keys & Fobs ................14 Battery Care ................25 Seat Adjustments .............. 15 Isolation Switches ............. 26 Footrests ................. 16 Tyre Pressures ..............27 Ignition ..................17 Troubleshooting ..............28 Scooterpac Invader Xtreme | User Manual... - Page 5 Cleaning ................29 10.2 Sizes & Weights ..............33 Warranty ..................... 30 11 Servicing ..................... 34 One-Year Warranty ............30 12 Notes..................... 38 Warranty Exclusions ............30 Warranty Policy..............31 10 Specifications .................. 32 Scooterpac Invader Xtreme | User Manual...
-
Page 6: Welcome
Scooterpac service centre will need to keep your Invader in good working order. Address 2 ________________________ If you have any questions, please contact the Scooterpac dealer that supplied your Invader Xtreme and they will be Town/City ________________________ happy to help you. Postcode... -
Page 7: Safety
2 Safety The Invader Xtreme should only be operated by a single person, who is not suffering from any condition which impairs vision, hearing, eyesight or the ability to react to sudden changes in surroundings. If you suffer from any of the above, it is recommended that you seek advice from your doctor before operating the Invader. -
Page 8: Safe Inclines
2.1 Safe Inclines The Invader Xtreme can climb inclines of up to 25˚ without danger. On this 25˚ incline, the Invader can stop, brake and turn. To reduce the possibility of tipping backwards on inclines, lessen the load on the back of the scooter by sliding the seat forward as much as possible and leaning forward. -
Page 9: Introduction
3 Introduction Your Invader Xtreme is a high-tech piece of mobility equipment that will give you years of faithful service and enjoyment. This manual introduces you to the operation, maintenance and care of your Invader. If you have any questions, or are unsure of anything, please contact the dealer your originally purchased the Invader from. -
Page 10: Your Invader
4.1 Intended Use The Invader Xtreme is designed for use off-road including gravel, mud, sand, or snow surfaces as well as on road environments including smooth pavements and roadways, in accordance with local laws. The Invader can be used in wet and windy weather, but discretion should be used when planning a journey in adverse weather conditions. -
Page 11: Unintentional Movement
4.2 Unintentional Movement The Invader Xtreme should be stationary before use. When the Invader is switched on, it will remain stationary with the manual brake levers engaged and will not move until these are released and the forward or reverse throttle lever is twisted. -
Page 12: Exterior Guide
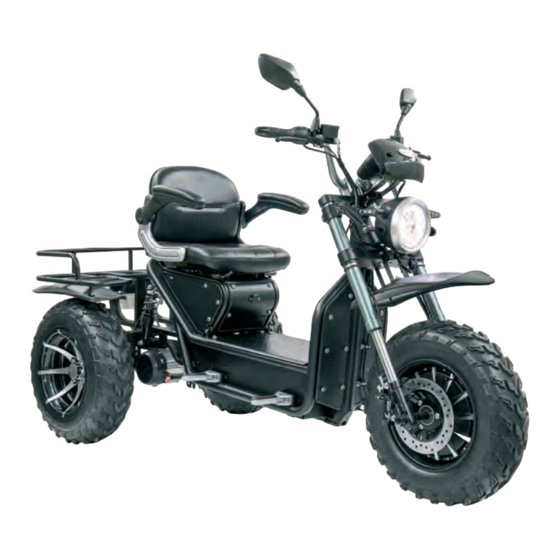
5 Exterior Guide Mirrors Brake Handle Turn Signals Headlight Shocks Tires Footrests Charging Port Motor Seat Adjust Trunk Armrest Seat Throttle Ignition Digital LCD Display Figure 4 – Exterior guide Scooterpac Invader Xtreme | User Manual... -
Page 13: Handlebar Controls Guide
3 Speed Switch – Use this switch to choose between different maximum speed modes. Position 1 equals 4mph, position 2 equals is 8mph and position equals 22mph. Figure 6 – Right Handlebar Scooterpac Invader Xtreme | User Manual... -
Page 14: Operating Your Invader
7 Operating Your Invader 7.1 Getting Started Before use, ensure that the Invader Xtreme is stationary on smooth, level ground. Only operate when you are safely and comfortably seated. 7.2 Keys & Fobs Alarm Fob Guide The Invader is delivered with several keys which operate 1. -
Page 15: Seat Adjustments
Forward/Backwards To move the seat forwards or backwards, grasp the black lever on the right- hand side underneath the seat whilst sitting down. Figure 9 Seating position adjustment handle Scooterpac Invader Xtreme | User Manual... -
Page 16: Footrests
Using your feet push the footrests towards the Invader and they will pop out. Reversing this process will fold them back into the sides of the Invader. Figure 10 – Ignition barrel Scooterpac Invader Xtreme | User Manual... -
Page 17: Ignition
2. Put the key into the position 2 (see fig. 10) and push down while turning counterclockwise. 3. Once it is in position 3 (see fig. 10) remove the key and reverse this process to disengage the steering lock. Figure 11 – Ignition barrel Scooterpac Invader Xtreme | User Manual... -
Page 18: Acceleration & Braking
To slow down, release the throttle lever and the Invader will decrease speed. The hydraulic disc braking system can be activated by pulling the brake levers located on the left and right side of the handlebars. Figure 13 – Brake lever Scooterpac Invader Xtreme | User Manual... -
Page 19: Engaging The Brake Lock
7.6.3 Reversing Hold down the green button on the left handlebar (see fig. 5) whilst gently twisting the throttle lever (see fig. 12). Figure 16 – Brake lock This will engage the reversing mode. Scooterpac Invader Xtreme | User Manual... - Page 20 Check the wing mirrors prior to manoeuvres. The wing mirrors fitted to the Invader are large, giving improved visibility and safety. They can be adjusted by gently twisting the housing. Scooterpac Invader Xtreme | User Manual...
-
Page 21: Digital Lcd Display
*PLEASE NOTE* The battery meter will dip down Figure 17 - Digital LCD Display when the Invader is in motion. The metre will return to the previous position when becoming stationary. This is normal. Scooterpac Invader Xtreme | User Manual... -
Page 22: Lights
7.8 Lights The Invader Xtreme is supplied with high quality LED headlights that can be activated from the handlebar controls. To switch on the lights, see fig. 5. When the ignition is switched on the lights are always active – you have a choice between low beam and high beam. -
Page 23: Horn
The electric horn is activated by pressing the button on the left handlebar (fig. 5). The horn should only be used in compliance with the Highway Code. The horn will only sound if the ignition is switched on. Scooterpac Invader Xtreme | User Manual... -
Page 24: Charging The Invader
12 hours continuously. If there are long periods where you decide not to use your scooter, we recommend that batteries are charged at least once a week. This will ensure they remain healthy and are ready for regular usage. Scooterpac Invader Xtreme | User Manual... -
Page 25: Maintenance
LEDs are energy efficient and long lasting however they may eventually require replacement. LED bulbs can be purchased from the dealer that supplied your Invader. Replacing bulbs should only be completed by a certified Scooterpac dealer, as it involves disassembling units that must be resealed to the original manufacturing specification. -
Page 26: Isolation Switches
If the Invader does not turn on and the display does not light up when the key is in the ignition, it is most likely that the isolation switches are set to off. Open the seat lock and switch the isolators to the on positions. Figure 19 – Circuit breaker Scooterpac Invader Xtreme | User Manual... -
Page 27: Tyre Pressures
The tyres should always have at least 3mm of tread to provide adequate grip on the road surface. If the tyres become worn, they should be replaced before the Invader is used again. Front tyre pressure: 10psi Rear tyre pressure: 10psi Scooterpac Invader Xtreme | User Manual... -
Page 28: Troubleshooting
If the machine turns on (display etc.) however the motor does not run, make sure the brake lock is not on. The motor will not engage as long as any brake is being pressed. Scooterpac Invader Xtreme | User Manual... -
Page 29: Maintenance
If possible, bring the battery inside. • Ensure your Invader undergoes a yearly service and safety check at your local Scooterpac dealer. • Do not overcharge the battery once the battery is fully charged, unplug it as soon as possible. -
Page 30: Warranty
To ensure validity, the Warranty must be registered to Scooterpac within 14 days of purchase. 9.1 One-Year Warranty From one year from the date of delivery, Scooterpac will provide a warranty on the motor, controller, electronics, and mechanical components. 9.2 Warranty Exclusions 1. -
Page 31: Warranty Policy
The warranty does not extend to the consequential costs resulting from fault clearance, freight and travel costs, loss of earnings, expenses, etc. The manufacturer will not accept responsibility for any damage or injury caused by misuse or non- observation of the instructions set out in this user manual. Scooterpac Invader Xtreme | User Manual... -
Page 32: Specifications
60V 32Ah SLA Rear Motor – 1200W Peak Output – 2700W 60V 4 Amp Off-Board Battery Charger Speed 4mph, 8mph, 22mph Charger Digital LCD Display Alarm System Dashboard Speedometer Locking Manual Steering Locking Odometer Tyres Pneumatic Scooterpac Invader Xtreme | User Manual... -
Page 33: Sizes & Weights
845 mm battery condition, tyre condition. Tyres Front - 21” x 7” x 10” Rear - 23” x 7” x 10” Maximum Slope 25 degrees Seat Back Height 340 mm Seat Width 475 mm Scooterpac Invader Xtreme | User Manual... -
Page 34: Servicing
In order to ensure continued safe operation, the Invader must be serviced every 12 months. We recommend recording the servicing dates and locations on the sheets below. Always have your Invader serviced at an authorised Scooterpac dealer, using original Scooterpac parts. - Page 35 Next Service Year Service Dealer Name Technician Name Date of service Mileage Notes Signed Next Service Year Service Dealer Name Technician Name Date of service Mileage Notes Signed Scooterpac Invader Xtreme | User Manual...
- Page 36 Next Service Year Service Dealer Name Technician Name Date of service Mileage Notes Signed Next Service Year Service Dealer Name Technician Name Date of service Mileage Notes Signed Scooterpac Invader Xtreme | User Manual...
- Page 37 Next Service Year Service Dealer Name Technician Name Date of service Mileage Notes Signed Next Service Year Service Dealer Name Technician Name Date of service Mileage Notes Signed Scooterpac Invader Xtreme | User Manual...
-
Page 38: Notes
12 Notes Scooterpac Invader Xtreme | User Manual... - Page 39 Scooterpac Invader Xtreme | User Manual...
- Page 40 Brighten your day Tel: 0330 124 1733 E-mail: info@scooterpac.com Web: www.scooterpac.com SP/INEX/M/EN/2024-A...
Need help?
Do you have a question about the INVADER XTREME and is the answer not in the manual?
Questions and answers