Table of Contents
Advertisement
Quick Links
Advertisement
Table of Contents

Subscribe to Our Youtube Channel
Summary of Contents for RTS TM-10K Gen 2
- Page 1 TM‑10K Gen 2 High Capacity Trunkmaster TM‑10K Gen 2 User Manual...
-
Page 3: Table Of Contents
TM-10K Gen 2 High Capacity Trunkmaster Table of contents | en Table of contents Safety Copyright and Disclaimer Notices Important safety instructions Introduction TM-10K Gen 2 Reference Diagram Understanding Trunking Cascade costs Alpha management Hardware details Installation Rack mounting Power On instructions... -
Page 4: Safety
| Safety TM-10K Gen 2 High Capacity Trunkmaster Safety Copyright and Disclaimer All rights reserved. The product information and design disclosed herein were originated by and are the property of Bosch Security Systems, LLC. Bosch reserves all patent, proprietary design, manufacturing, reproduction, use and sales rights thereto, and to any article disclosed therein, except to the extent rights are expressly granted to others. -
Page 5: Important Safety Instructions
TM-10K Gen 2 High Capacity Trunkmaster Safety | en Caution! To reduce the risk of electric shock, grounding of the center pin of this plug must be maintained. Warning! To reduce the risk of fire or electric shock, do not expose this apparatus to rain or moisture. - Page 6 | Safety TM-10K Gen 2 High Capacity Trunkmaster 12. Use only with the cart, stand, tripod, bracket, or table specified by the manufacturer, or with the apparatus. When a cart is used, use caution when moving the cart/apparatus combination to avoid injury from tip-over.
-
Page 7: Introduction
(1) system with decentralized hardware.) The RTS Trunking System consists of a TM-10K Gen 2 that supports trunking data through Ethernet. Add a backup TM-10K Gen 2 to prevent downtime in the event of a failure of the main master control unit. -
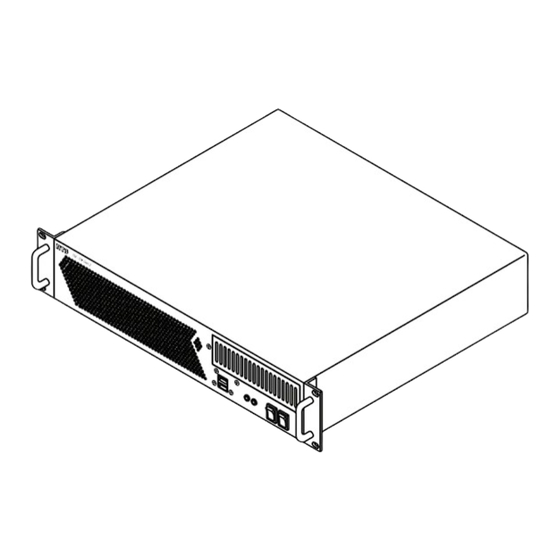
Page 8: Tm-10K Gen 2 Reference Diagram
| Introduction TM-10K Gen 2 High Capacity Trunkmaster TM-10K Gen 2 Reference Diagram Callout Description Rack ear Front panel USB connectors Power indicator LED Disk drive activity indicator Power switch (momentary toggle) Reset switch (momentary toggle) RJ-45 Ethernet (NIC 1 & 2) connector... -
Page 9: Understanding Trunking
Cascade Costs are numeric values associated with each intercom in the matrix system. When a cascade is created, the TM-10K Gen 2 selects the intercom with the lowest cost. Cascaded trunks are used when no direct trunks are available to satisfy a request. The Trunk Master attempts to tie two trunks together to satisfy the request, forming a cascade through a third intercom. -
Page 10: Alpha Management
| Understanding Trunking TM-10K Gen 2 High Capacity Trunkmaster Alpha management For each key assignment, two flags affect trunking behavior. If the AZedit scroll enable flag is set, then an AZedit session on a different intercom can program that assignment on a key. If the Trunk scroll enable flag is set, then a keypanel on a different intercom can scroll to that assignment and copy it to a key. -
Page 11: Hardware Details
TM-10K Gen 2 uses the DisplayPort (if connected); otherwise, it uses DVI. If the TM-10K Gen 2 powers on with no monitor, no video is available, even if you connect a monitor after the fact. Alternatively, once you boot the TM-10K Gen 2, you can disconnect the monitor;... -
Page 12: Installation
Using the screws you previously removed, attach a rack ear to each side of the unit. Notice! Install the TM-10K Gen 2 in an equipment rack. The unit does not have special ventilation requirements. We recommend using standard rear mount rack rails to support the unit in mobile installations. -
Page 13: Software And Requirements
Two software packages are available to use with an external PC connected to the TM-10K Gen 2: Trunk Edit and Trunk Supervisor. The TM-10K Gen 2 includes Trunk Edit to provide the user with the ability to configure and monitor the TM-10K Gen 2. Trunk Supervisor is available as an add-on software package available for an additional cost. -
Page 14: Trunk Connections And Setup
TM-10K Gen 2 High Capacity Trunkmaster Trunk connections and setup The TM-10K Gen 2 supports local and remote trunking. Local trunking consists of the Trunk Master and an intercom located on the same campus, possibly in different buildings, and possibly connected via fiber. Remote trunking occurs when there is a significant amount of delay (e.g. -
Page 15: Configure The Trunk Master To Connect To An Intercom
The Available Trunk Masters window appears. Notice! The browse function only works if the PC is on the same subnet as the TM-10K Gen 2. If they are on different subnets, you must manually enter the TM-10K Gen 2 IP address. -
Page 16: Configure An Intercom To Connect With A Trunk Master
A pop-up menu appears. Notice! The browse function only works if the PC is on the same subnet as the TM-10K Gen 2. If they are on different subnets, you must manually enter the TM-10K Gen 2 IP address. In the Available Intercoms window, select the intercom. -
Page 17: Creating Trunks
TM-10K Gen 2 High Capacity Trunkmaster Trunk connections and setup | en In the Main: field, enter the IP Address of the main Trunk Master. Click the browse button and select the Trunk Master from the list. In the Partner: field, enter the IP Address of the redundant Trunk Master, if applicable. - Page 18 | Trunk connections and setup TM-10K Gen 2 High Capacity Trunkmaster 17. Right-click the Port or Alpha entry associated with the Icom 1 entry made. 18. From the pop-up menu, select Choose new assignment..19. Select the port from where the trunk connects.
- Page 19 TM-10K Gen 2 High Capacity Trunkmaster Trunk connections and setup | en Notice! This is similar to assigning keys in the local intercom system, except you need to select an intercom system first when making assignments. For more about key assignments, see the AZedit Software User Manual.
-
Page 20: Cascades
| Cascades TM-10K Gen 2 High Capacity Trunkmaster Cascades Cascade flag Setting a cascade flag in Trunk Edit identifies the trunk line is usable in a cascade. To set the Cascade flag, do the following: Select Trunk from the left navigation in Trunk Edit. -
Page 21: Assign A Cascade Cost
B1, B2 or B3. B3 has the lowest cascade cost, a cascade will be created through this intercom, if possible; if not, the TM-10K Gen 2 tries to cascade through B2; if this is not possible, it will try to cascade through B1. -
Page 22: Remote Assignment Gains
TM-10K Gen 2 High Capacity Trunkmaster Remote assignment gains Currently, RTS intercoms allow the user to adjust listen levels for local point-to-point and party line assignments, for example, to adjust the individual component volumes when listening to a mix of sources. The Volume Adjust Across Trunking feature extends the capability to allow the user to adjust the listen volumes for remote assignments. -
Page 23: Configuration
This command installs TM-10K application v10.1.0. Notice! This step will fail if the TM-10K Gen 2 is not updated to Platform OS v1.10 (step 5), or if the computer was not rebooted after updating the Platform OS (step 6). Remove the thumb drive. -
Page 24: Operation
| Remote assignment gains TM-10K Gen 2 High Capacity Trunkmaster Figure 8.1: Intercom Configuration Screen - Options Page In the Panels with Gains field, enter the number of remote panels with gains allowed. This value cannot exceed the number of ports in the system In the Gains Per Panel field, enter the number of remote assignments that can have non- unity gains. - Page 25 TM-10K Gen 2 High Capacity Trunkmaster Remote assignment gains | en Figure 8.2: Keypanel / Port Configuration Screen - Advanced Page AZedit warns you if you try to enable remote assignment gains for more ports than the configured maximum. For more information, see Configuration, page 23...
- Page 26 | Remote assignment gains TM-10K Gen 2 High Capacity Trunkmaster Figure 8.3: Remote Assignment Gains Screen From the Port field, select a port. Only ports with remote assignment adjust enabled are selectable. Click the Add Entry button. The Add Remote Assignment Gains screen appears.
-
Page 27: Compatibility
TM-10K Gen 2 High Capacity Trunkmaster Remote assignment gains | en Figure 8.4: Keypanels / Ports Change Volume… popup menu From the popup menu, select Change Volume…. The Port Volumes screen opens. Figure 8.5: Port Volumes Adjust the assignment listen volume, as needed. - Page 28 | Remote assignment gains TM-10K Gen 2 High Capacity Trunkmaster Local Intercom Upgraded, TM-10K not Upgraded This scenario is exactly like the previous scenario: Normal trunking operation, but no volume adjustment for remote assignments. TM-10K and Local Intercom Upgrade, Remote Intercom not Upgraded In this scenario, the intercom allows listen gains for remote assignments to be adjusted, at the keypanel and via AZedit.
-
Page 29: Tm-10K Gen 2 Update Options
The operating system and TM-10K Gen 2 application software are installed on the unit at the factory prior to shipment. The TM-10K Gen 2 ships with a bootable USB flash drive containing the OS (used to reinstall the operating system), the application software, and a license file. - Page 30 | TM-10K Gen 2 update options TM-10K Gen 2 High Capacity Trunkmaster Hostname: tm10k-1 New Value: Press Enter. The Domain window appears. In the New Value field, enter a new domain. Domain: local New value: Press Enter. The DNS1 window appears.
- Page 31 If n is selected, the VDP controller is disabled. (default) Notice! The TM-10K Gen 2 does not support VDP since that requires an RS-485 connection. However, installation of the OS and application on an original TM-10K still supports RS-485 connections and a VDP controller.
- Page 32 | TM-10K Gen 2 update options TM-10K Gen 2 High Capacity Trunkmaster Found 2 Ethernet adapters: lan0 MAC address = 00:18:7d:2a:70:55 lan1 MAC address = 00:18:7d:2a:70:56 lan0 (MAC 00:18:7d:2a:70:55): IP address: 192.168.5.107 Prefix length: 8 Default gateway: 192.168.5.0 Change these values? (y/n, default y) Notice! lan0 uses the RJ-45 Ethernet (NIC1) connector.
- Page 33 TM-10K Gen 2 High Capacity Trunkmaster TM-10K Gen 2 update options | en 40. In the Change these values? (y/n, default y) field, enter y or n (use lowercase). 41. Press Enter. If y is selected, the Bond lan1 with lan0 window appears.
- Page 34 | TM-10K Gen 2 update options TM-10K Gen 2 High Capacity Trunkmaster Preferred gateway: Fair-shared Change these values? (y/n, default y) 52. In the Change these values? (y/n, default y) field, enter y or n (use lowercase). 53. Press Enter.
-
Page 35: Change The Root Password
Passwd: password changed root:~ # Software update The TM-10K Gen 2 application can be updated via USB thumb drive. The steps are the same as when initially installing the application. To perform an update, do the following: Log onto the TM-10K as the user: root. - Page 36 – The TM-10K Gen 2 does not support encrypted USB thumb drives. Insert the USB thumb drive with the TM-10K Gen 2 application software into a USB port on the TM-10K Gen 2 . At the prompt, type tm_update --usb.
-
Page 37: System And Wiring Diagrams
TM-10K Gen 2 High Capacity Trunkmaster System and wiring diagrams | en System and wiring diagrams Figure 10.1: Example of a non-redundant TM-10K Gen 2 system Bosch Security Systems, LLC 03-2022 | 01 | F.01U.401.756 User Manual... - Page 38 | System and wiring diagrams TM-10K Gen 2 High Capacity Trunkmaster Figure 10.2: Example of a redundant TM-10K Gen 2 system 03-2022 | 01 | F.01U.401.756 Bosch Security Systems, LLC User Manual...
- Page 39 TM-10K Gen 2 High Capacity Trunkmaster System and wiring diagrams | en Figure 10.3: 9-pin D-sub connector pinouts Contacts 1 2 3 4 5 6 RJ-12 Modular Plug View From Cable Entrance Latch Figure 10.4: RJ-12 connector pinout Figure 10.5: RJ-45 connector pinout Figure 10.6: Unspecified device to DE-9S audio cable...
- Page 40 | System and wiring diagrams TM-10K Gen 2 High Capacity Trunkmaster To Station Breakout In Intercom System To Audio Transport RJ-45 Modular Plug Interface/Device Audio Signal Audio Signal Pins 1, 2, 7 and 8 Not Used Figure 10.8: Unspecified device to RJ-45 audio cable Figure 10.9: DE-9S to DE-9S audio cable...
-
Page 41: Recommended Cables
TM-10K Gen 2 High Capacity Trunkmaster System and wiring diagrams | en To Station Breakout To Station Breakout In Second Intercom System In First Intercom System RJ-12 Modular Plug RJ-12 Modular Plug Audio Signal Audio Signal Pins 1 and 6... -
Page 42: Maintenance
Create a bootable USB thumb drive The TM-10K Gen 2 Platform OS is distributed as a bootable file system image (an .iso file) which can be used to create a bootable USB thumb drive. You cannot copy the file to the USB drive;... -
Page 43: Boot From The Usb Flash Drive
Boot from the USB Flash Drive To boot from the USB flash drive, do the following: Plug the bootable USB flash drive into one of the USB slots on the TM-10K Gen 2 . Power on the TM-10K Gen 2 . - Page 44 | Maintenance TM-10K Gen 2 High Capacity Trunkmaster Log onto the TM-10K as the user: root. Press Enter. The system displays the root command prompt. At the command prompt, type install_os --keep-site- -keep-lic. Press Enter. A warning appears that says all data on the computer will be erased, and prompts whether to continue.
-
Page 45: Replace A Power Supply
TM-10K Gen 2 High Capacity Trunkmaster Maintenance | en 11.4 Replace a power supply To remove a power supply, do the following: Lift up the spring latch (1) that holds the power supply in place. Use the handle (2) to pull the power supply from the chassis. -
Page 46: Technical Data
| Technical data TM-10K Gen 2 High Capacity Trunkmaster Technical data Power TM-10K GEN 2 High Capacity Trunkmaster Gen 2 TM-10K Input voltage (VAC) 100 VAC - 240 VAC Input current (A) 1.0 / 0.5 A Power frequency 60 / 50 Hz... - Page 48 12000 Portland Avenue South Burnsville MN 55337 www.rtsintercoms.com © Bosch Security Systems, LLC, 2022 202203011255...
Need help?
Do you have a question about the TM-10K Gen 2 and is the answer not in the manual?
Questions and answers