Advertisement
Available languages
Available languages
Advertisement
Table of Contents

Summary of Contents for QUIPTED 8720865187013
- Page 1 Jumpstarter Gebruikershandleiding...
- Page 2 1.0. Introductie Inhoud verpakking Hartelijk dank voor je vertrouwen in een Quipted product. In deze handleiding staat belangrijke informatie over het product, neem de handleiding goed door voor je eigen veiligheid en die van anderen. Voor eventuele vragen kun je mailen naar: quipted@outlook.com...
- Page 3 2.3. Onderhoud We raden je aan om de jumpstarter elke 3 maanden op te laden. 2.4. Reiniging Je kunt de jumpstarter reinigen met een droge doek. Maak de jumpstarter niet schoon met schoonmaakmiddelen. Lees de handleiding zorgvuldig alvorens je dit toestel gebruikt; - Je mag de jumpstarter niet gebruiken voor commerciële doeleinden;...
- Page 4 We willen uw er nogmaals op attenderen hoe belangrijk het is om de handleiding goed door te nemen alvorens gebruik van het product. Experimenteer alsjeblieft niet. Quipted is niet verantwoordelijk en aansprakelijk voor schade of letsel dat voortvloeit uit het niet opvolgen van de in deze handleiding beschreven aspecten.
-
Page 5: Inhoud Verpakking
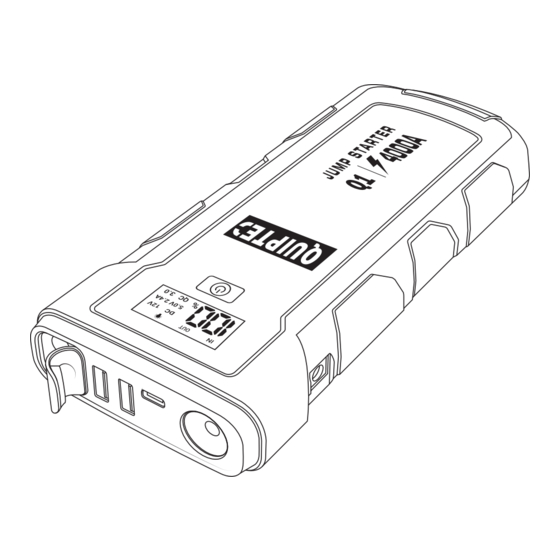
4.0 Inhoud verpakking 1. 1 x Jumpstarter 2. 1x Slimme startkabels 3. 1x Multifunctionele USB-kabel 4. 1x USB-C kabel 5. 1x 230 V adapter 6. 1x Draagtas 7. 1x Handleiding 5.0. Jumpstarter DC 12V 5.0V 2.4A QC 3.0 Tabel 2 Jumpstarter Nr indicatie Functie Effect... -
Page 6: Lcd Display
6.0. LCD display DC 12V 5.0V 2.4A QC 3.0 Tabel 3 LCD display Nr indicatie Functie Effect Batterijniveau indicatie Geeft het batterij niveau van de jumpstarter weer. Ledlamp indicatie Brand wanneer de zaklamp is geactiveerd. DC-output Brand wanneer er connectie is gemaakt tussen het ingestoken apparaat en de jumpstarter. - Page 7 Tabel 4 Slimme startkabels Nr indicatie Functie Effect EC5 plug Steek de plug in de Jumpstarter. Zorg ervoor dat de plug goed vastzit. Indicator (LED) Status weergave van de klemmen. Klemmen Zorg ervoor dat de klemmen goed worden aangesloten. Zie stap 3 van 8.0 voor de uitleg hoe je dit op juiste wijze doet.
- Page 8 Als de aansluiting correct is en er geen problemen zijn, zal de indicator van de slimme startkabels onafgebroken groen licht geven. 3. Als de indicator onafgebroken groen is, start dan het voertuig. Brand de indicator niet onafgebroken groen? (zie tabel 4). Wacht op een onafgebroken groen licht van de indicator en start vervolgens het voertuig binnen 30 seconden.
- Page 9 8.1. Werking Zaklamp Druk op de aan/uitknop van de jumpstarter voor 3 seconden om de zaklamp te starten. Druk nogmaals op de aan/uitknop om de modus te veranderen. De volgorde is als volgt: zaklamp, SOS-signaal, stroboscoop en uitschakeling. 8.2. Opladen van de jumpstarter Gebruik alleen adapters die getest en goedgekeurd zijn! Optie 1: 230V adapter 1.
- Page 10 - Alle garantieclaims zijn beperkt tot reparatie of vervanging van het defecte product en naar eigen inzicht. - Indien je service of informatie nodig hebt in relatie tot de jumpstarter, neem dan contact met ons op via: quipted@outlook.com 11.0 Bedrijfsgegevens Quipted...
-
Page 11: Safety Warnings
1.0. Introduction Inhoud verpakking Thank you very much for your trust in a Quipted product. This guide states important information about the product, read the manual carefully for your own safety and that of others. For any questions you can mail to:quipted@outlook.com This powerful jumpstarter has a starting power of 2000A and a peak power of 4000A. - Page 12 2.3. Maintenance We recommend that you charge the jumpstarter every 3 months. 2.4. Cleaning You can clean the jump starter with a dry cloth. Do not clean the jumpstarter with cleaning products. Read the manual carefully before using this device! - Do not use the jumpstarter for commercial purposes;...
- Page 13 We would like to draw your attention once again to the importance of reading the manual carefully before using the product. Please don't experiment. Quipted is not responsible and liable for any damage or injury resulting from failure to comply with the aspects described in this manual.
- Page 14 4.0. Features/accessories 1. 1x Jumpstarter 2. 1x Smart jumper cables 3. 1x multifunctional USB-cable 4. 1x USB-C cable 5. 1x 230 V adapter 6. 1x Bag 7. 1x Manual 5.0. Jumpstarter DC 12V 5.0V 2.4A QC 3.0 Table 2 Jumpstarter Nr indicator Function Effect...
- Page 15 6.0. LCD display DC 12V 5.0V 2.4A QC 3.0 Table 3 LCD display Nr indicator Function Effect Battery level indication Displays the battery level of the jump starter. Led light indication Lights when the flashlight is activated. DC-output Lights when connection is established between the plugged-in device and the jump starter.
- Page 16 Table 4 Smart jumper cables Nr indicator Function Effect EC5 plug Insert the plug into the jump starter. Make sure the plug is secured in place. Indicator (LED) Status display of terminals. Black cable Connect this cable to the negative terminal of the battery.
- Page 17 If the connection is correct and there are no problems, the indicator of the smart jumper cables will shine a continuous green light. 3. If the indicator is solid green, start the vehicle. Is the indicator not continuously shining a green light? (see Table 4).
-
Page 18: Security Mechanisms
8.1. Flashlight operation Press the power button of the jumpstarter for 3 seconds to start the flashlight. Press the power button again to change the mode. The order is as follows: flashlight, SOS signal, strobe and shutdown. 8.2. Charging the jump starter Only use adapters that have been tested and approved! Option 1: 230V adapter 1. -
Page 19: Warranty
- All warranty claims are limited to repair or replacement of the defective product and at our sole discretion. - If you need service or information related to the jump starter, please contact us at: quipted@outlook.com 11.0 Company details Quipted Ranonkelstraat 33 3262 BR Oud-Beijerland Nederland EAN 8720865187013...
Need help?
Do you have a question about the 8720865187013 and is the answer not in the manual?
Questions and answers