Advertisement
Quick Links
Advertisement

Related Manuals for GuardTrax GT-900100

Summary of Contents for GuardTrax GT-900100
- Page 1 GuardTrax User Guide...
- Page 2 RFID Tags IMPORTANT NOTE: Prior to powering up the device, it is very important that the GuardTrax be charged for four (4) hours upon its first charge. Insert the mini USB connector of the included wall charger into the USB connector on the side of the device.
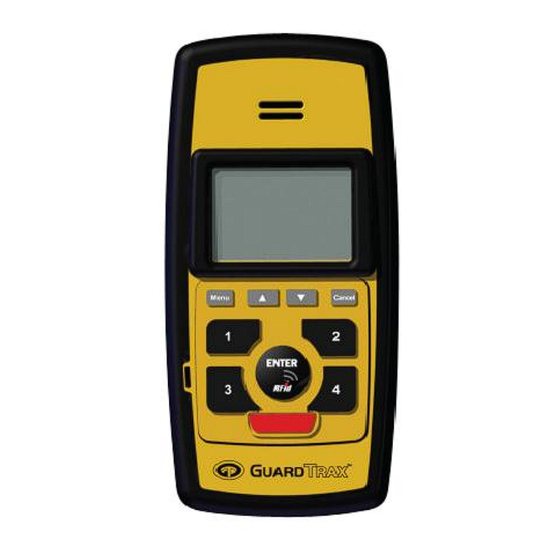
- Page 3 GuardTrax User Guide After powering on my GuardTrax, what should I expect to see? The LCD display has eight (8) icons plus an area to show messaging or feedback. See examples below: Speaker GPRS RFID Mail/SM /Ring Battery Date & Time...
- Page 4 These bars indicate the GSM signal strength and connection to the GSM mobile network. Presence of the bars means your GuardTrax has the ability to make voice calls. GPRS: The GPRS icon indicates that the device has a data connection and is communicating with the server.
- Page 5 The default setting is GMT but you may set your time zone with the menu option button. Your GuardTrax is now ready for action. Wherever you walk or drive, the GuardTrax will be reporting your activity to the GuardTrax web site located at www.myguardtrax.com.
- Page 6 RFID function, to conserve battery. The RFID icon will disappear from the display. NOTE: The GuardTrax RFID reader will turn off after an RFID tag is read. The RFID reader must be turned on again by following the steps listed above.
- Page 7 GuardTrax User Guide Key Code / Key Code Definition Nothing to Report/All Clear Window Damaged or Broken Intruder/Unauthorized Person Safety Hazard Fire Hazard Property Damage/Vandalism Door Found Open/Ajar/Broken Crime in Progress Bomb Threat Burglary/B&E EMS Notified/On-Property LE Notified/On-Property Client POC Requires Phone Call...
- Page 8 Enter the call code desired. (Example 333) After entering the call code, press the ENTER button. Put the GuardTrax to your ear and wait as the call is connected (after approximately 10 seconds). In order to hang up or disconnect a call in progress, press the CANCEL button.
- Page 9 GuardTrax User Guide How do I receive a phone call using the GuardTrax? The GuardTrax can be used as a limited mobile phone with its own dedicated phone number. The GuardTrax phone number is kept secure in your Web interface account. Although the GuardTrax is limited to specific outgoing calls, it is not restricted for incoming calls.
- Page 10 GuardTrax User Guide How do I initiate a PANIC button event? The PANIC button serves as a safety feature of the GuardTrax so that in a crisis, the user only needs to hold the red PANIC button down for five (5) seconds in order to initiate a series of events.
- Page 11 GuardTrax User Guide One of the features of the GuardTrax is the Menu button. The menu feature will allow you to doing the following: ODIFY THE RINGER VOLUME [MENU] [ENTER] [ENTER] [ ] [ENTER] UP OR DOWN ARROW KEY In order to change the ringer volume, press the MENU key once and the display will read “OPTIONS”, then press the ENTER key so that the...
- Page 12 ID [ENTER] ARROW KEY In order to view the device ID on your GuardTrax, press the MENU key once and the display will read “options”, then press the ENTER key so that the screen reads “RNG VOL” (Ring Volume). Use the up or down arrows to toggle down to “INFO”, then, press the ENTER key again;...
- Page 13 GuardTrax User Guide ACCESSING YOUR GUARDTRAX ACCOUNT ONLINE Navigate to: http://myguardtrax.com Login information: Prior to receiving your GuardTrax device, you should have received an e-mail containing your username and password for the GuardTrax web site. NOTE: This is your dashboard. GuardTrax Customer Care will have...
- Page 14 GuardTrax User Guide By clicking on the tracking tab, next to the dashboard tab, a satellite image map will display the locations of all GuardTrax devices wherever they are currently located. By clicking on a single device name in the left hand column, the map will zoom in on the one specific device that you selected showing the most current position.
- Page 15 GuardTrax User Guide Specific details about each position can be viewed, such as speed, direction, time of the record, alerts or key codes, etc., by clicking on the displayed icon on the map. If you would like to view the history of the device for a particular day (12:00am –...
-
Page 16: Alerts & Notifications
GuardTrax User Guide ALERTS & NOTIFICATIONS By clicking on the TRACKING tab at the top of the GuardTrax web site, a list of devices can be seen in the column on the left of the screen. To the right of the device name, there is a yellow diamond icon. By clicking on this icon, an information box will appear displaying Events, Alerts, and other important information. - Page 17 REPORTS The GuardTrax reports security officer location and activities into the GuardTrax web site. As a user, you may retrieve the history reports in two different ways. You may view it through the mapping page or through the reports tab.
- Page 18 RFID reads that occurred during a specific date range. Event Detail Report: This report will generate a tabular list of all events generated by the GuardTrax during a specific date range. RFID Scan Report: This report will generate a tabular ist of...
- Page 19 GuardTrax User Guide ASSIGNING RFID TAGS WITHIN YOUR ACCOUNT RFID tags are considered points of interest (POI) in the GuardTrax site. GuardTrax customer care has pre-loaded all of your RFID tags prior to your receipt of the device and equipment. The tags are assigned to your account and must be added to a specific group within your account and “named”.
- Page 20 GuardTrax User Guide 1. Click on the additional settings tab 2. Click on the drop down arrow to display a list of available tags 3. Select the tag number that you would like to assign to the POI (example: 20121) Optional: You may also check the box titled “Generate Alert”...
- Page 21 GuardTrax User Guide You have now provisioned an RFID tag for use. You may now begin to “read” the tags and they will begin to show up as events in the GuardTrax site. G u a r d T r a x...
- Page 22 Referencing means that each tag can be manually assigned a specific GPS location through the process that will be explained hereafter. After properly setting up a tag in the POI section of the GuardTrax website, the user should click on the General tab in the POI/RFID Tags Detail Section.
- Page 23 The user should use their cursor to pinpoint exactly where the tag is located on top of the building. Because GuardTrax does not have the ability to map individual floors of a building, the user will need to determine where the tag is and identify that location as best they can from the top of the building.
- Page 24 GuardTrax User Guide After saving the Geo-Referenced information, the user will be able to view the location of the tag by the icon which pinpoints the geo- referenced location as shown below. This process should be followed for each tag that is to be geo referenced.
- Page 25 GuardTrax User Guide GUARD TOUR ALERT The Guard Tour Alert feature allows users to set up predefined guard tours. Upon the expected completion of the tour, an email and/or SMS is sent indicating that the tour was completed or listing the RFID tags that were not scanned as expected.
- Page 26 GuardTrax User Guide The next step is to select the RFID tags to be scanned during the Guard Tour by clicking the “RFID Assignment”: button as shown below: Then, setup the delivery conformation section to include emails addresses and/or phone numbers of SMS capable devices.
- Page 27 GuardTrax User Guide FCC Compliance statement (United States) FCC Class B part 15 This device is verified to comply with part 15 of the FCC Rules. Operation is subject to the following two conditions: (1) This device may not cause harmful interference, and (2) this device must accept any interference received, including interference that may cause undesired operation.
- Page 28 GuardTrax User Guide Industry Canada Certification The GuardTrax 2.0 Model GT-900100 complies with industry Canada RSS -132 and RSS – 133 under certification number 9528A. Under Industry Canada regulations, this radio transmitter may only operate using an antenna of a type and maximum (or lesser) gain approved for the transmitter by Industry Canada.
Need help?
Do you have a question about the GT-900100 and is the answer not in the manual?
Questions and answers